Learn
Delete a Blank Page in Word: Why Backspace Won't Work

A page in Word is not an object you can select and throw away. It is a result: paragraphs, breaks, and spacing stack up until Word decides a new sheet is needed. That is why hitting Backspace fifty times on an empty page changes nothing, and why the usual advice to just delete a blank page in Word misses the point entirely. What you actually need is a way to find whatever is generating that page.
This guide splits the problem into five causes, then walks through the removal steps for a blank page stuck in the middle of a document and one stranded at the very end.
Five Reasons Delete Won't Remove a Blank Page in Word
Blank pages show up in two places: somewhere in the middle of the document, or at the very end. The causes differ, and so do the fixes, so start by working out which one you have.
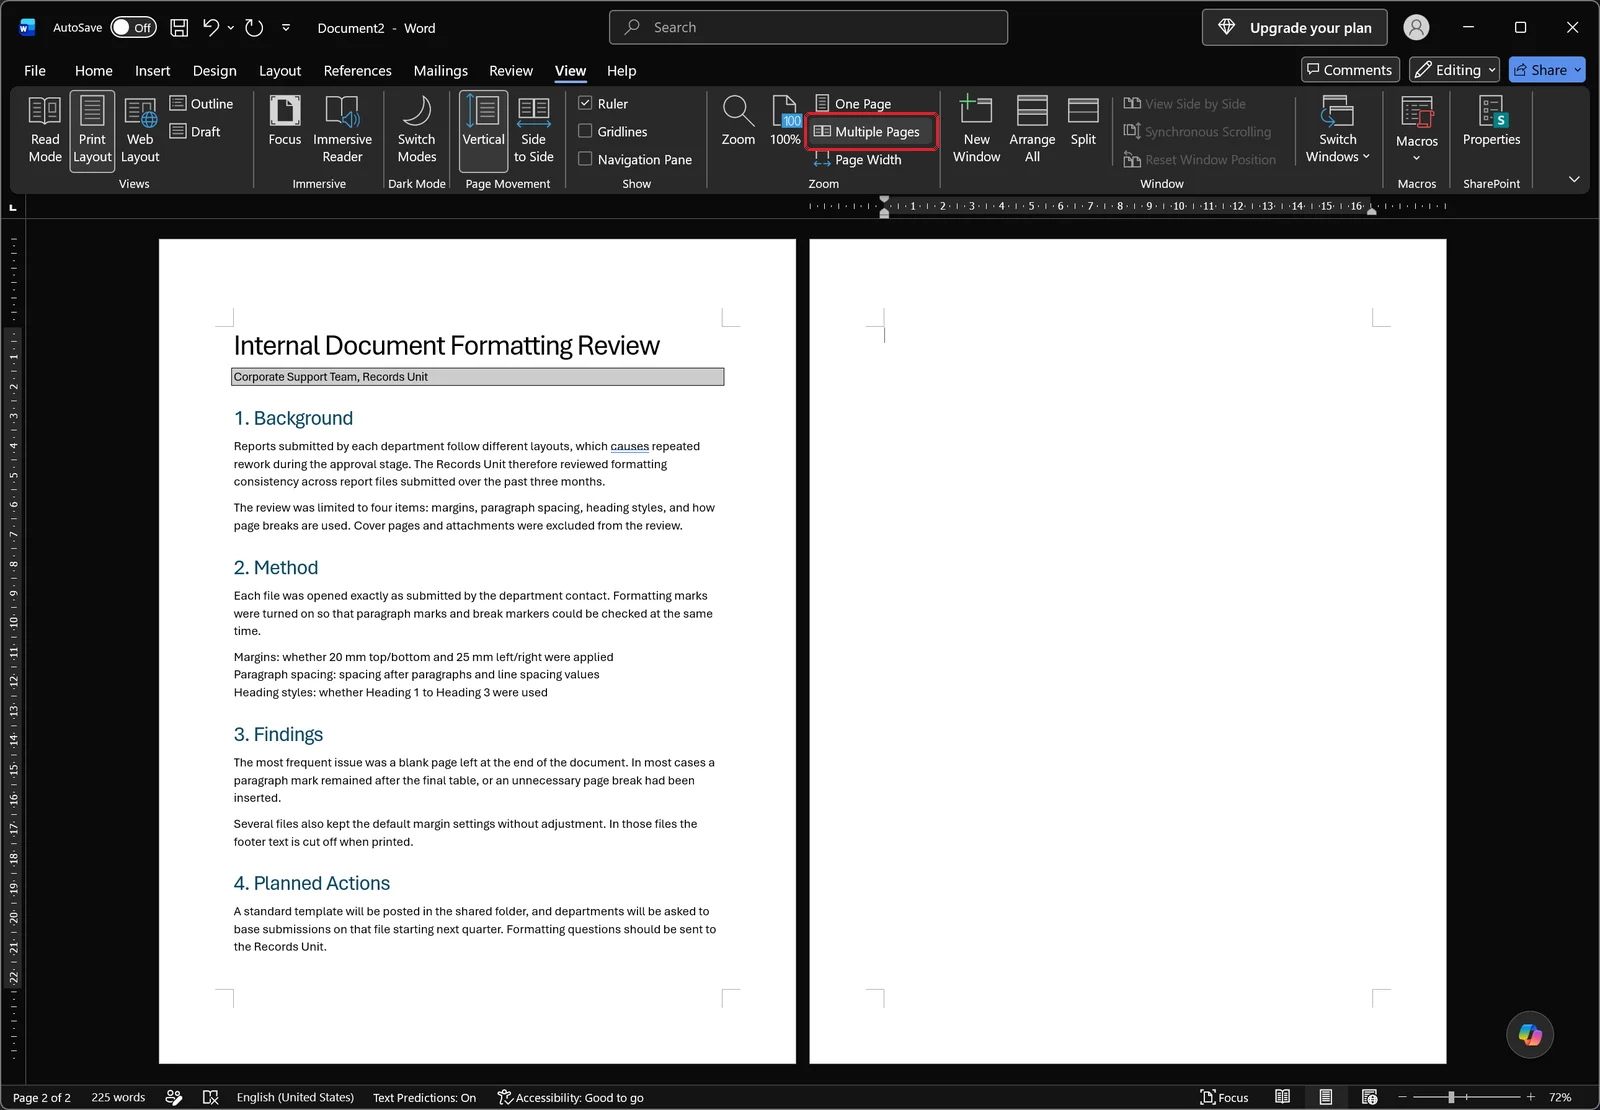
Click Multiple Pages in the Zoom group on the View tab and Word fits two sheets on screen at once, as shown above. The left page carries the report text; the right one is completely empty. Seeing them side by side tells you immediately whether the blank page is trailing the document or wedged between two sections of content.
The final paragraph mark cannot be deleted
Every Word document ends with a paragraph mark, and there is no way to remove it. If the preceding page is full, that single paragraph spills onto a new sheet and reads as a blank page. This is designed behavior, not corruption, so the fix is never deletion — it is shrinking that paragraph until it fits back on the previous page.
Word always keeps an empty paragraph after a table
Even when a table is the last thing in your document, Word places a paragraph mark after it, because otherwise you would have nowhere to keep typing. That paragraph cannot be deleted either. When the table runs close to the bottom margin, the paragraph behind it gets pushed onto the next page. The answer here is to shrink or hide it, not to remove it.
Page breaks and section breaks push content forward
A blank page in the middle of a document is usually a break mark.
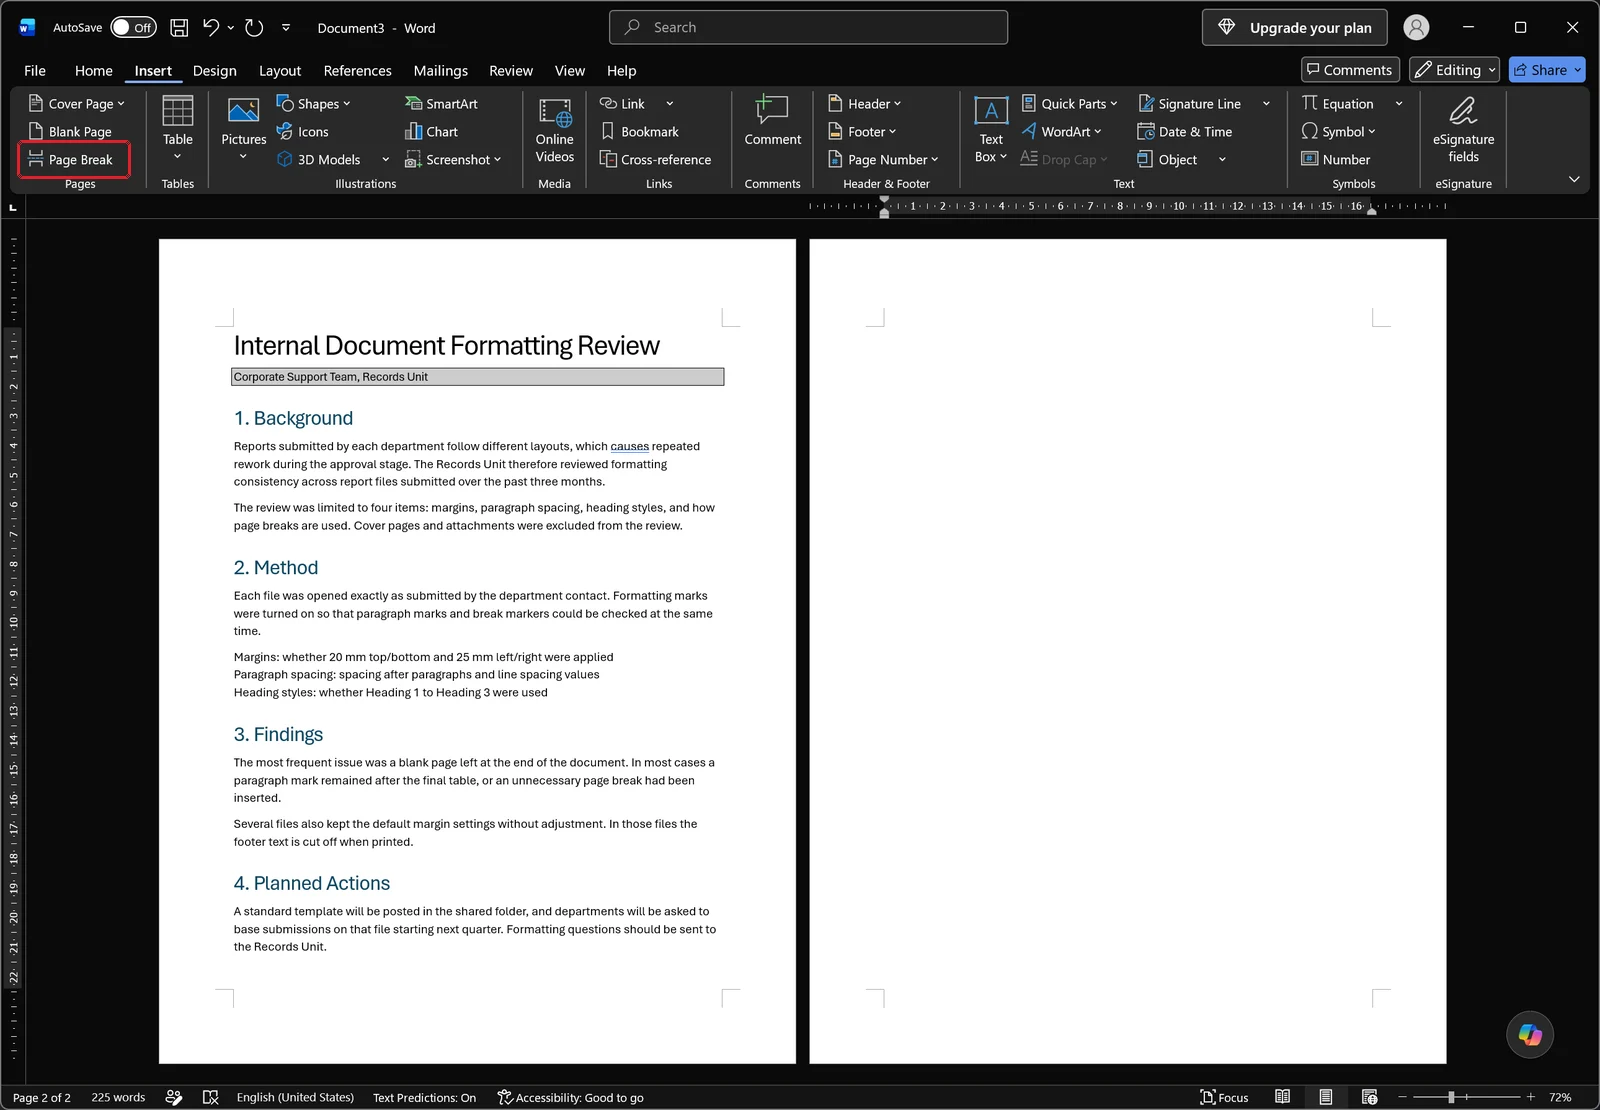
Page Break in the Pages group of the Insert tab forces the next page to start at the cursor. A common pattern: someone inserted a break (or pressed Enter a dozen times) to push a heading down, the text above later got shorter, and the break is still sitting there producing an empty sheet. Section breaks push pages the same way, but they also carry formatting, so they need to be handled differently.
Paragraph spacing and table settings can spill onto a new page
If there is not a single visible empty line and the page still overflows, look at paragraph formatting. A large Spacing After value or a generous line spacing setting means the text sits on the previous page while the empty room beneath it creates another one. Table settings do this too: when rows are set not to break across pages, the whole table jumps to the next sheet and leaves a half-empty page behind it.
Section start settings and PDF export
If the document looks fine on screen but grows extra pages only when you print or save as PDF, check whether a section is set to start on an odd or even page. To begin a new section on an odd page, the previous section has to end on an even one, so Word quietly inserts a filler page. That page contains nothing you can click on, which is exactly why Delete does nothing to it — only changing the section setting removes it.
Before You Delete: Turn On Formatting Marks and Find the Page
Until you can see the cause, no keystroke will change the outcome. Three quick steps make the rest of the job straightforward.
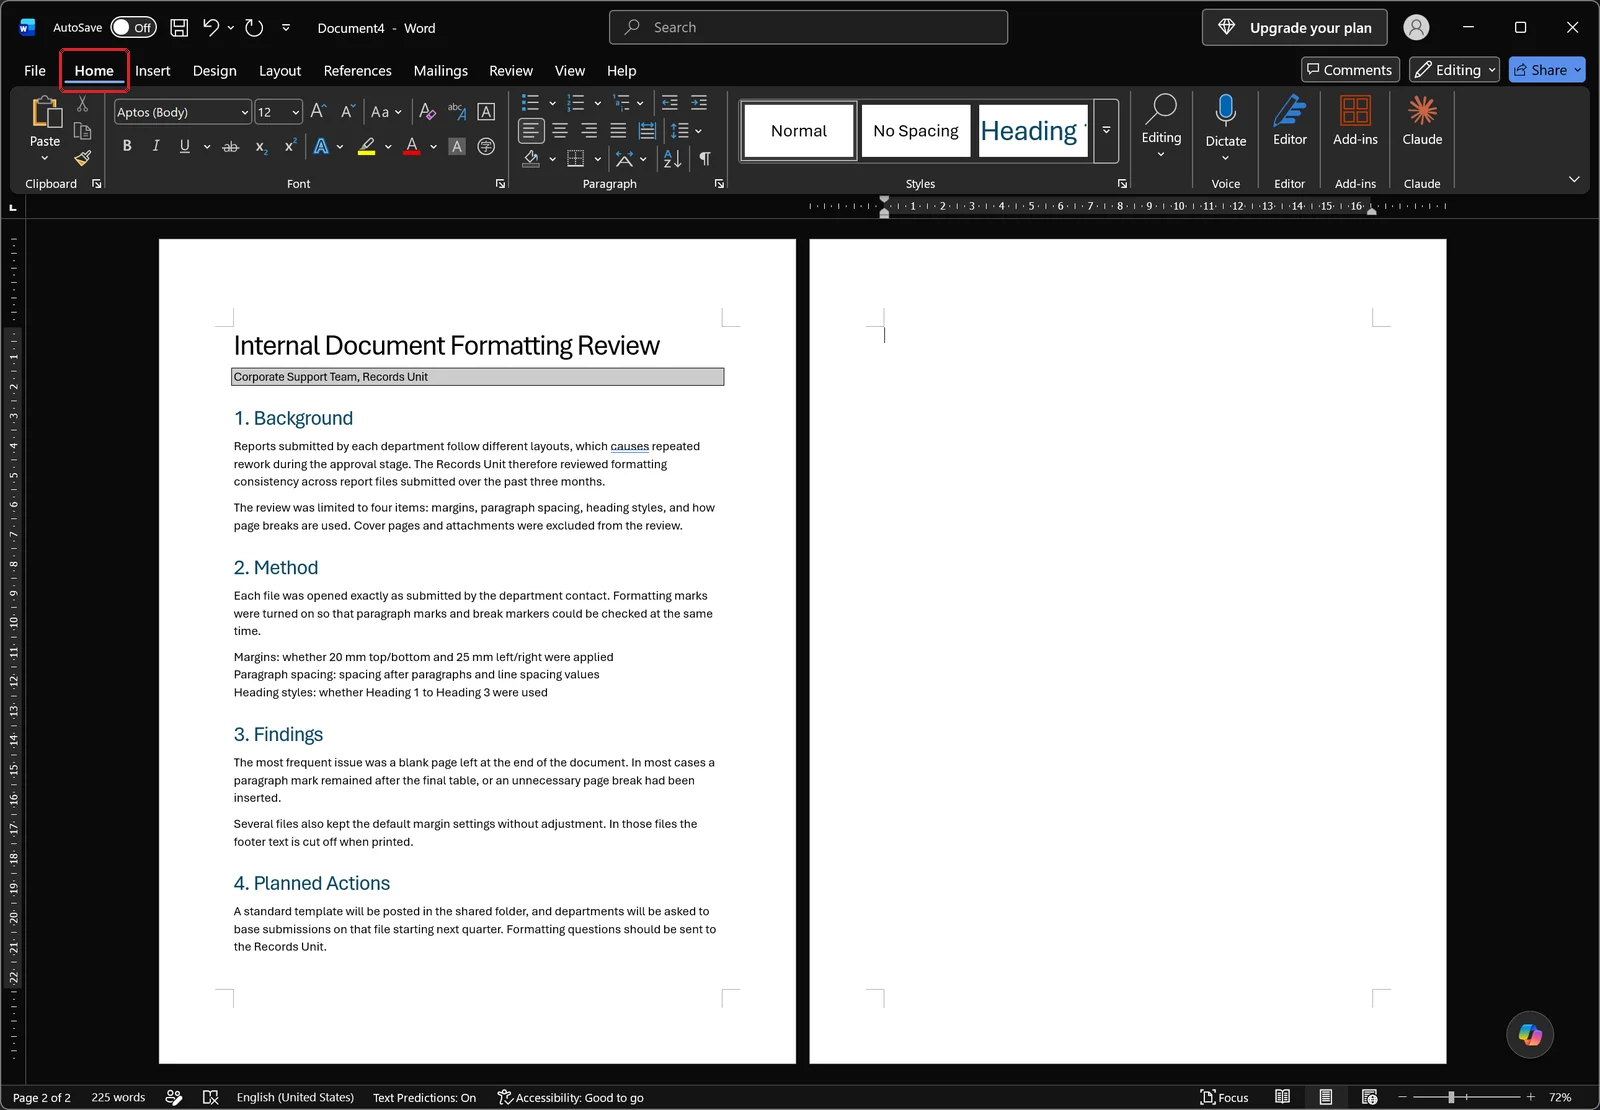
Show formatting marks with Ctrl+Shift+8
The Paragraph group on the Home tab contains the pilcrow-shaped button that toggles formatting marks. Click it, or press Ctrl+Shift+8. Note that the 8 has to come from the number row across the top of the keyboard; the numeric keypad will not trigger it.
With marks on, empty paragraphs appear as ¶, a page break appears as a dotted line labeled Page Break, and a section break appears as a double dotted line with its type spelled out. Telling those three apart solves roughly half the problem on its own.
Pin down which page is empty using the Navigation pane
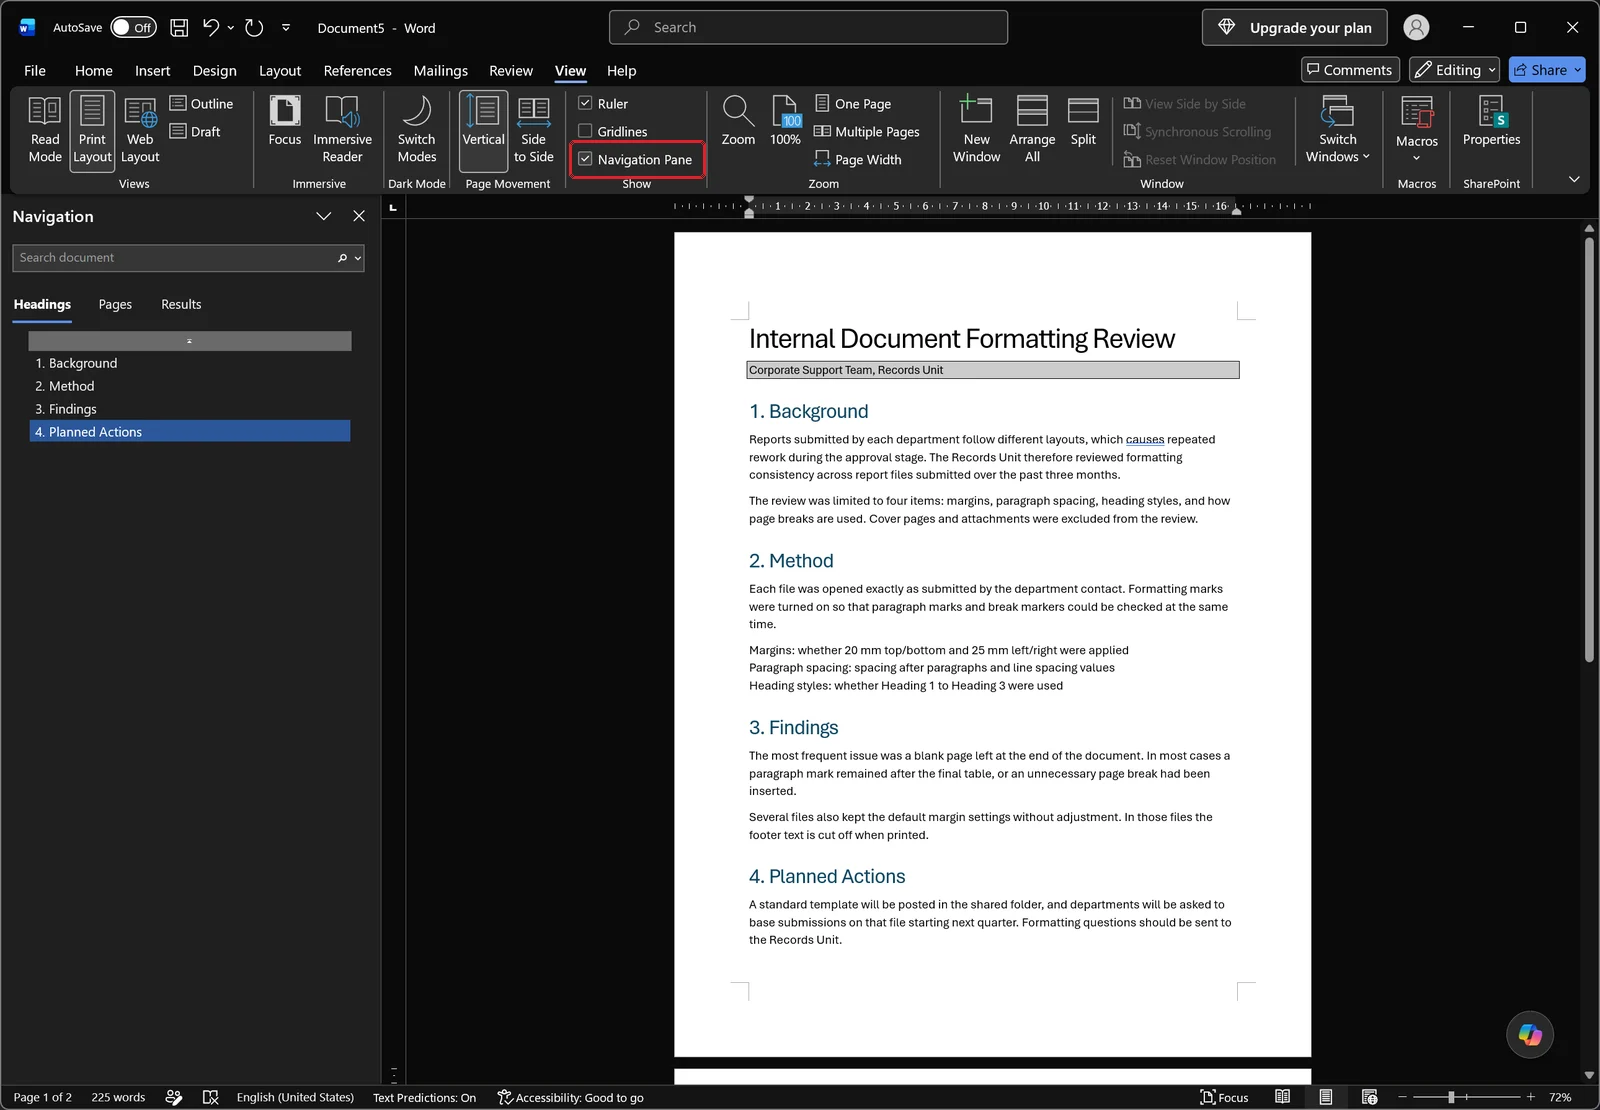
Tick Navigation Pane in the Show group on the View tab and a pane opens down the left side of the window. The Headings tab gives you the document structure; switch to Pages and you get vertical thumbnails, so an empty sheet is obvious at a glance. If you have more than one blank page, jot down how many there are and where they sit before you touch anything.
Switch to Draft view to isolate break marks
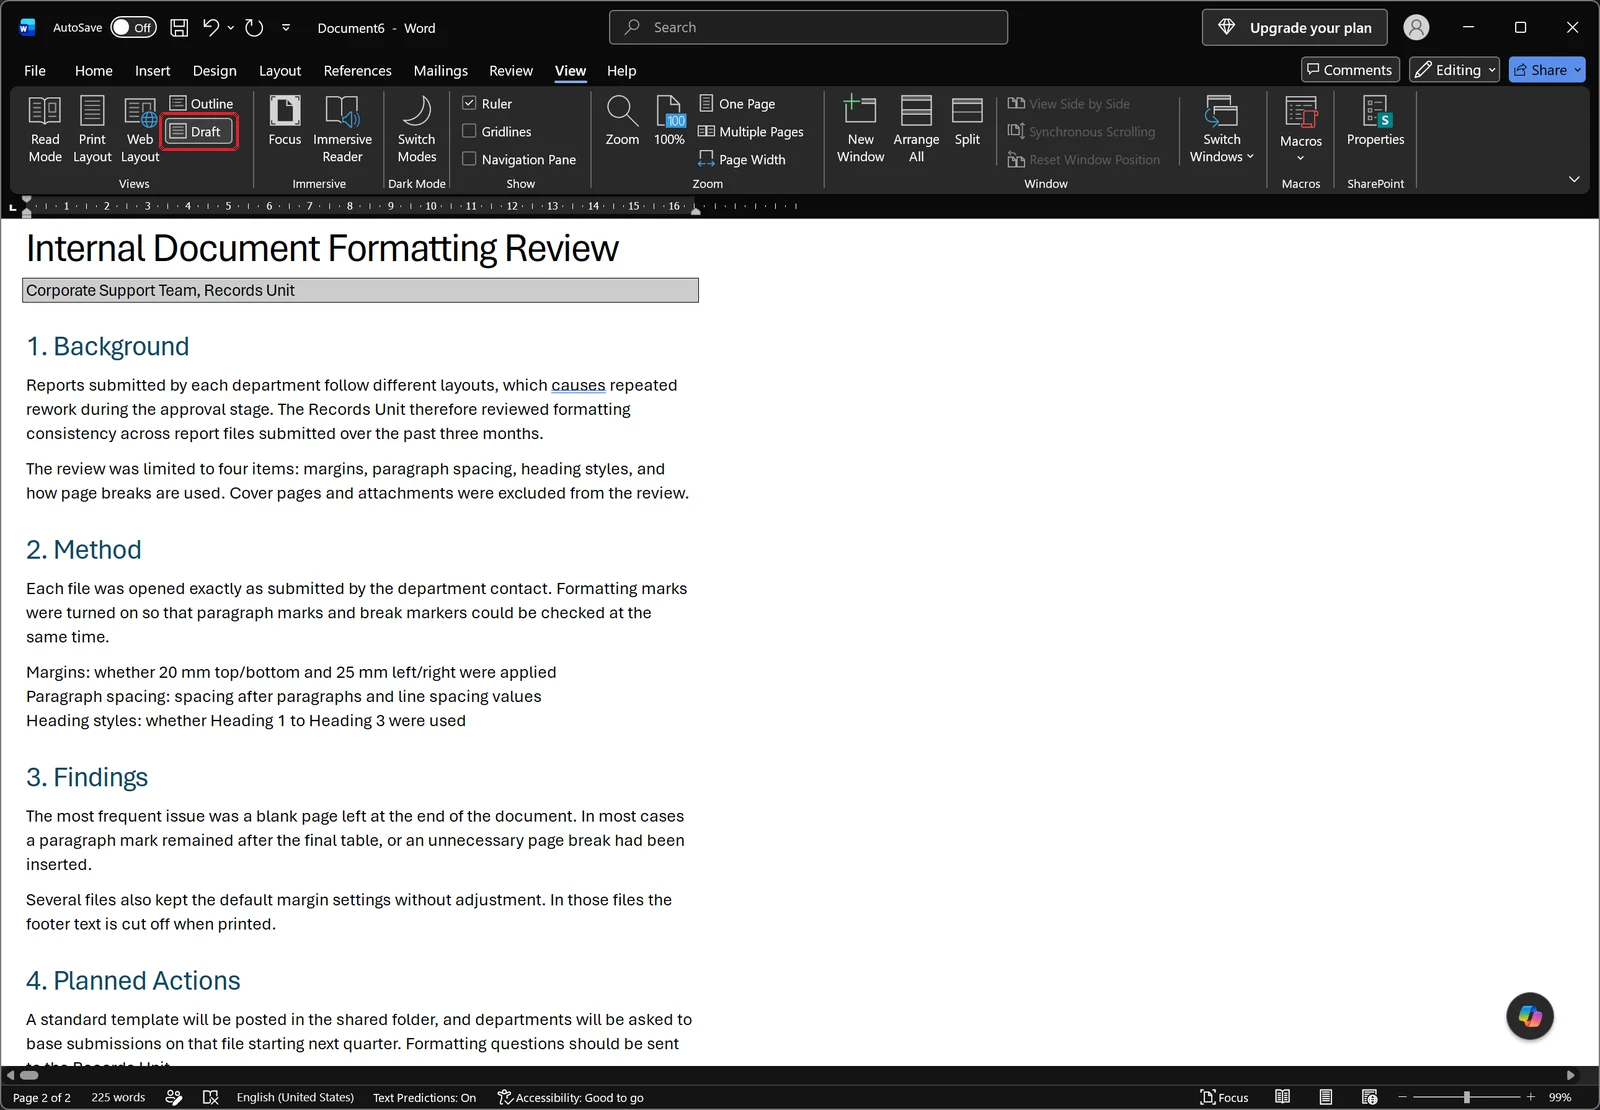
Click Draft in the Views group on the View tab and the document collapses into a continuous stream of text with no margins or page edges, as shown above. Because Word is no longer laying out pages, scrolling from top to bottom is quick; switch formatting marks on in this view and the break marks line up in one narrow column, which is the fastest way to count how many section breaks a document actually contains and where they sit.
Removing a break is mechanical, wherever you find one: put the cursor immediately before the break mark and press Delete, or immediately after it and press Backspace. Dragging across the mark and deleting the selection works just as well.
Removing a Blank Page in the Middle: Page Breaks and Section Breaks
A blank page in the body of a document usually has one clear cause. Turn on formatting marks, look just above and just below the empty sheet, and a break mark is almost always sitting there.
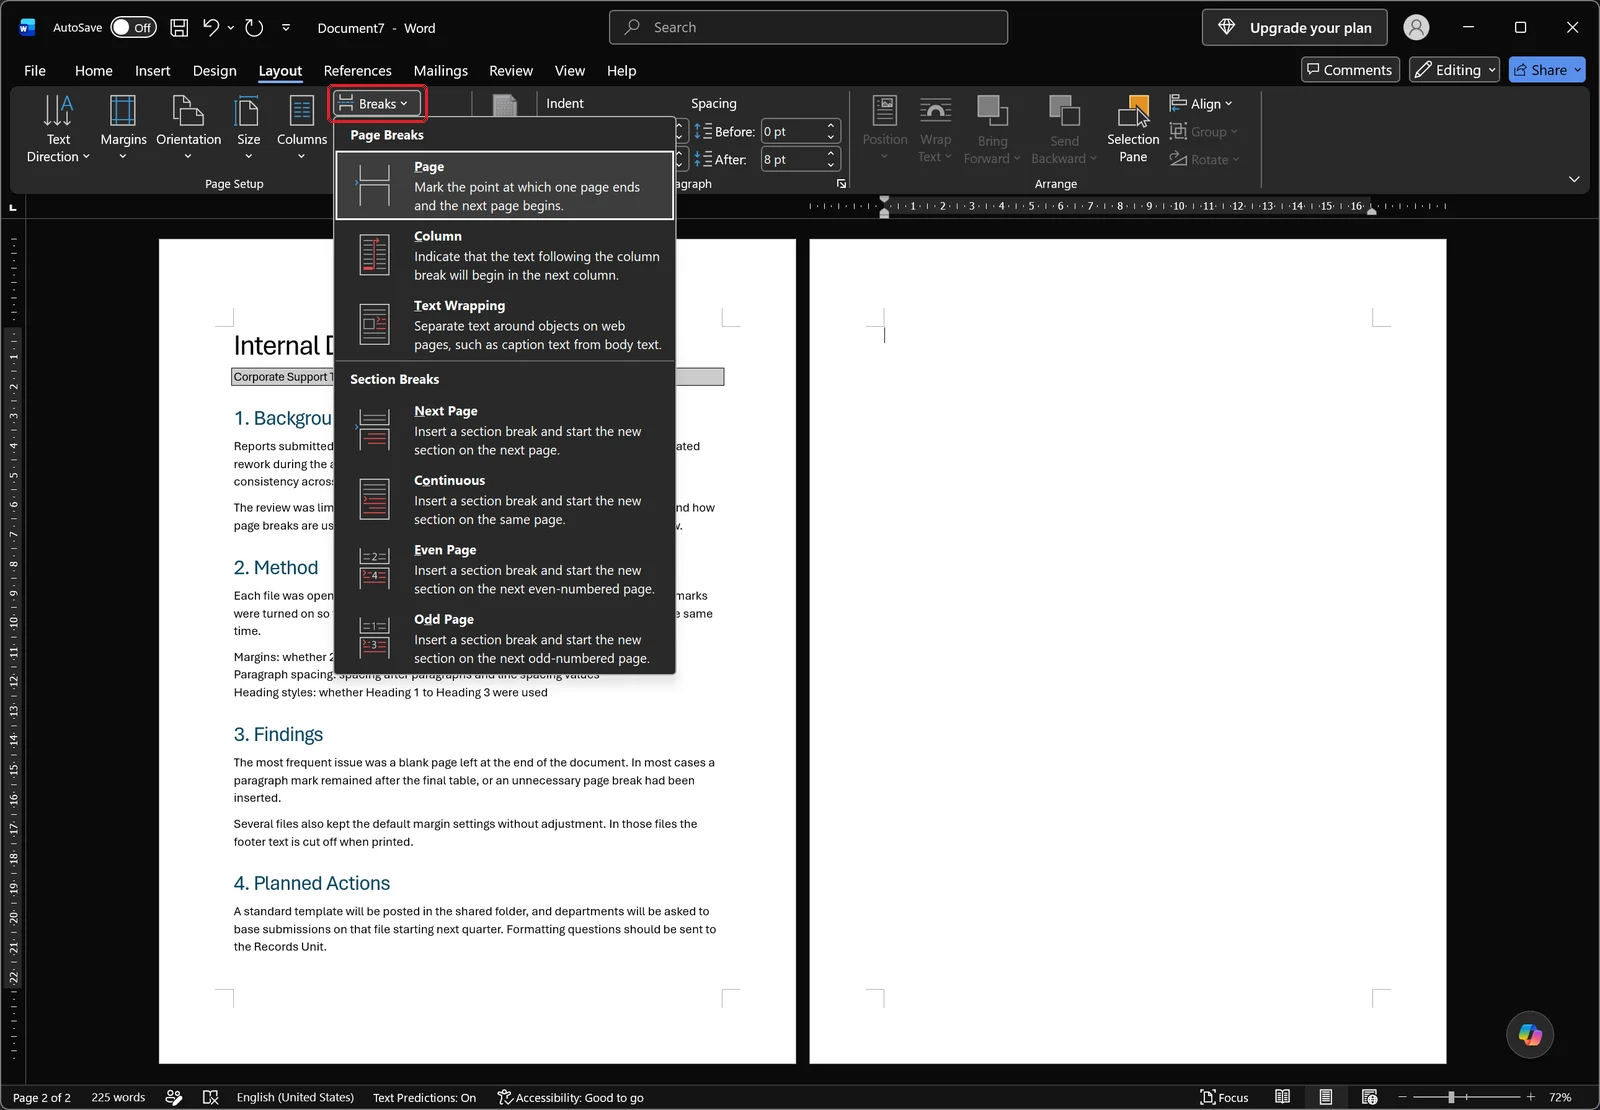
Page breaks: cursor in front of the mark, then Delete
Click Breaks on the Layout tab and the full list of break types appears. The upper group, Page Breaks, holds Page, Column and Text Wrapping. The lower group, Section Breaks, holds Next Page, Continuous, Even Page and Odd Page — the ones that open a new section. Identifying which group your mark belongs to decides how you treat it.
Page breaks carry no formatting, so you can simply remove them. With marks visible, click just in front of the dotted Page Break line, press Delete, and the content below moves up onto the previous page. Stacks of empty paragraph marks (¶) work the same way: delete as many as you need and keep the rest.
Why deleting a section break changes headers and orientation
A section break mark stores the page setup of the section before it. Headers and footers, page numbering, paper orientation and margins are all bundled into that mark, so deleting it makes the earlier section inherit the settings of the section that follows. That is why a landscape table page suddenly flips to portrait, or a header vanishes, the moment you clear a break.
If you need to keep the formatting, do not delete the break — change how the section starts instead, and that setting lives in the Page Setup dialog. Choose Custom Margins at the bottom of the Margins gallery on the Layout tab to open it.
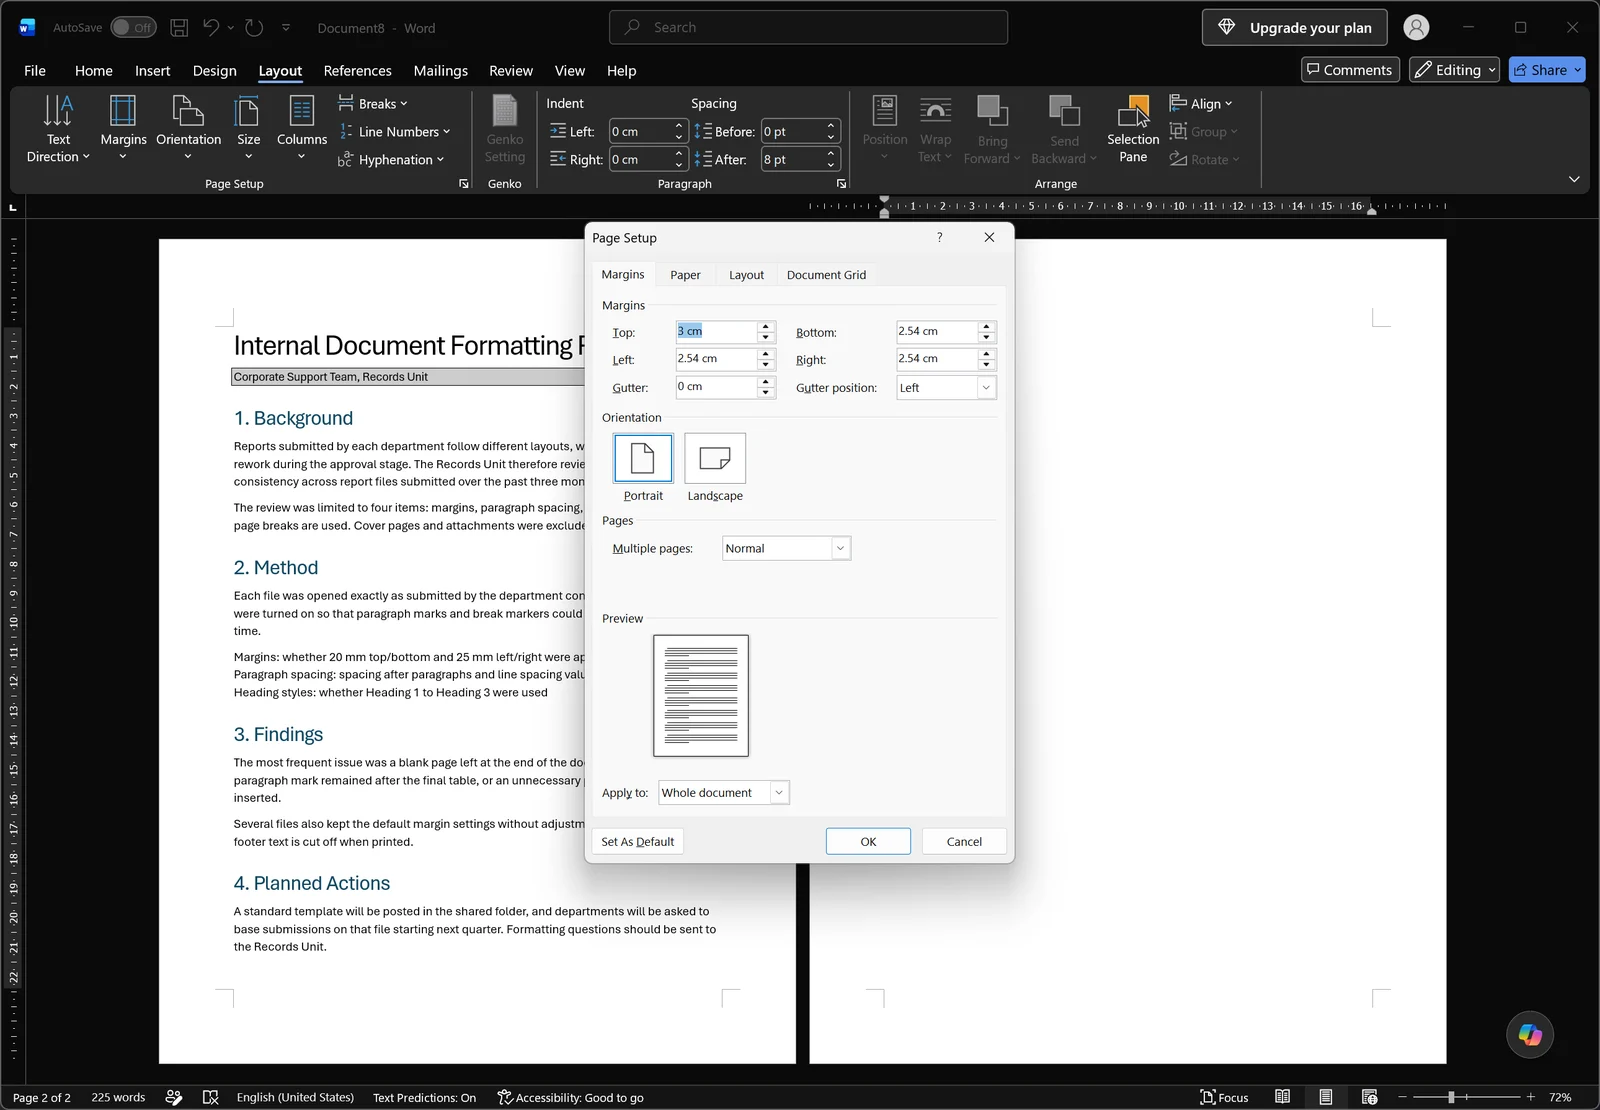
The dialog appears over the document as shown above. It has four tabs — Margins, Paper, Layout and Document Grid — and the Margins tab opens first with top, bottom, left and right values, a gutter box and the orientation choice. At the bottom sits the Apply to dropdown, which defaults to Whole document. Section start behavior lives on the Layout tab of this dialog, and setting Apply to to This section lets you adjust one section without disturbing the formatting of the others.
Clear every page break at once with Find and Replace
If you have several blank pages and page breaks are the cause of all of them, there is no need to work through them individually. Press Ctrl+H to open Find and Replace, type ^m in the Find what box, leave Replace with empty, and choose Replace All. Every manual page break in the document disappears. Section breaks can be found with ^b, but since removing one rewrites formatting as described above, review those one at a time rather than clearing them in bulk.
When the cleanup is done, click Print Layout in the Views group on the View tab to return to the normal view. Draft view never draws page boundaries, so Print Layout is the only place you can confirm the blank page is genuinely gone.
👉 How to Change Line Spacing in Word: 1.5, Exact pt, and Fixes
When the Last Page Won't Go Away: Empty Paragraphs and Tables
For a blank page at the end of a document, "delete it" is the wrong framing. The final paragraph mark is not removable, so the goal is to shrink the space it occupies until it fits back onto the previous page. Work through the steps below in order — most documents are fixed by the first two.
Step 1: Set the empty paragraph to 1 pt
Put the cursor inside the empty paragraph, click into the font size box on the Home tab, and type 1. The dropdown list has no 1 pt entry, so you have to type the number and press Enter. Once the paragraph height drops to a single point, the overflowing line pulls back up to the bottom of the previous page.
Step 2: Apply Hidden in the Font dialog
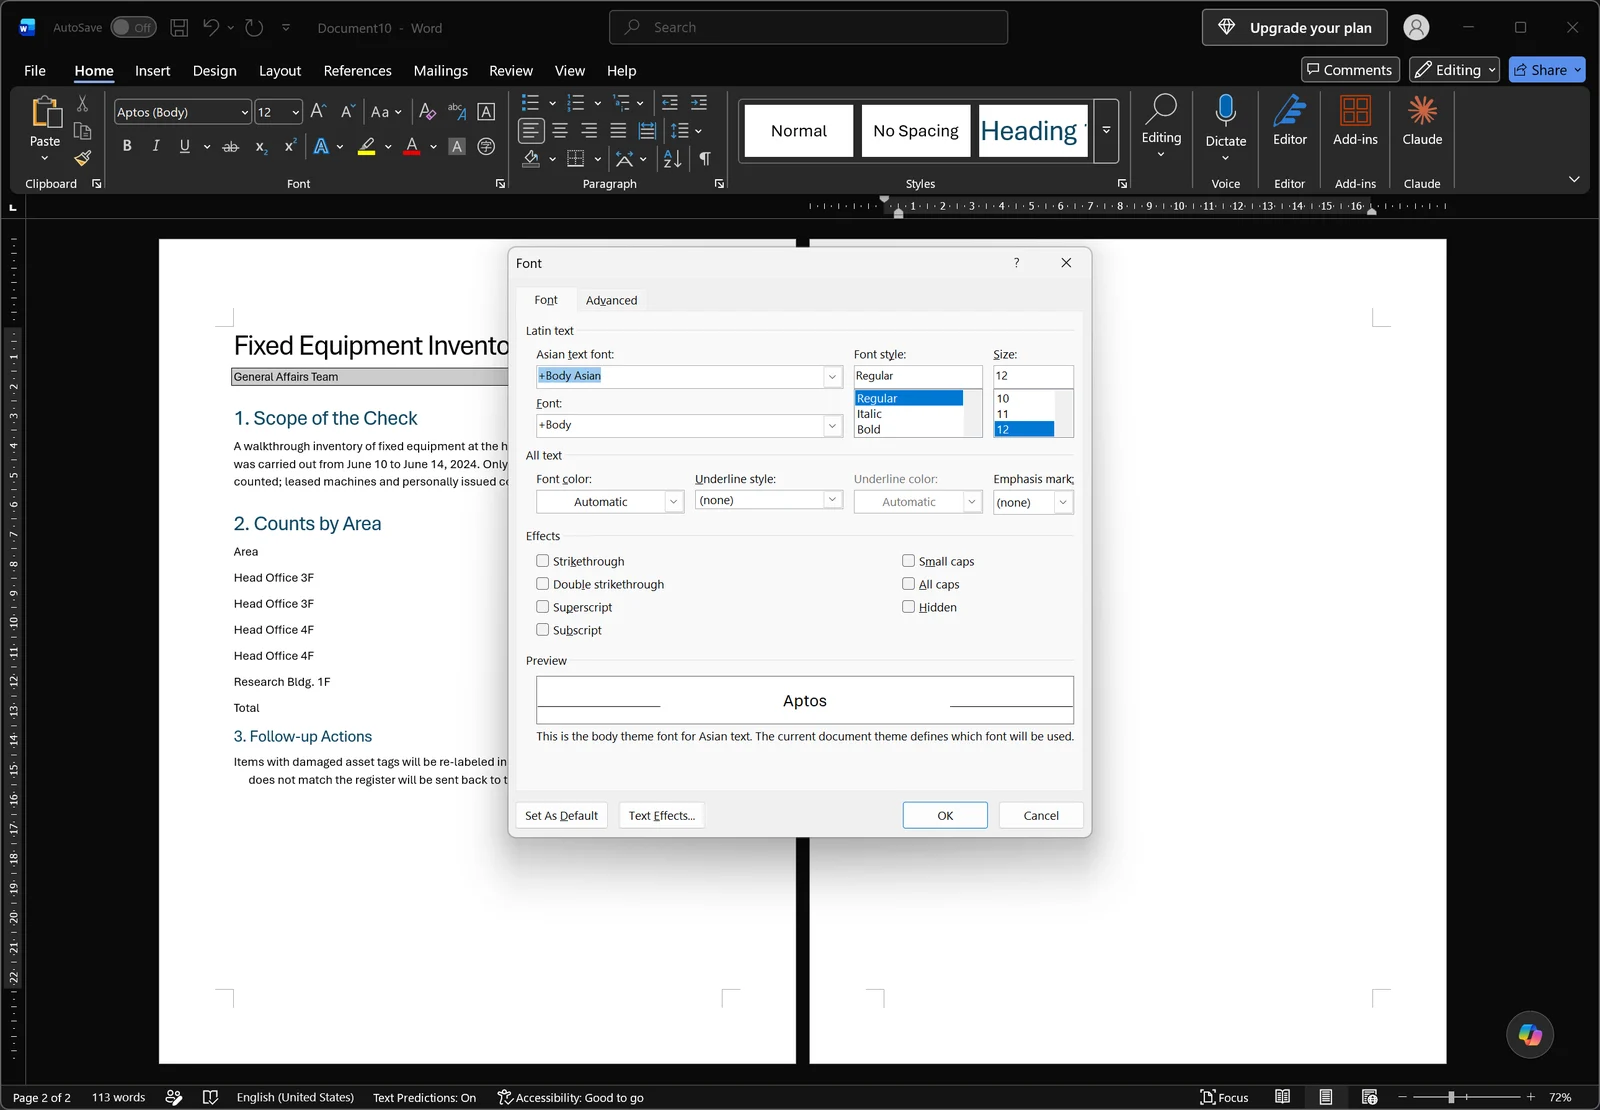
If 1 pt is still not enough, select the paragraph and press Ctrl+D to open the Font dialog. Below the font, font style and size lists is a block of effect check boxes, and one of them is Hidden. Applying it removes the paragraph from view whenever formatting marks are off, and it will not appear in print or in a PDF export either. When a table is the last element in the document and the paragraph behind it cannot be deleted at all, this is the most reliable option.
Step 3: Reduce paragraph spacing and line spacing
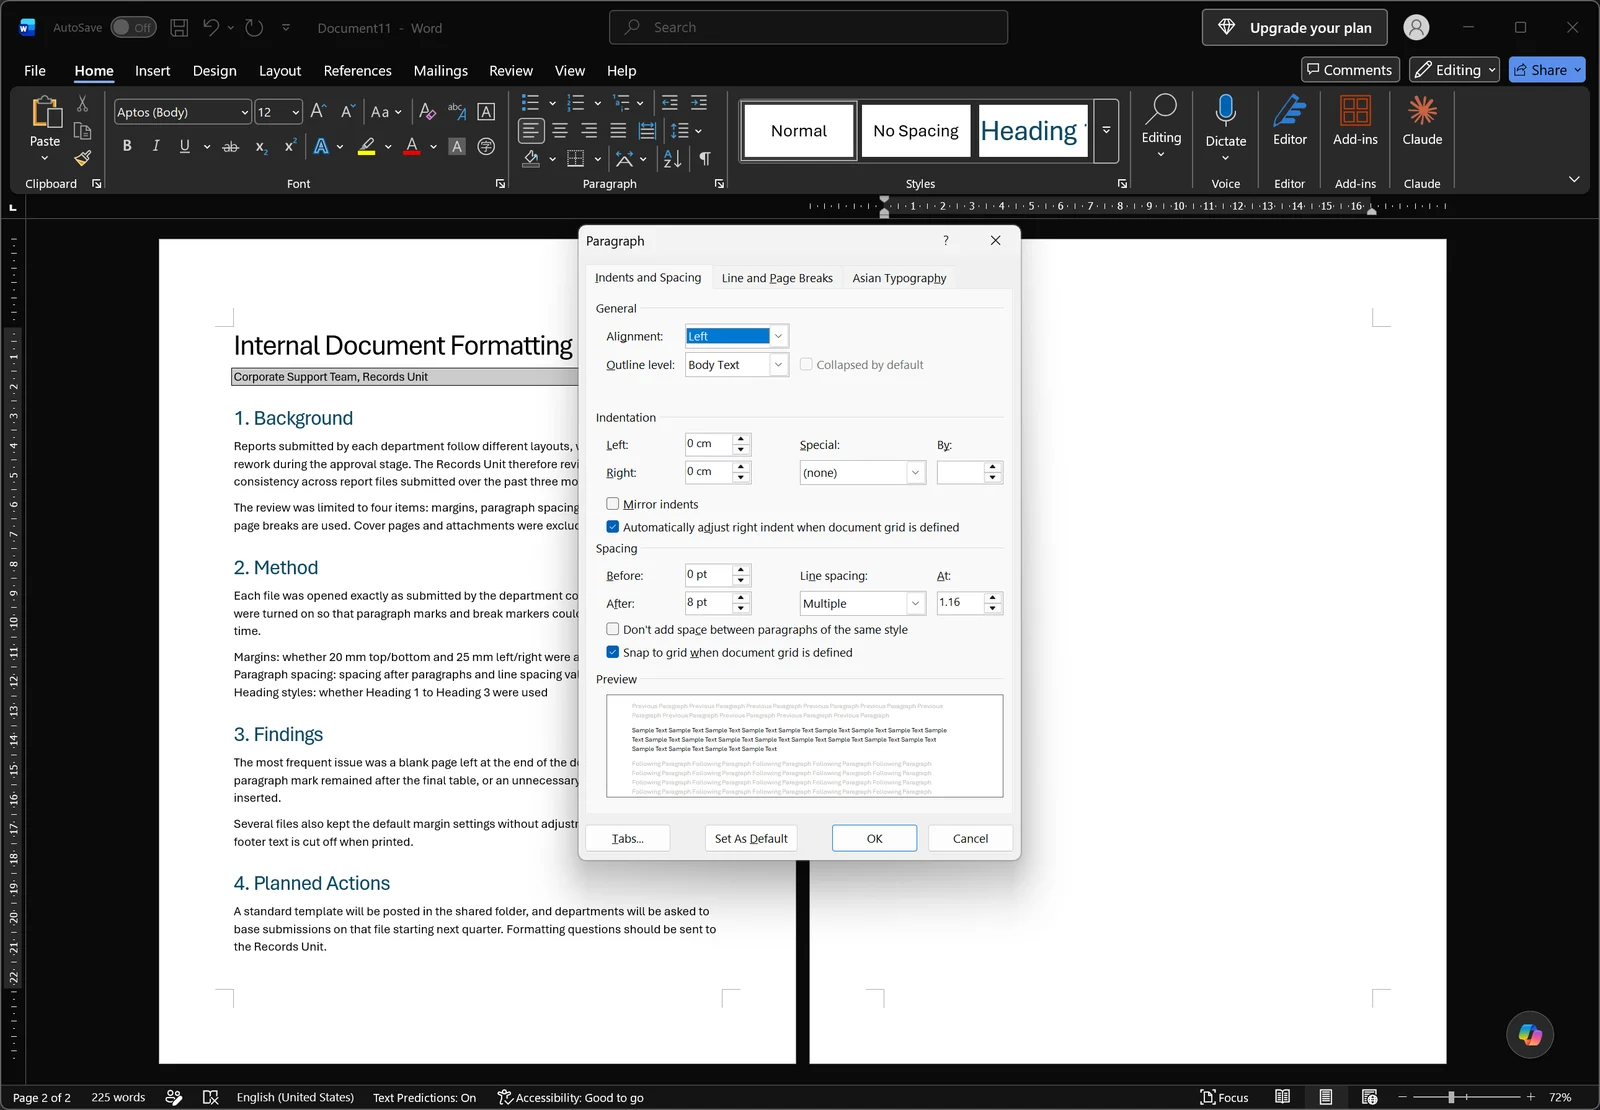
Sometimes the paragraph is not the problem — the spacing attached to it is. The Indents and Spacing tab of the Paragraph dialog holds Spacing Before and After boxes alongside the Line spacing dropdown and its At value. Drop Spacing After to 0 and set line spacing to Exactly, and you control the paragraph's height precisely instead of leaving it to the style.
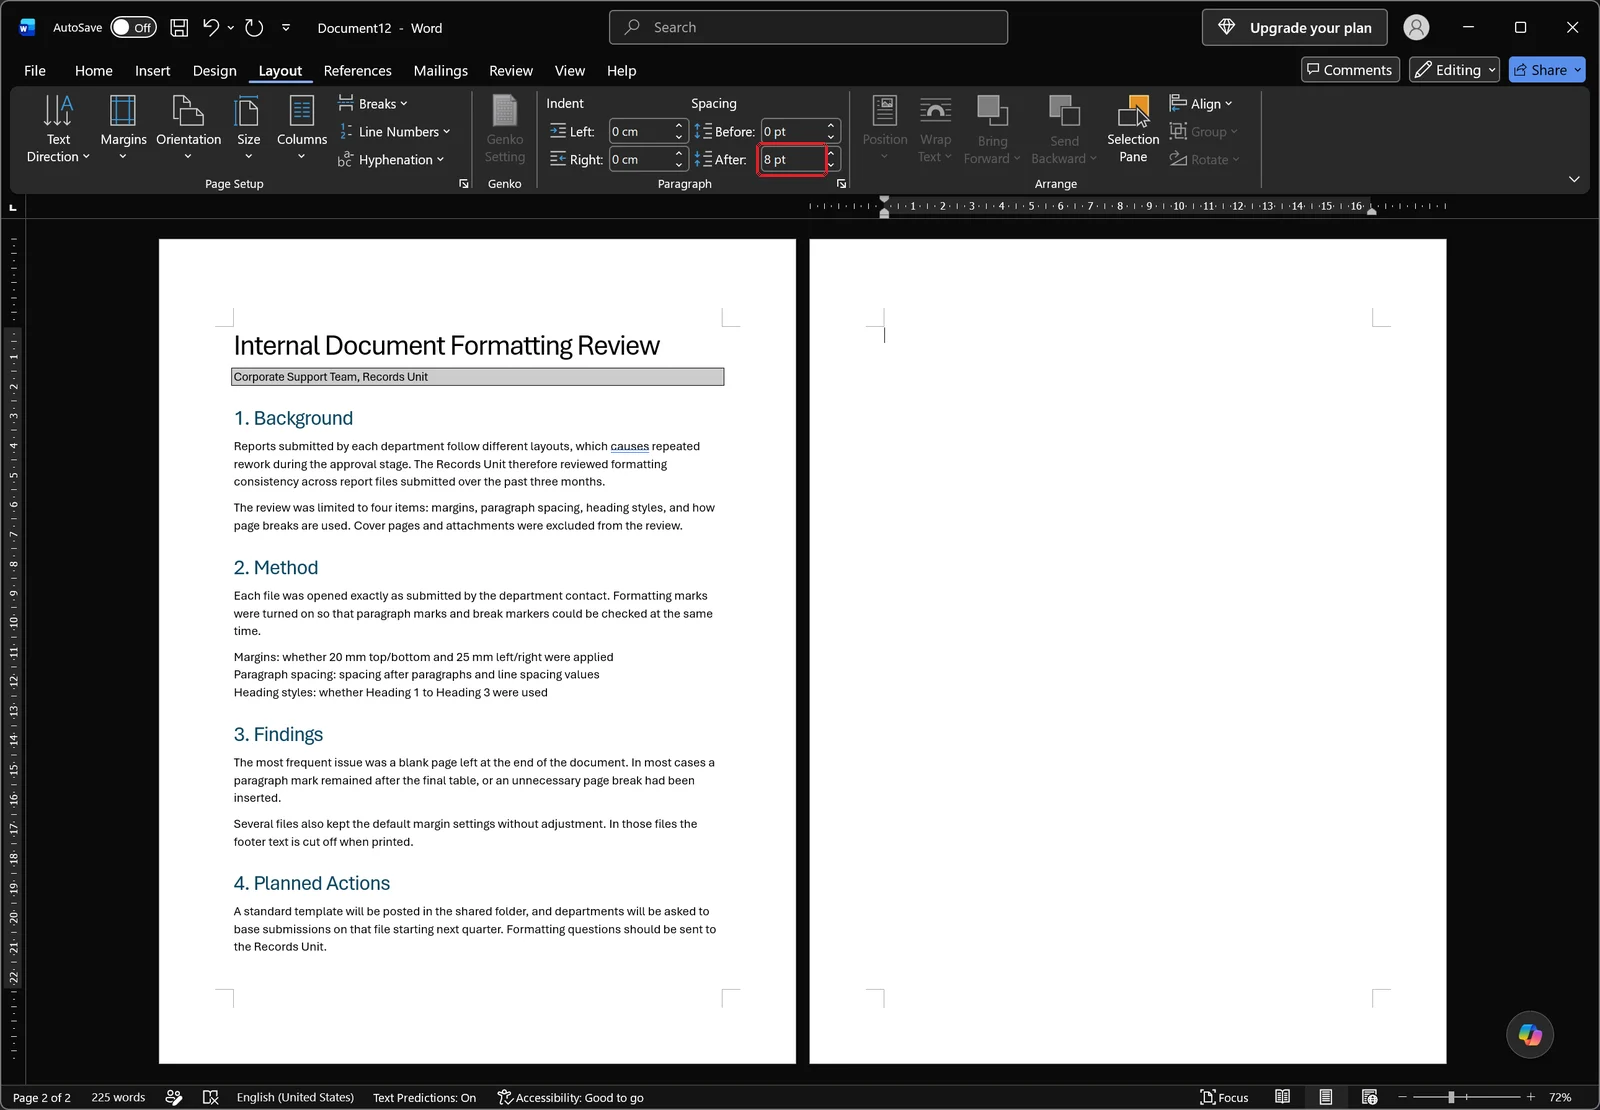
You can also make the change straight from the ribbon. The Paragraph group on the Layout tab has Before and After spin boxes, and the Spacing After box in the screenshot above still holds 8 pt. Enter 0 there and the gap under the current paragraph disappears. When a document is spilling over by exactly one line, this single adjustment often settles it.
Step 4: Trim the bottom margin slightly
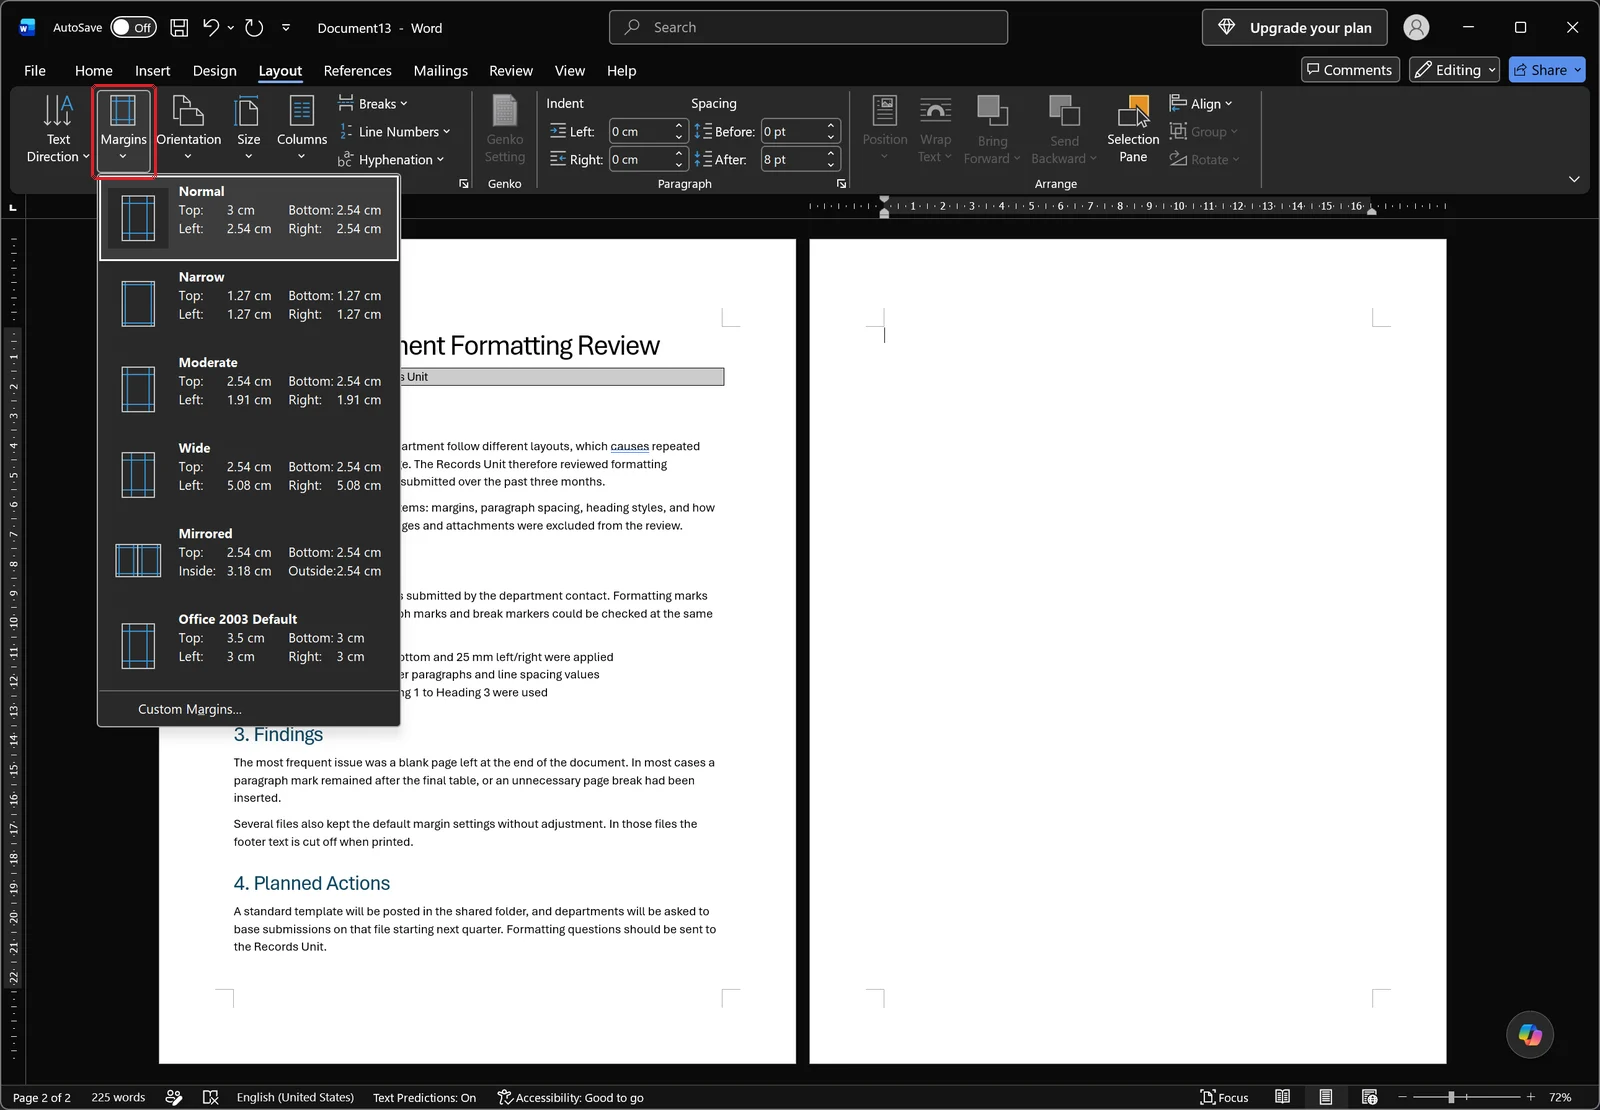
If one stubborn line still remains, click Margins on the Layout tab and try a different preset. The gallery lists Normal, Narrow, Moderate, Wide and the other sets with their actual measurements, so you can judge how much room each one buys you before committing, and the custom margins command at the bottom lets you type exact values. Taking a millimeter or two off the bottom margin is frequently enough to pull that last line back. That said, if the document follows a required corporate or academic format, keep margin changes as your last resort.
Still Stuck? A Checklist and PDF Export Notes
The order to work in when several pages are blank
When the causes are mixed, sequence matters. Following the order below means each step cleans up before the next one has to be judged.
- Press Ctrl+Shift+8 to show formatting marks.
- Use the Navigation pane to note which pages are blank and how many.
- Open Ctrl+H and clear all page breaks with
^m. - Switch to Draft and evaluate each section break individually — delete it if the formatting is not needed, otherwise change only the section start.
- Handle empty paragraphs after a table or at the end of the document with 1 pt or Hidden.
- Adjust Spacing After and margins last.
Headers, footnotes, and text boxes that create pages
If the body is empty and pages keep appearing anyway, look outside the body. A footnote that grew long enough to run onto the next page, a large shape or text box pushed past the page boundary, and an oversized header or footer height are the usual suspects. Text boxes and shapes stay invisible even with formatting marks on, so the quickest test is to drag across the blank page and see whether anything gets selected.
Blank pages that appear only in print or PDF
When the page count on screen does not match the total in print preview, suspect section settings. Find the section breaks in Draft view, check whether the section start is set to Odd Page or Even Page, and switch it to New page if the parity is not required. After the change, reopen print preview and confirm the total has dropped — that is the only reliable check.
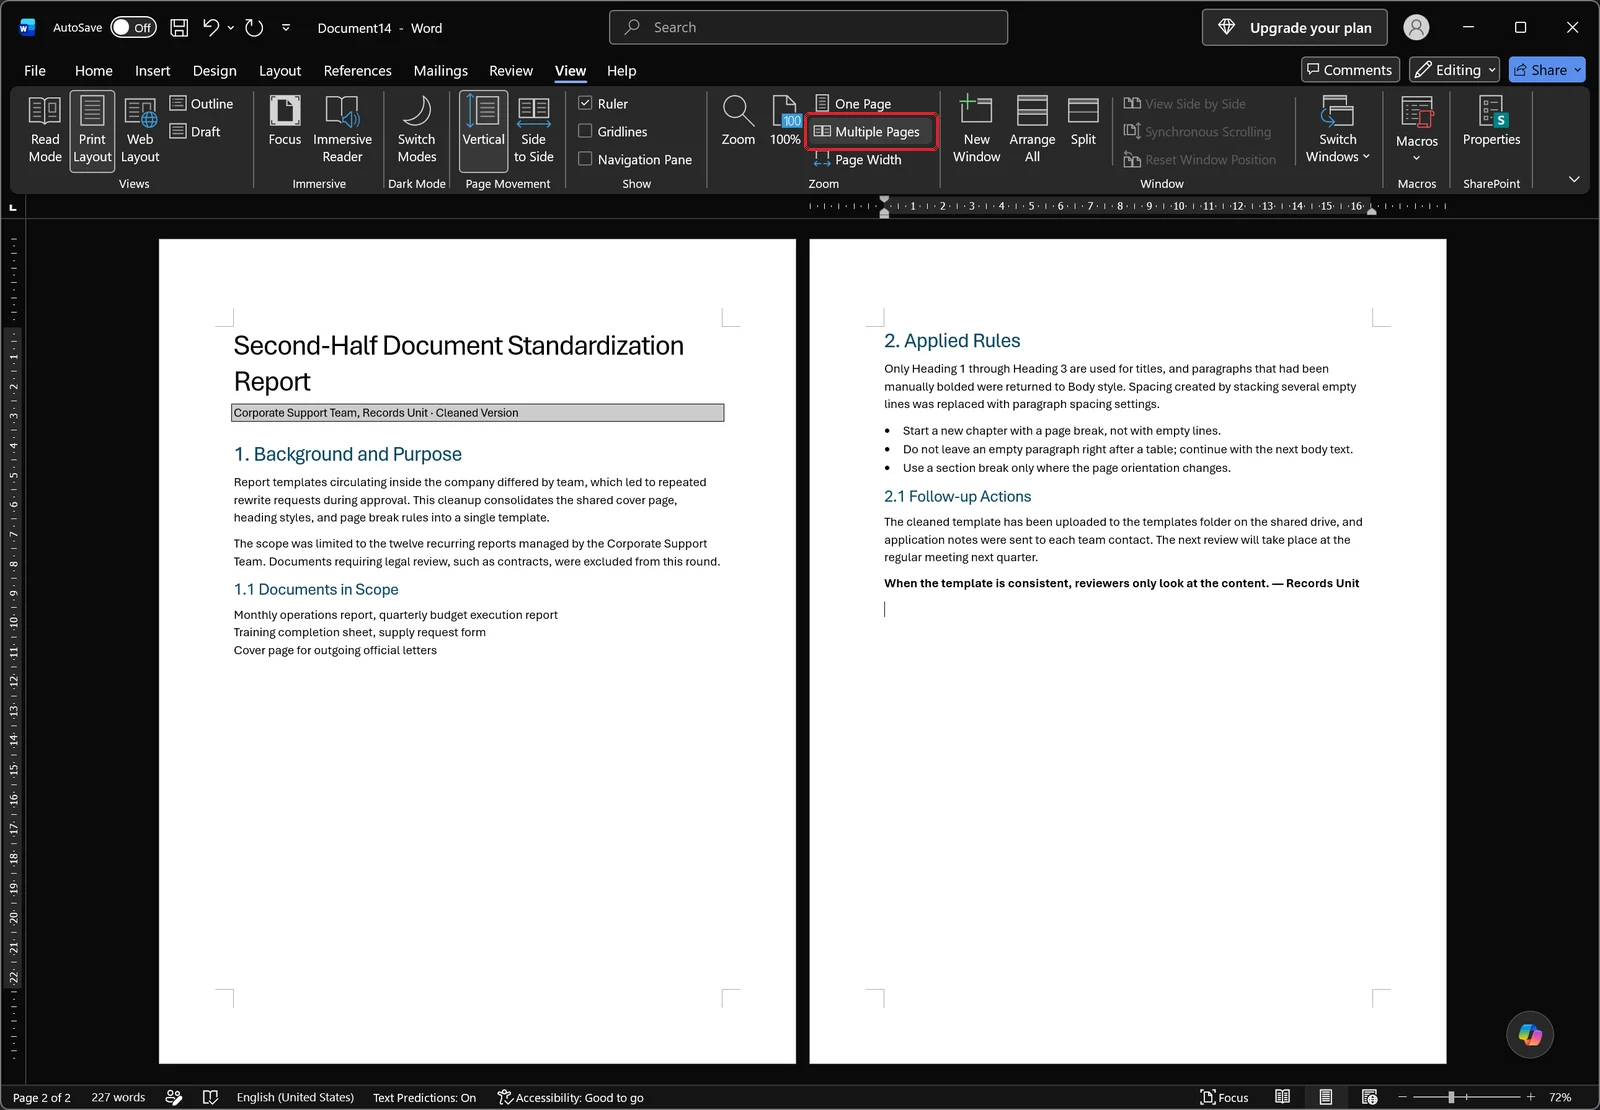
Finish by returning to Multiple Pages to inspect the result. When both sheets are filled with content and no empty page sits between or after them, as above, the cleanup is done.
👉 How to Mail Merge from Excel to Word: Letters, Labels, and Envelopes Step by Step
FAQ: Deleting Blank Pages in Word
Q. The last page won't delete no matter what. Is my file corrupted?
No, that is normal behavior. Word does not allow the final paragraph mark in a document to be deleted, and when that paragraph lands on a new sheet it looks like a blank page. Instead of deleting it, pull it back onto the previous page: try 1 pt font size, then Hidden via Ctrl+D, then Spacing After set to 0, then a slightly smaller bottom margin.
Q. What is the shortcut for showing formatting marks?
Ctrl+Shift+8. The 8 must come from the number row, not the numeric keypad. It does exactly what the pilcrow button in the Paragraph group on the Home tab does, and pressing it again turns the marks off. Since it is the only way to tell empty paragraphs, page breaks, and section breaks apart, turn it on before you start.
Q. How do I get rid of a blank page after a table?
If the table is the last element in the document, the paragraph behind it cannot be deleted. Place the cursor in it, type 1 into the font size box, and if the page survives, press Ctrl+D and tick Hidden in the Font dialog. Setting Spacing After to 0 in the Paragraph group on the Layout tab clears the leftover room under the table as well.
Q. I deleted a section break and my header and page orientation changed. Why?
Because the section break mark stores the page setup of the section before it. Remove the mark and the earlier section adopts the following section's headers, footers, page numbering, orientation, and margins. If that formatting has to stay, leave the break alone and instead change the section start to New page on the Layout tab of the Page Setup dialog, which removes the blank page without touching anything else.
Q. Why does a blank page appear only when I save as PDF?
In most cases the section start is set to Odd Page or Even Page, and Word inserts a filler page to satisfy that rule. Locate the section break in Draft view, change that section's start to New page, and confirm the result against the total page count in print preview.
Cutting Down Document Cleanup with inline AI
None of this is difficult once you know the cause, but it is still manual work: open the file, turn on formatting marks, hunt down breaks, adjust spacing, repeat. With dozens of files, you run the same inspection dozens of times. inline AI is a local AI agent that reads and edits the Excel and document files already on your PC, so tidying data scattered across multiple files or bringing formatting into line can be handled as a plain-language request instead of a file-by-file pass. Everything runs on your own machine rather than in the cloud, so internal reports and documents containing personal data never leave it.
See what an agent could take over at your company in a 30-minute call.