Learn
Insert Slide Numbers in PowerPoint: Skip the Title Slide

Typing a number into a text box on every slide is the one method that guarantees trouble later. When people search for how to insert slide numbers in PowerPoint, they usually assume it is a formatting chore. It is not — PowerPoint has a built-in field that works out each slide's position on its own, so inserting a slide in the middle or reordering the deck renumbers everything automatically.
Hiding the number on the cover, moving it, and restyling it all live inside that same system. This guide walks through numbering an entire deck in one pass, skipping the title slide, changing the position and font in Slide Master, diagnosing numbers that refuse to appear, and handling starting numbers and handout pages.
Why Automatic Numbering Beats Typing It Yourself

Empty bottom corners like the ones above mean no numbering has been applied yet. In a review deck, you spend a lot of time pointing at pages, and without numbers every reference turns into "the table on the third one — no, fourth."
What goes wrong with manually typed numbers
A text box with a number in it looks identical on screen. The difference is that the number has no relationship to the slide's actual position. Add one slide in the middle and every number after it has to be retyped by hand. Reorder the deck an hour before the meeting and you print a stack of pages whose numbers no longer match their order.
Automatic numbers are inserted as a field
What PowerPoint inserts is not a fixed digit but a field written as <#>. In Slide Master and in layouts you see that symbol literally; on a real slide, PowerPoint replaces it with that slide's position in the deck. That is why deleting or moving slides renumbers the rest without any extra work.
Three things to decide first
Settling these before you start saves you from undoing work halfway through.
- Scope: the whole deck, or only a particular stretch of it
- The cover: does the title slide get a number, or not
- Template condition: does your company template already include a number placeholder in every layout, or do you need to add one
The third point matters most. Templates that come from outside often have the number placeholder in some layouts and not others, which is exactly the situation where numbers show up on part of the deck and nowhere else.
Number Every Slide in One Pass
Open Header & Footer... from the Insert tab
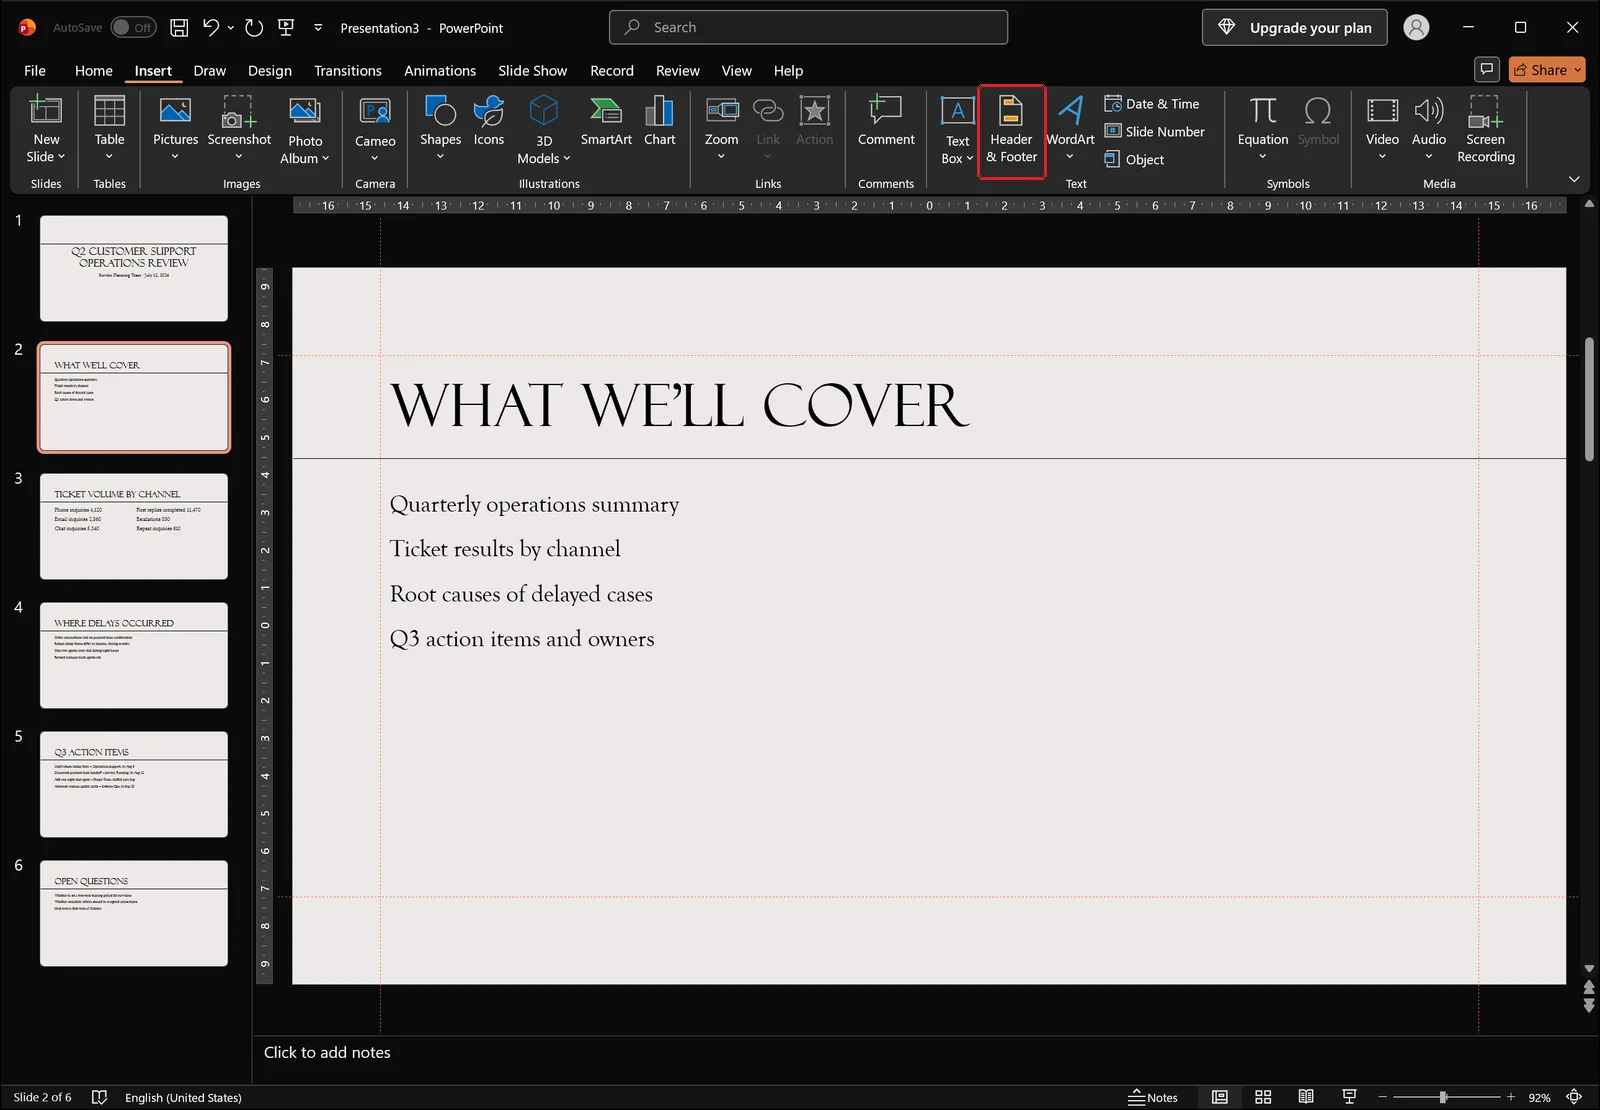
Click the Insert tab on the ribbon, then choose Header & Footer... in the Text group — the command boxed in red above. It opens a dialog where you pick which elements appear on your slides.
Check Slide number, then click Apply to All
The dialog separates settings for slides from settings for notes and handouts. On the Slide tab, tick Slide number, then click Apply to All at the bottom right. Numbers appear in the bottom corner immediately, and any slide you add afterward picks up the next number on its own.
Where the number lands depends on your theme and layout — bottom right in some templates, bottom center in others. Moving it is covered further down.
Apply vs Apply to All
There are two buttons, and they do different things. Apply affects only the slides currently selected; Apply to All affects the entire deck. If your numbers showed up on just a few slides, you almost certainly clicked Apply. That said, Apply is exactly the button you want when you deliberately need to exclude a handful of slides.
The Slide Number command opens the same dialog
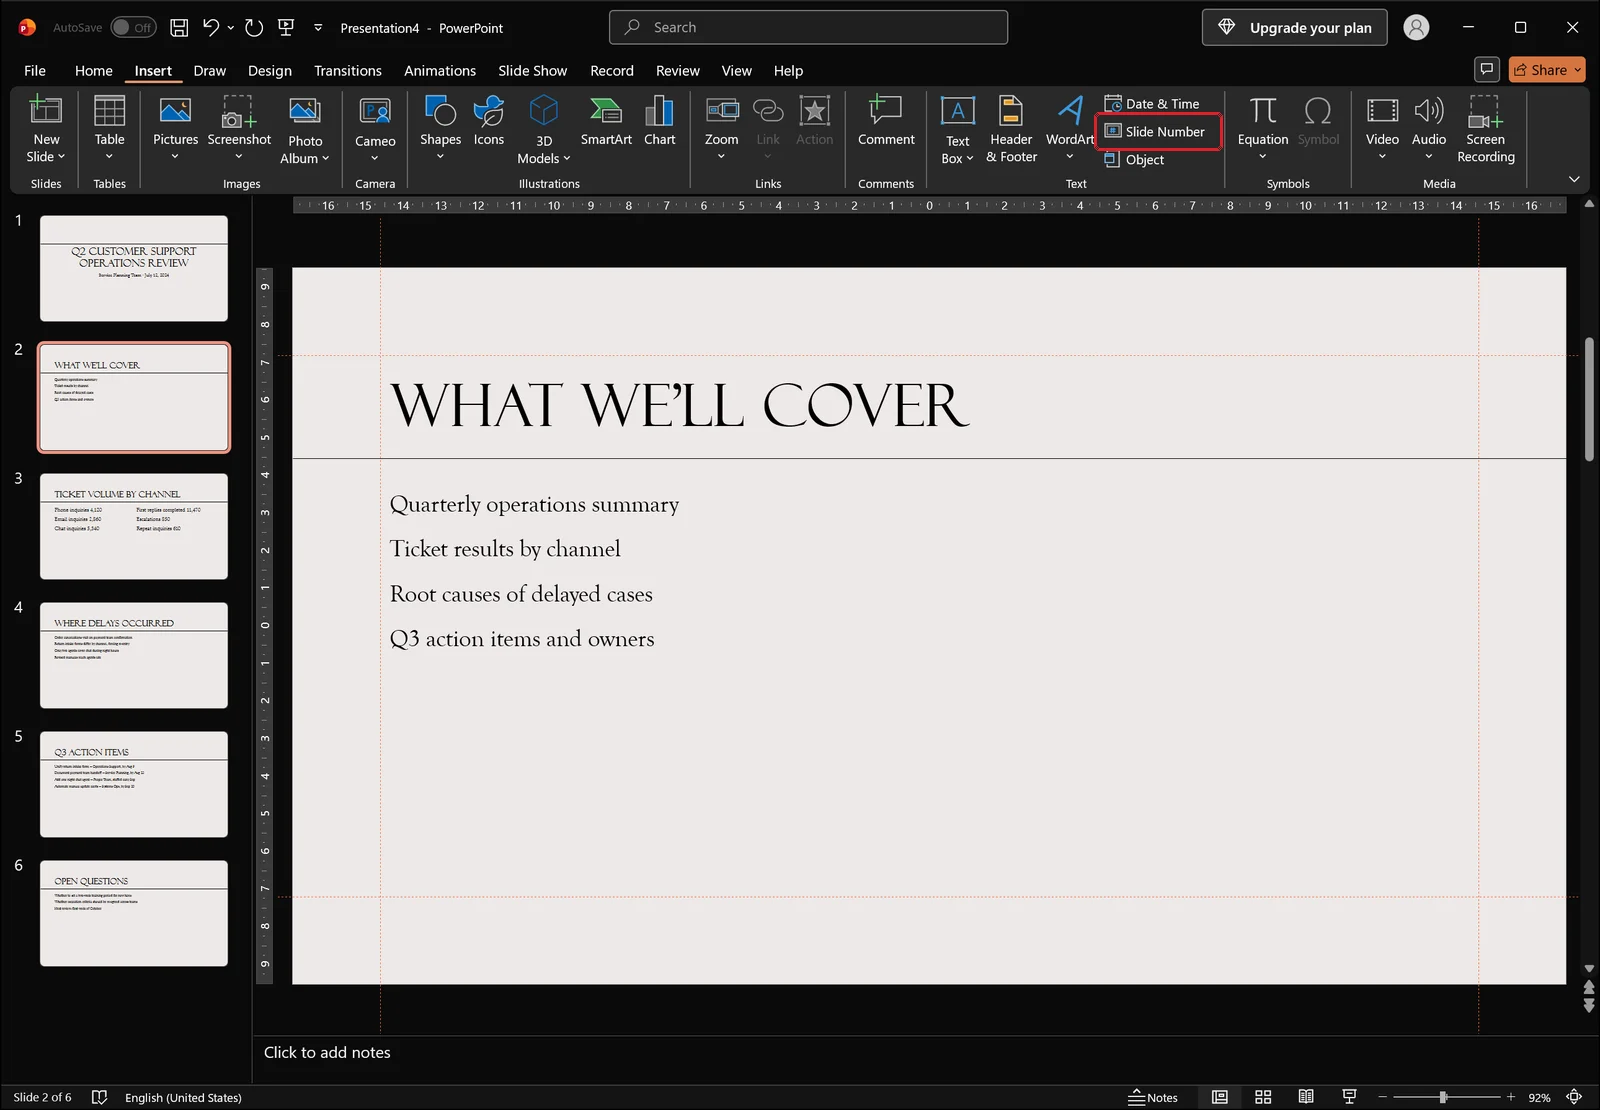
The same Text group also contains a Slide Number command. Clicking it opens the identical dialog you just used. The two entry points produce the same result, so use whichever one you reach for naturally.
Leaving the Title Slide Unnumbered
Tick "Don't show on title slide"
If you would rather not stamp a number on the cover, turn on one more option in the same dialog. Near the bottom of the Slide tab, check Don't show on title slide, then click Apply to All. The option suppresses the number only on slides built from the title slide layout.

After applying, the cover's bottom corners are empty, as shown above. If a number is still sitting there, that slide was probably built from some other layout rather than the title slide layout.
Why the next slide is still number 2
Hiding a number and not counting a slide are two different things. The cover is still counted, so the second slide continues to display as 2. To make the first content slide read 1, you have to change the starting number to 0 — covered in the starting number section below.
Excluding an agenda or divider slide
To drop the number from specific slides such as an agenda or a section divider, you have two options. Select those slides, open the Header & Footer dialog, clear the Slide number checkbox, and click Apply rather than Apply to All. Or select the number placeholder sitting on that slide and delete it. Either way, the slides that follow keep their original numbering.
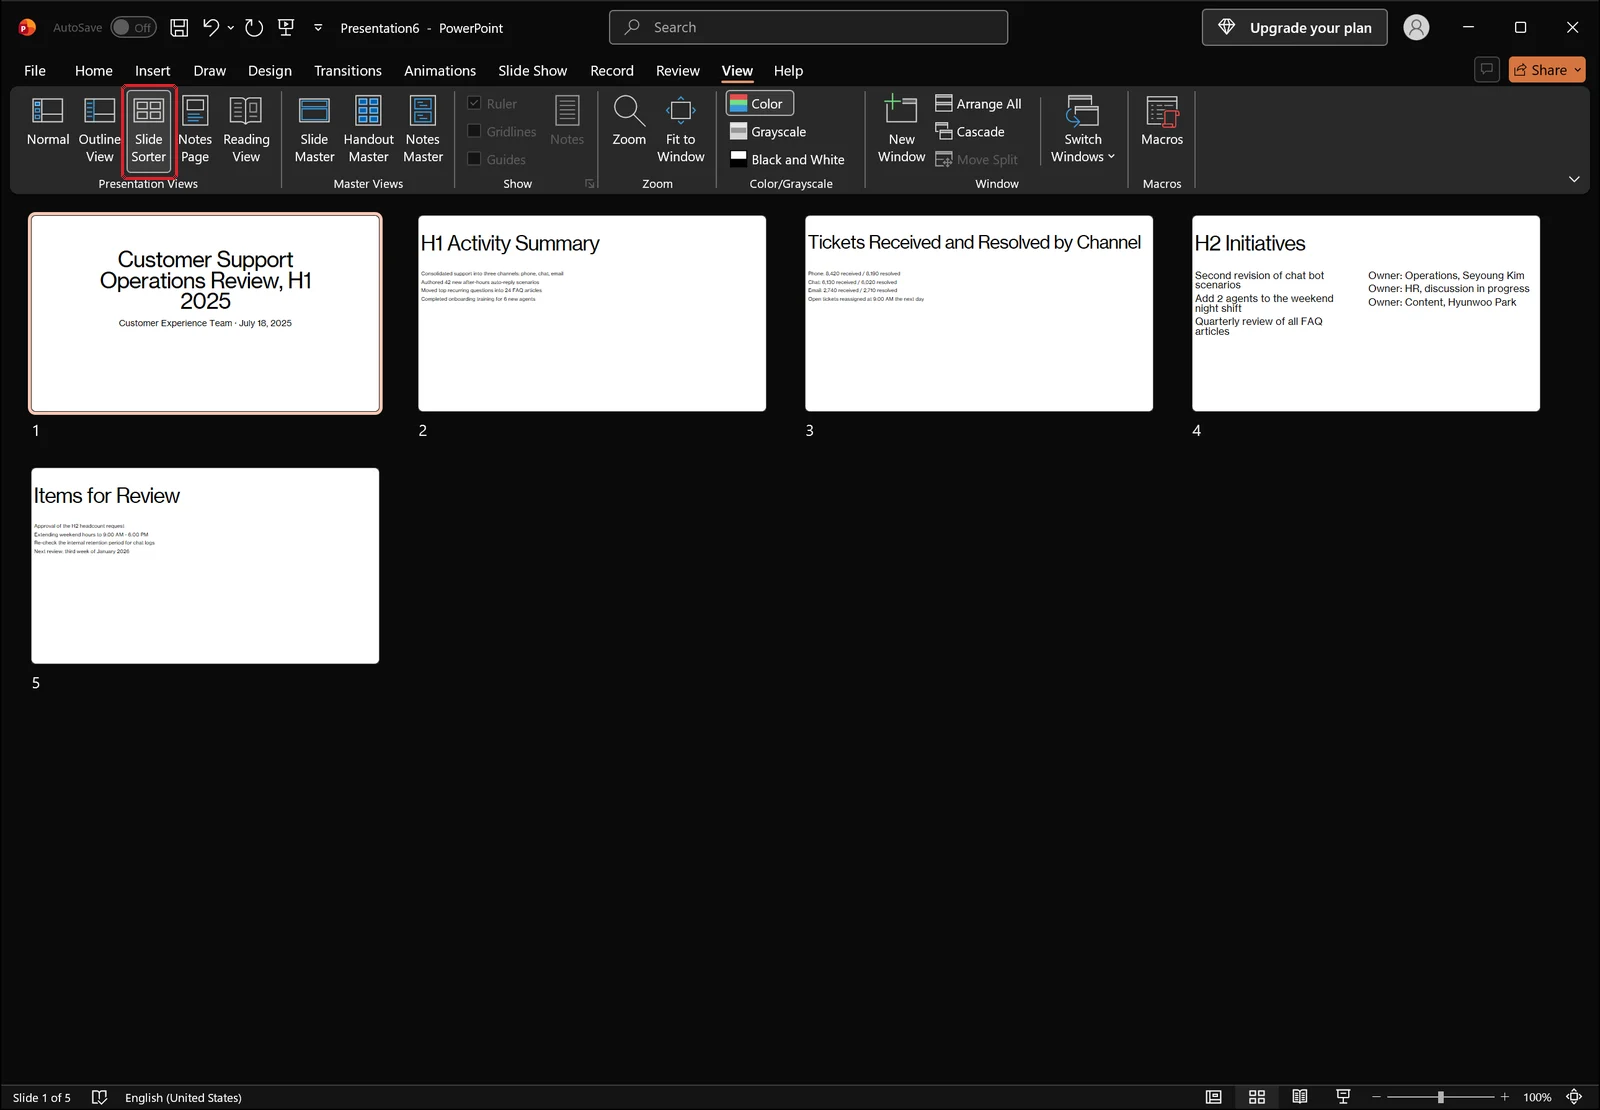
To review the deck as a whole, go to the View tab and click Slide Sorter in the Presentation Views group. Thumbnails line up in a grid, so you can move through every slide at once without scrolling.
👉 How to Add Sections in PowerPoint: Group and Reorder Slides
Move and Restyle the Number in Slide Master
Adjusting the number's position or font slide by slide leaves you with dozens of tiny inconsistencies. To change it once and have it hold everywhere, work in Slide Master.
Open View > Slide Master
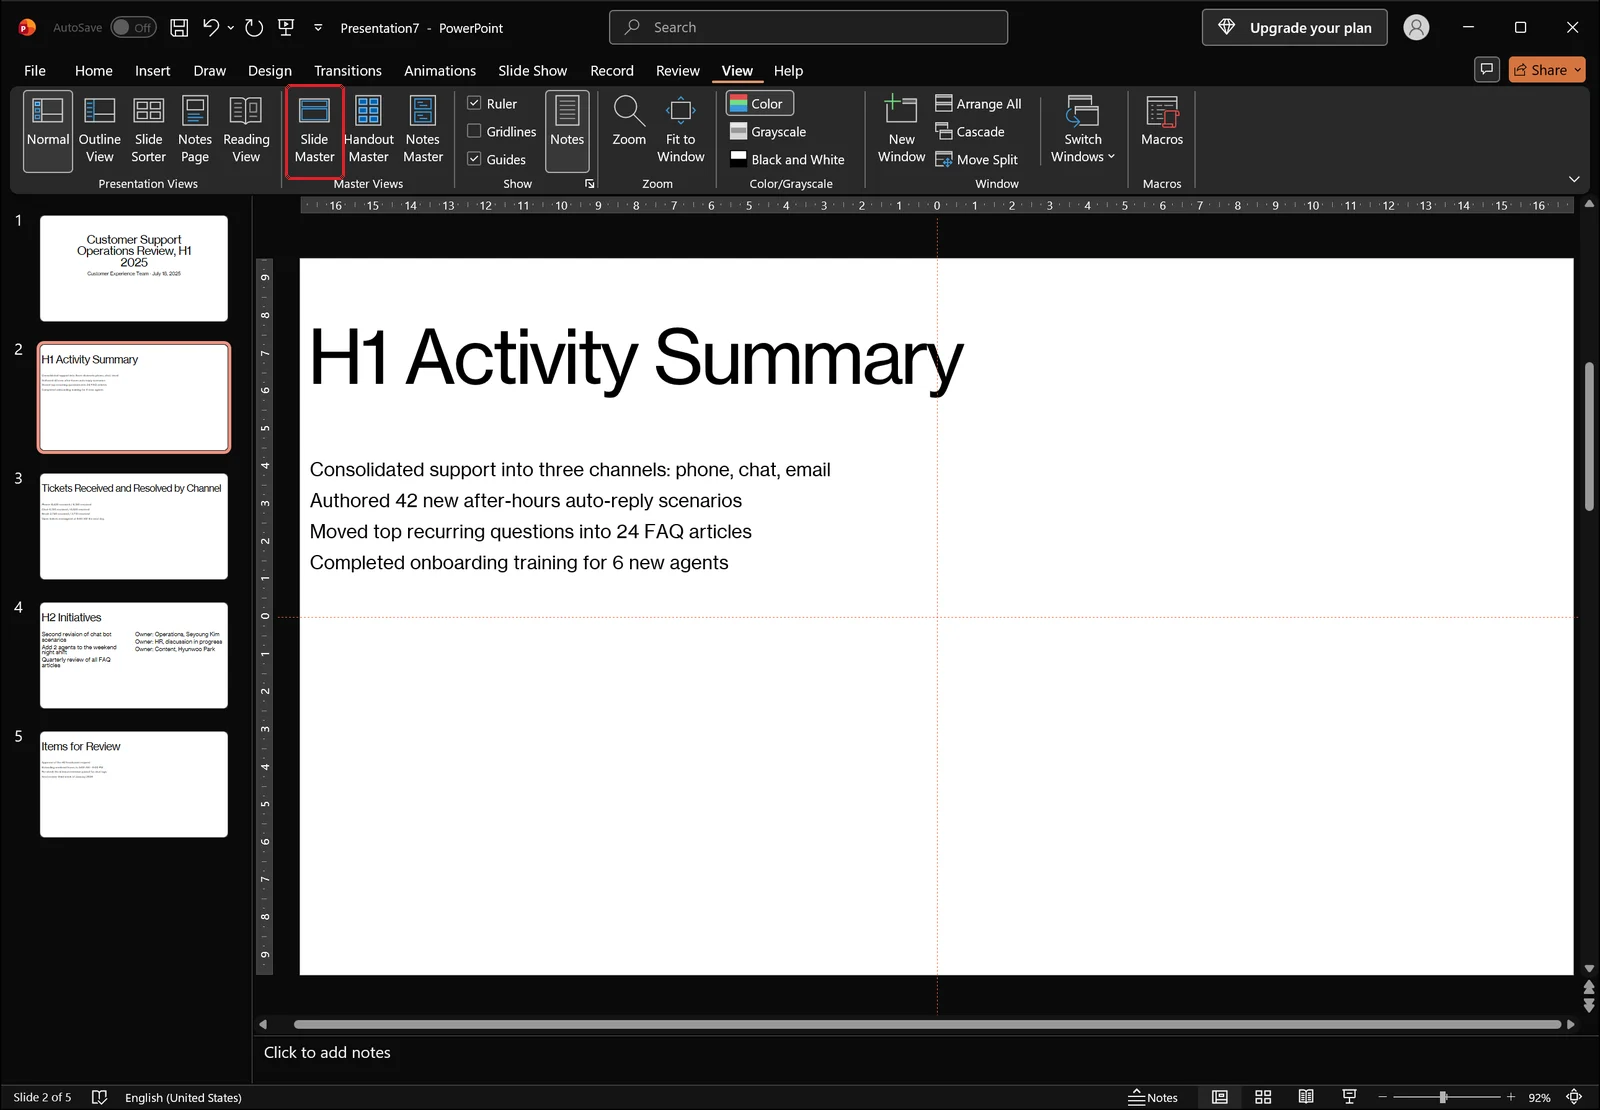
Open the View tab and click Slide Master in the Master Views group. From there you can edit the master slide and the layouts that inherit from it.
Reposition and resize the <#> placeholder
On the top master slide, find the small placeholder containing <#>. Drag its border to move it, or pull a corner handle to resize it. Changes made on the master are inherited by the layouts below, but if a particular layout already had its number placeholder moved independently, you need to fix that layout too before everything lines up.
Change the font and color
Select the <#> placeholder on the master and open the Font dialog to set the typeface, font style, size, and font color, so the treatment carries across the deck. A number two or three sizes smaller than body text, in a gray tone, stays readable without competing with the content. On a dark background theme, lighten the color or the number will disappear into the design.
Close master view and check the result
Once the formatting is set, close master view and return to normal view. Slide Sorter is the fastest way to confirm that every number sits in the same spot at the same size.
👉 How to Use Slide Master in PowerPoint: Format Every Slide
Checklist: Numbers Are On but Nothing Appears
You ticked the box, you clicked Apply to All, and still no digits. The cause is usually one of these four.
The layout has no number placeholder
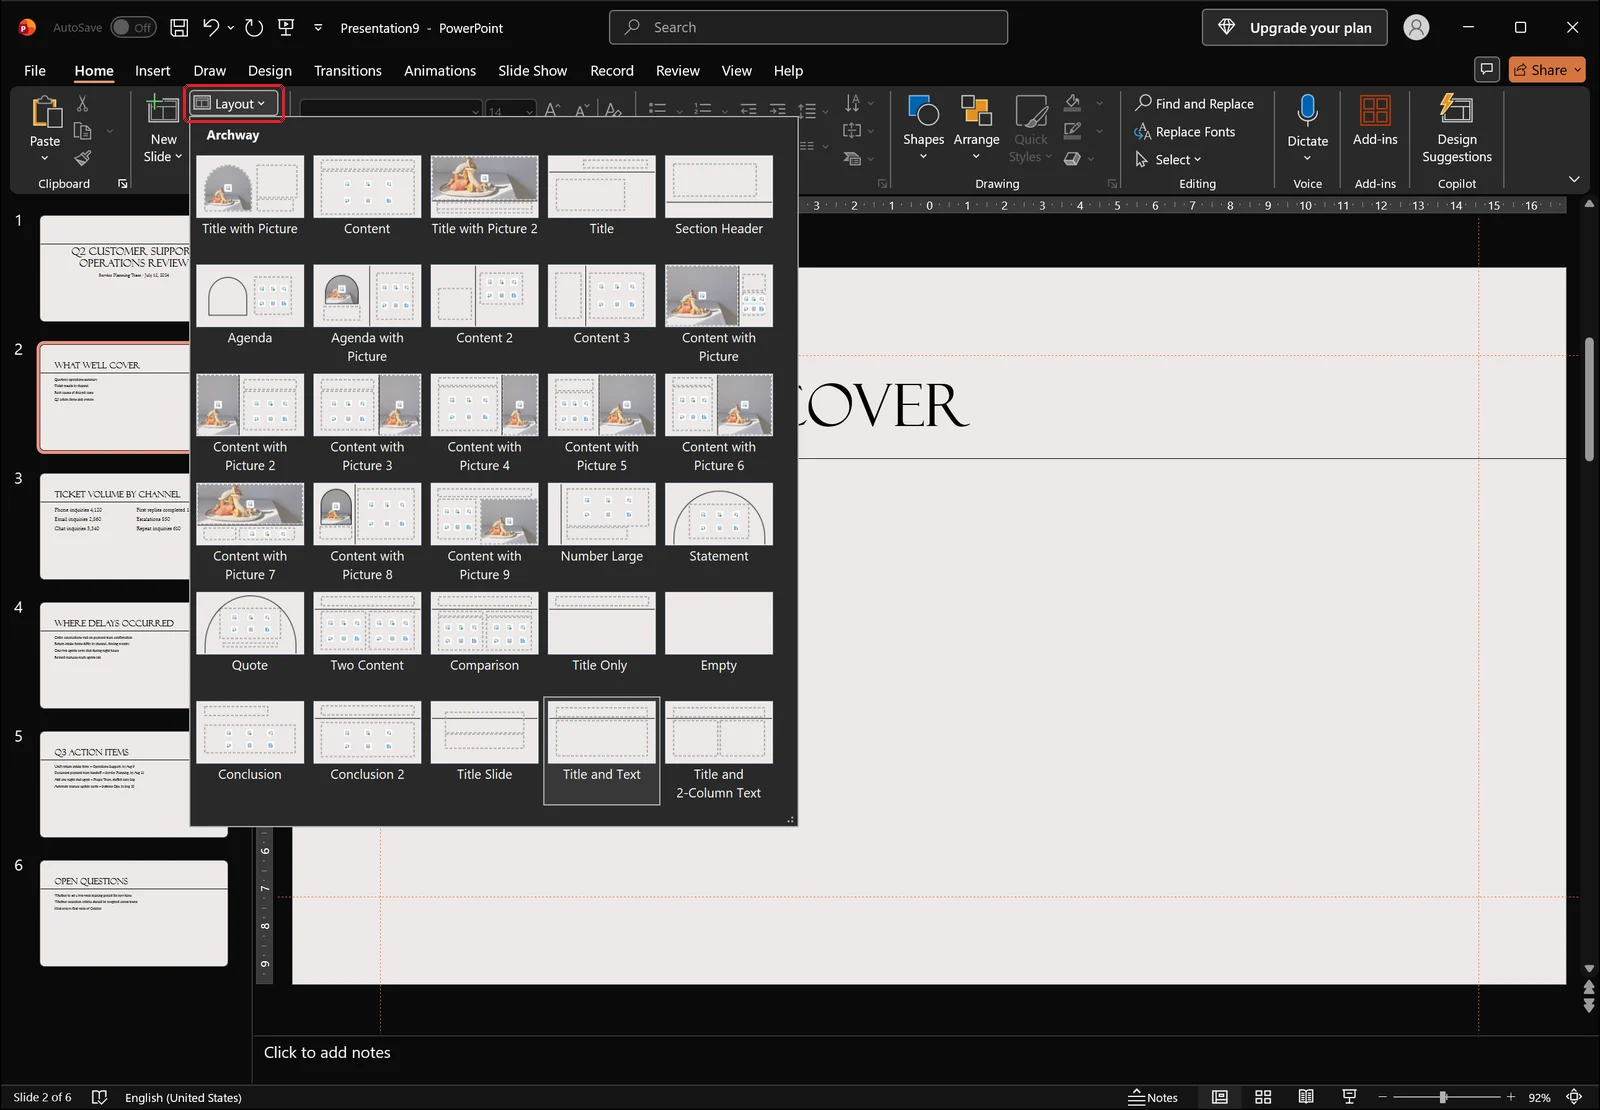
Blank layouts and custom layouts inherited from an outside template sometimes contain no number placeholder at all. Click Layout on the Home tab to open the gallery and switch the slide to a layout where numbering works. If you have to keep the current layout, go into Slide Master and add a number placeholder to that specific layout.
The placeholder is off-canvas or buried behind a shape
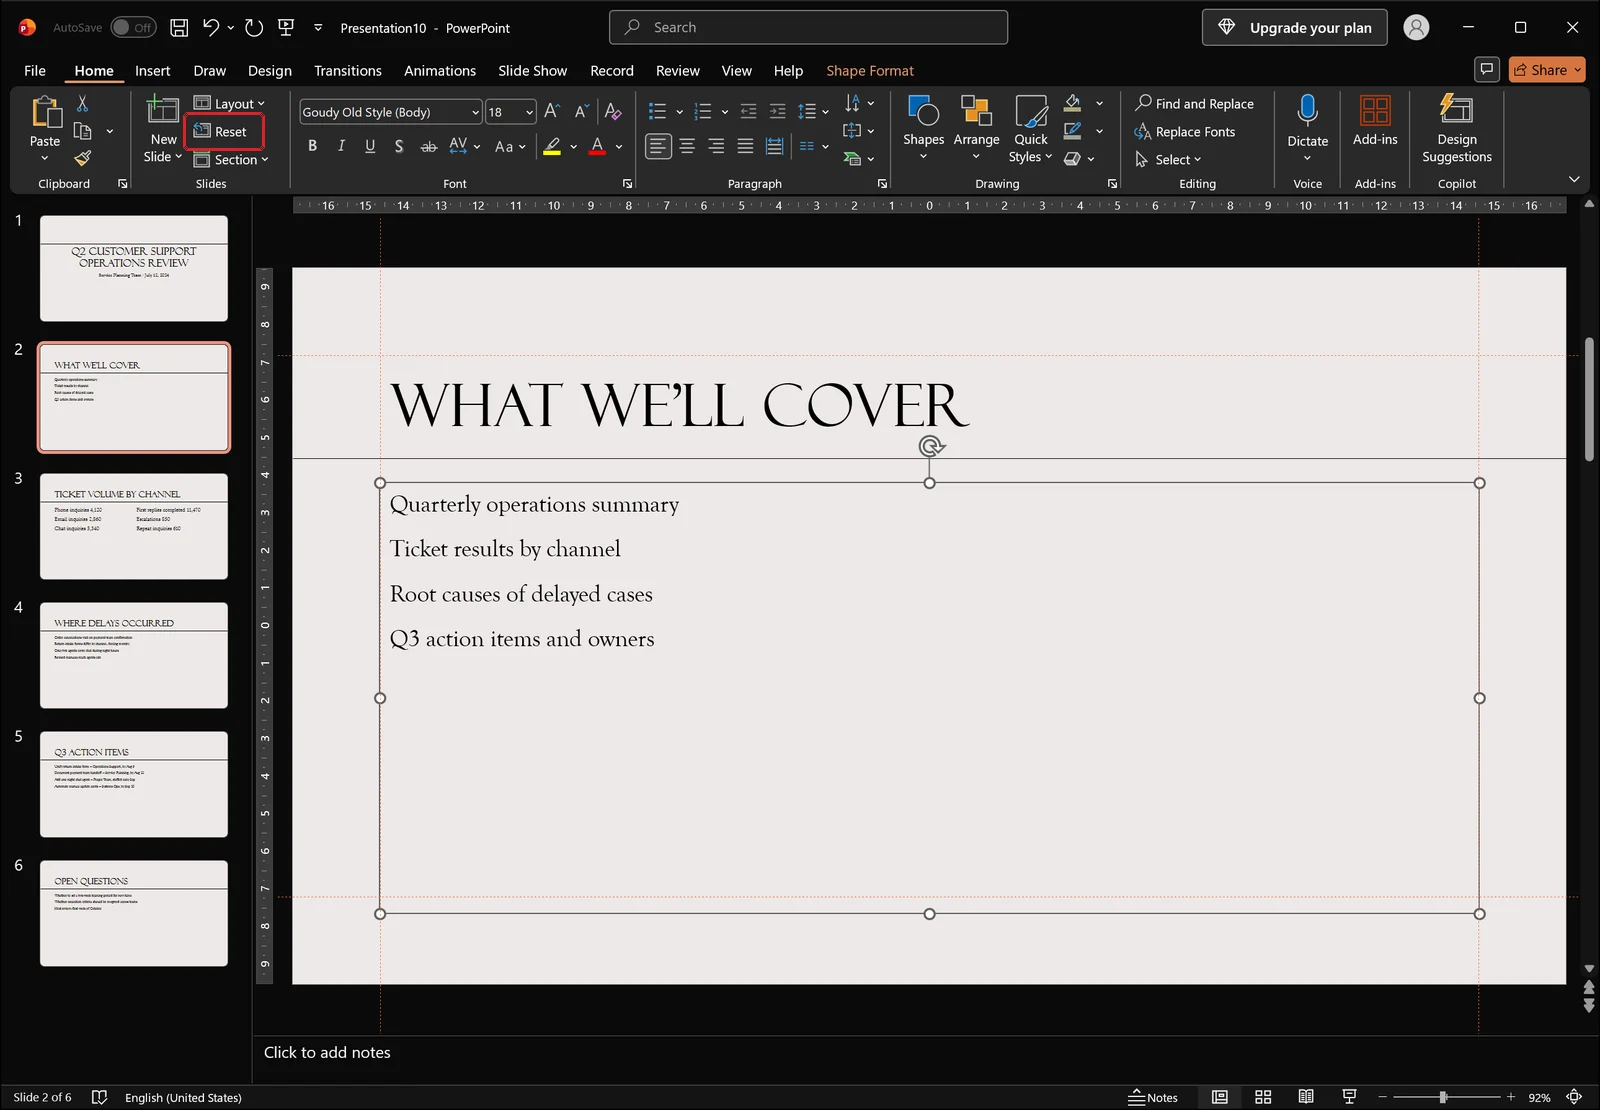
The number may be there while the placeholder has been dragged past the slide edge or covered by a full-bleed image or shape. The setting is correct, but nothing shows. Select the placeholder to see where it actually sits, or use Reset in the Slides group on the Home tab to send the layout's placeholders back to their defined positions.
Use Reset to restore placeholders
Clicking Reset returns that slide's placeholders to the position, size, and formatting defined by its layout. It also undoes any manual arrangement you made, so on slides where you moved things intentionally, check the result before moving on.
Color and background graphics
If the number is still invisible, check two more things. The number's font color may match the background exactly, or the background formatting may have the option to hide background graphics switched on. Finally, confirm you did not click Apply instead of Apply to All in the Header & Footer dialog, and re-run it if needed.
Starting Numbers and Handout Page Numbers
Set the deck to start at 0 or any number
The starting number lives on the Design tab under Slide Size > Custom Slide Size. Set Number slides from to 0 and the cover becomes 0, which makes the second slide display as 1. If you have already hidden the number on the title slide, nobody ever sees the 0 — the deck simply reads 1 from the first content slide onward.
Continuing numbers across split files
When a presentation is split across two or three files, set each later file to start where the previous one ended. If the first file finishes at 18, set the second file to start at 19. Printed and stapled together, the sequence runs unbroken.
Page numbers in Handout Master
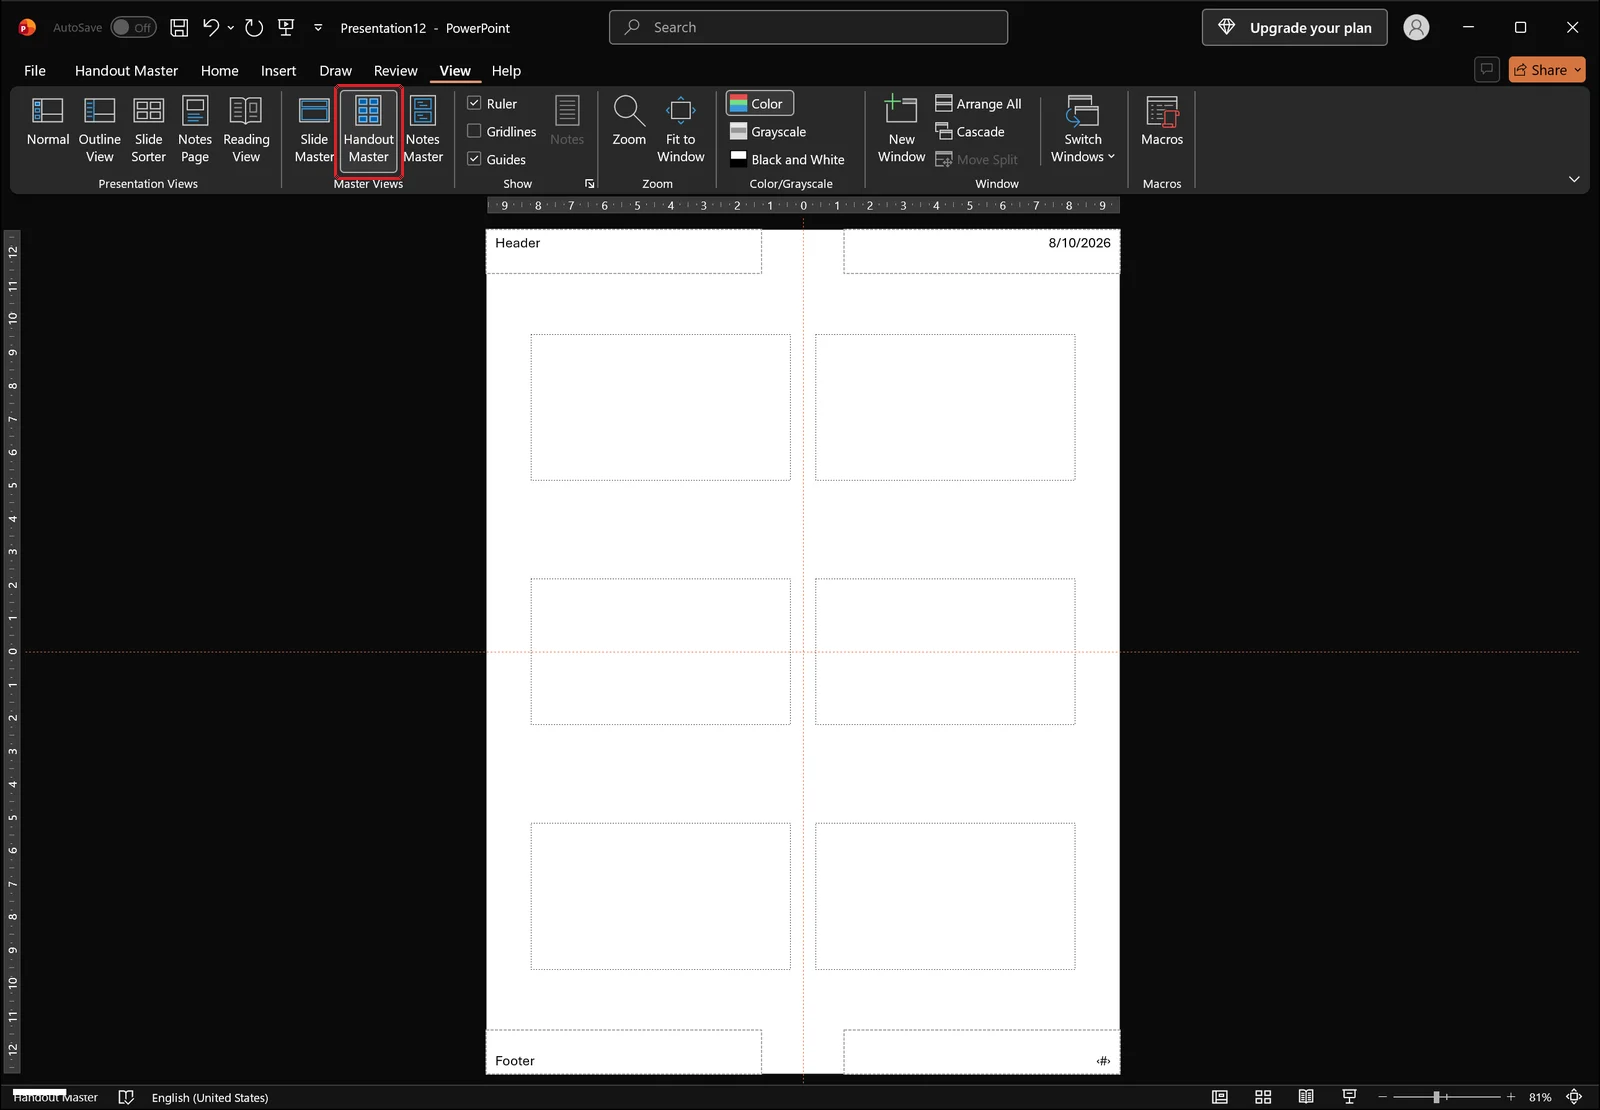
The number printed on a handout is separate from the slide number. Print in handout format and the page number from Handout Master appears in addition to the number on the slide itself, so one sheet can show two different digits. Open Handout Master on the View tab to inspect the header, footer, date, and page number placeholders around the page edges and remove whichever ones you do not want.
Frequently Asked Questions
Q. I checked Slide number but nothing shows up on any slide.
Usually the layout in use has no number placeholder, or the placeholder was pushed off the slide or covered by another object. Try Reset on the Home tab to restore placeholder positions, and if that fails, switch layouts from the Layout gallery. Then confirm in Slide Master that the layout actually contains a number placeholder, and that you clicked Apply to All in the Header & Footer dialog rather than Apply.
Q. I hid the cover number and now the second slide reads 2. How do I start at 1?
Hiding the number does not stop the cover from being counted. Go to Design > Slide Size > Custom Slide Size and set Number slides from to 0. The cover becomes 0 and the slide after it displays as 1.
Q. Can I hide numbers on just a few specific slides?
Select those slides, open the Header & Footer dialog, clear the Slide number checkbox, and click Apply. Be careful not to click Apply to All, which strips numbers from the entire deck. Deleting the number placeholder on those slides gives the same result, and either way the slides that follow keep their original numbering.
Q. When I print, I see two numbers on the page.
Printing in handout format stamps the Handout Master page number alongside the number already on the slide. Go to View > Handout Master and turn off the page number to leave only the slide number. If you prefer the reverse — page-based numbering only — turn off the slide number instead.
Q. Does the number update automatically when I reorder slides?
Yes, as long as it was inserted through Header & Footer. The number is a <#> field that reads each slide's current position, so moving, adding, or deleting slides renumbers the rest right away. Numbers typed into a text box do not update.
Reducing document work with inline AI
Slide numbering is a one-time setup, but the rest of building a deck is not: cleaning up tables, refreshing figures, and squaring formatting across slides come back every cycle. inline AI is a local agent that works directly on your Word and Excel files, so a request like "pull the delayed cases out of this sheet and summarize them" is carried out by reading and editing the file itself. Everything runs on your own machine rather than a cloud service, so internal reports and documents containing personal data stay where they are.
See what an agent could take over at your company in a 30-minute call.