Learn
Heading Styles in Word: Apply Heading 1 and 2, Then Edit Them

Making a line bold and bumping the font size up two points does not create a heading. As far as Word is concerned, that line is still a body paragraph that happens to look large. Learning how to apply and modify heading styles in Word starts with that distinction: when you use Heading 1 or Heading 2, the paragraph carries the information "this is a heading," and because of that, editing the style definition once updates every matching heading in the file. This guide covers applying the styles, editing their definitions to unify formatting, changing the overall look from the Design tab, and cleaning up a document where the formatting has already drifted.
What Actually Changes When You Use Heading Styles
Direct formatting vs. a real style
A draft where the chapter lines were only made bold and larger by hand looks fine on screen, but nothing about those paragraphs tells Word they are headings. If someone later asks you to make every chapter heading 14pt navy, you have to hunt down each one and change it manually. In a 30-page document, that is 30 repetitions of the same edit, and one of them will be missed.
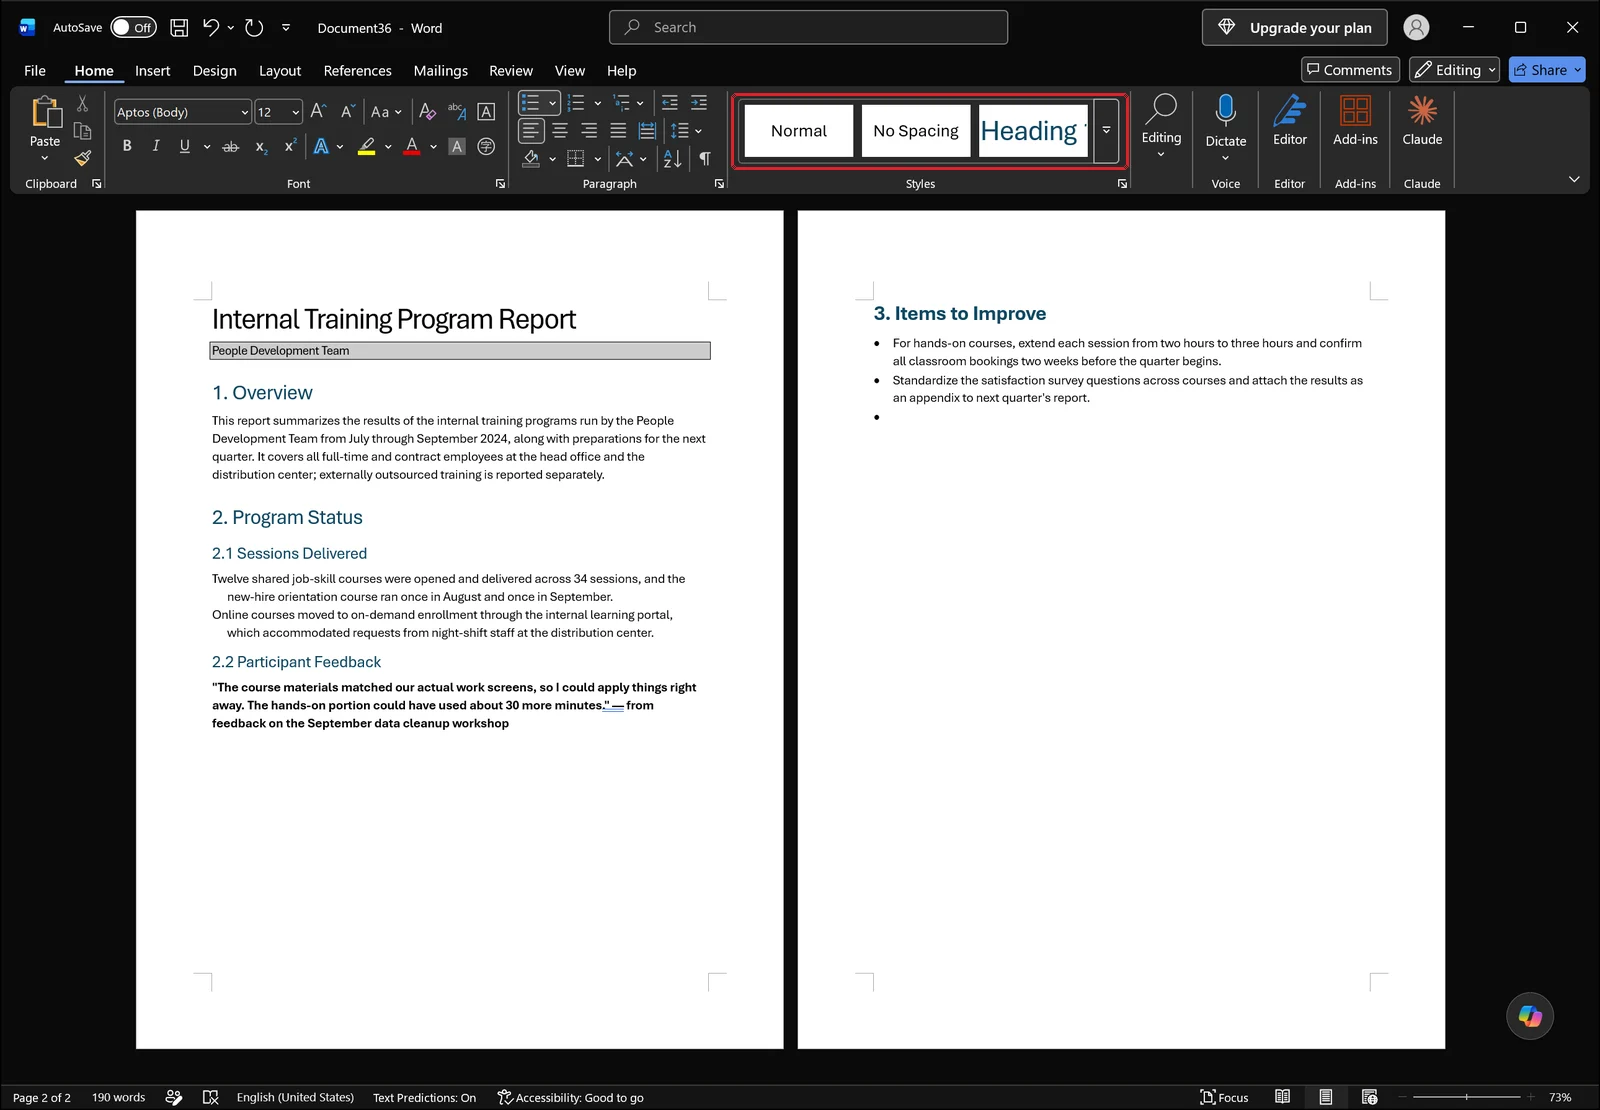
The report above uses real styles instead. Chapter-level lines such as 1. Overview and 2. Program Status are Heading 1, and the section under them, 2.1 Sessions Delivered, is Heading 2. The size and color differences you see are not typed in by hand; they come from the style definitions, which means they are consistent by default and editable in one place.
The Heading 1 / Heading 2 / Heading 3 hierarchy
The rule is straightforward. Heading 1 is your top level, Heading 2 is a subsection inside it, and Heading 3 is for the rare case where you need to split things further. Picking Heading 2 for a top-level chapter because you think it looks better breaks the hierarchy, and that mistake shows up the moment you generate a table of contents.
Also note that the big line at the very top of the document usually should not be Heading 1. Word ships with separate Title and Subtitle styles, and using them keeps the outline clean, since the document title is not one of your chapters.
Three things you get for free
Applying heading styles buys you more than consistent formatting. The Navigation Pane lists your headings in a collapsible hierarchy, the automatic table of contents on the References tab reads those headings directly, and Outline view lets you collapse or reorder whole sections at once. A heading made with bold text alone is invisible to all three.
Before You Start: Where the Styles Live
Expanding the Styles gallery
Heading styles sit in the Styles gallery on the right side of the Home tab. How many entries you see at once depends on your window width, so if the gallery only shows Normal, No Spacing, and Heading 1, click the More arrow at the right edge of the gallery to open the full list.
It is also common for Heading 2 to be missing entirely. Word hides lower-level heading styles until they become relevant, so once you apply Heading 1 somewhere in the document, Heading 2 appears in the gallery.
Opening the Styles pane for the full list
To see styles that never make it into the gallery, open the Styles pane with Alt+Ctrl+Shift+S. Style names are listed vertically, and hovering over a name shows a tooltip summarizing font, size, and spacing. When you just want to know what point size Heading 1 is currently set to, that tooltip is the fastest answer.
Applying Heading 1 and Heading 2 to Build the Structure
Put the cursor in the paragraph and click
Heading styles are paragraph styles, so you do not need to select the text. Click anywhere inside the line that should become a heading, then click Heading 1 in the gallery, and the whole paragraph takes the style.
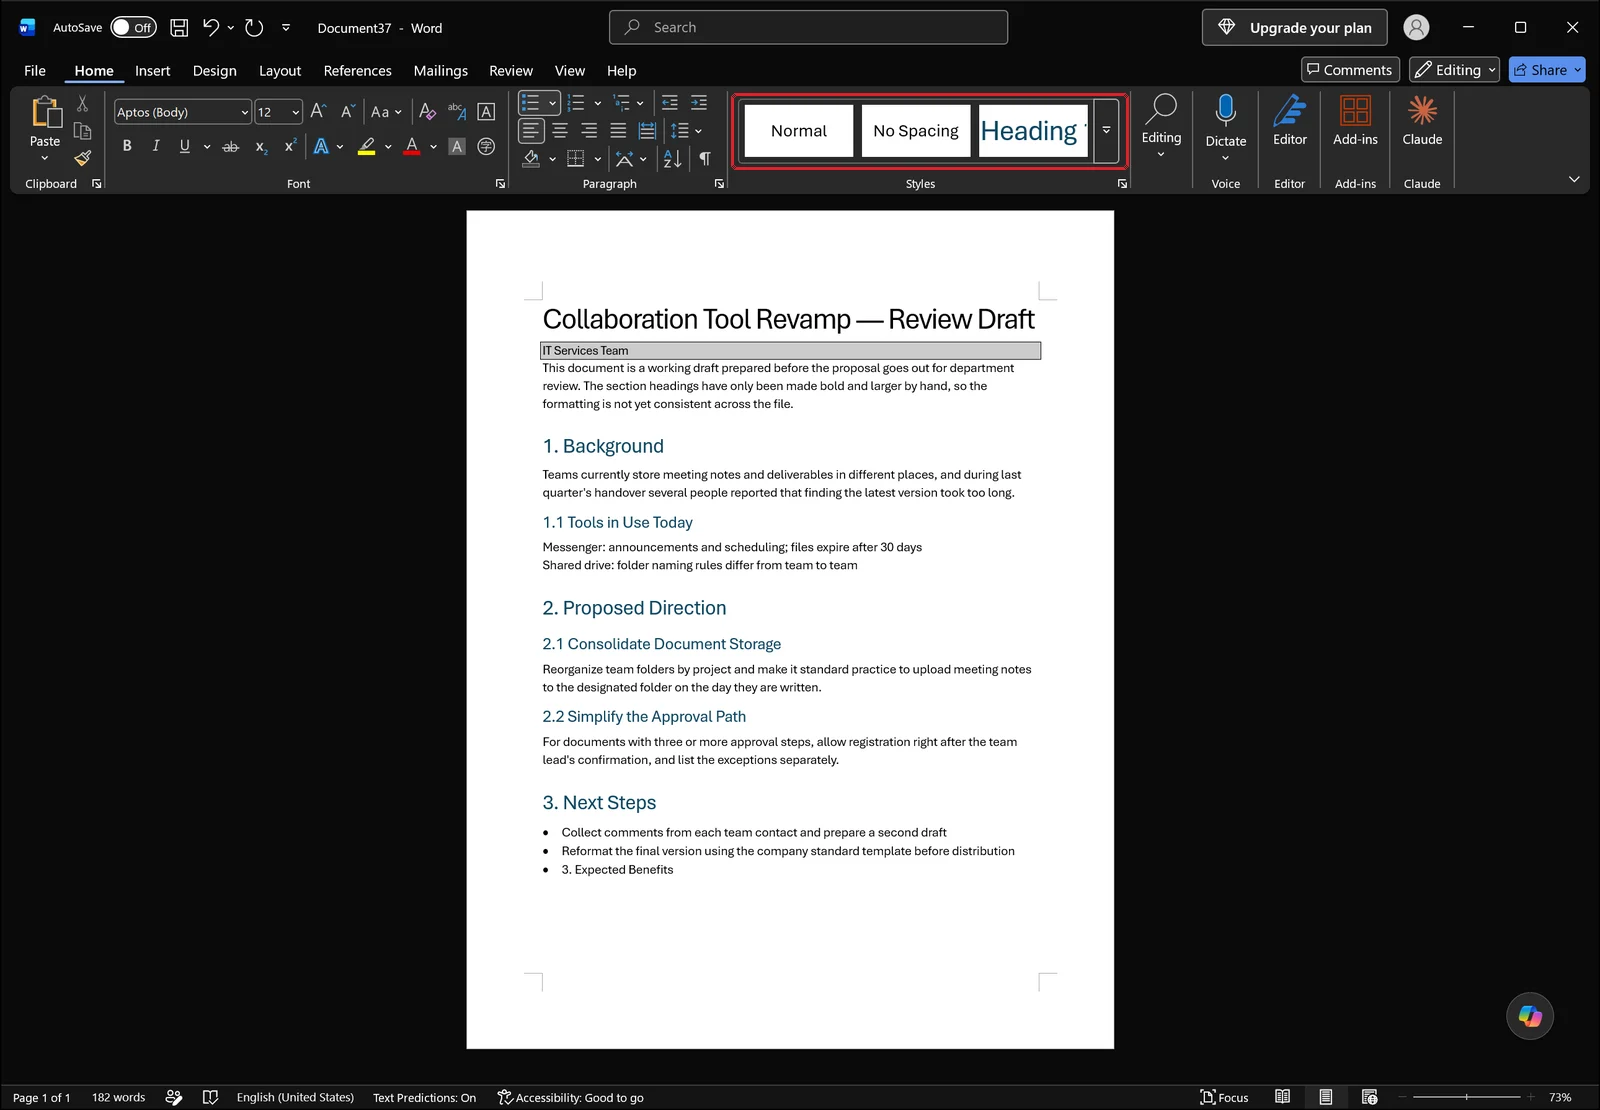
The draft above has a freshly typed line that is meant to be a heading but is still sitting in plain body formatting, inheriting whatever the surrounding paragraph had. Clicking inside it and choosing a style from the gallery is all it takes. If the level you want is not visible, open the gallery with the More arrow first.
To restyle several scattered headings in one pass, drag through the first paragraph, hold Ctrl while dragging through the rest, then click the style once.
Keyboard shortcuts
If reaching for the gallery slows you down, use Ctrl+Alt+1 for Heading 1, Ctrl+Alt+2 for Heading 2, and Ctrl+Alt+3 for Heading 3. When you are structuring a rough draft, scrolling from top to bottom and pressing just the first two is usually enough to get the skeleton in place.
Checking the result in the Navigation Pane
The most reliable way to confirm that a style actually stuck is the Navigation Pane. On the View tab, select the Navigation Pane check box in the Show group.
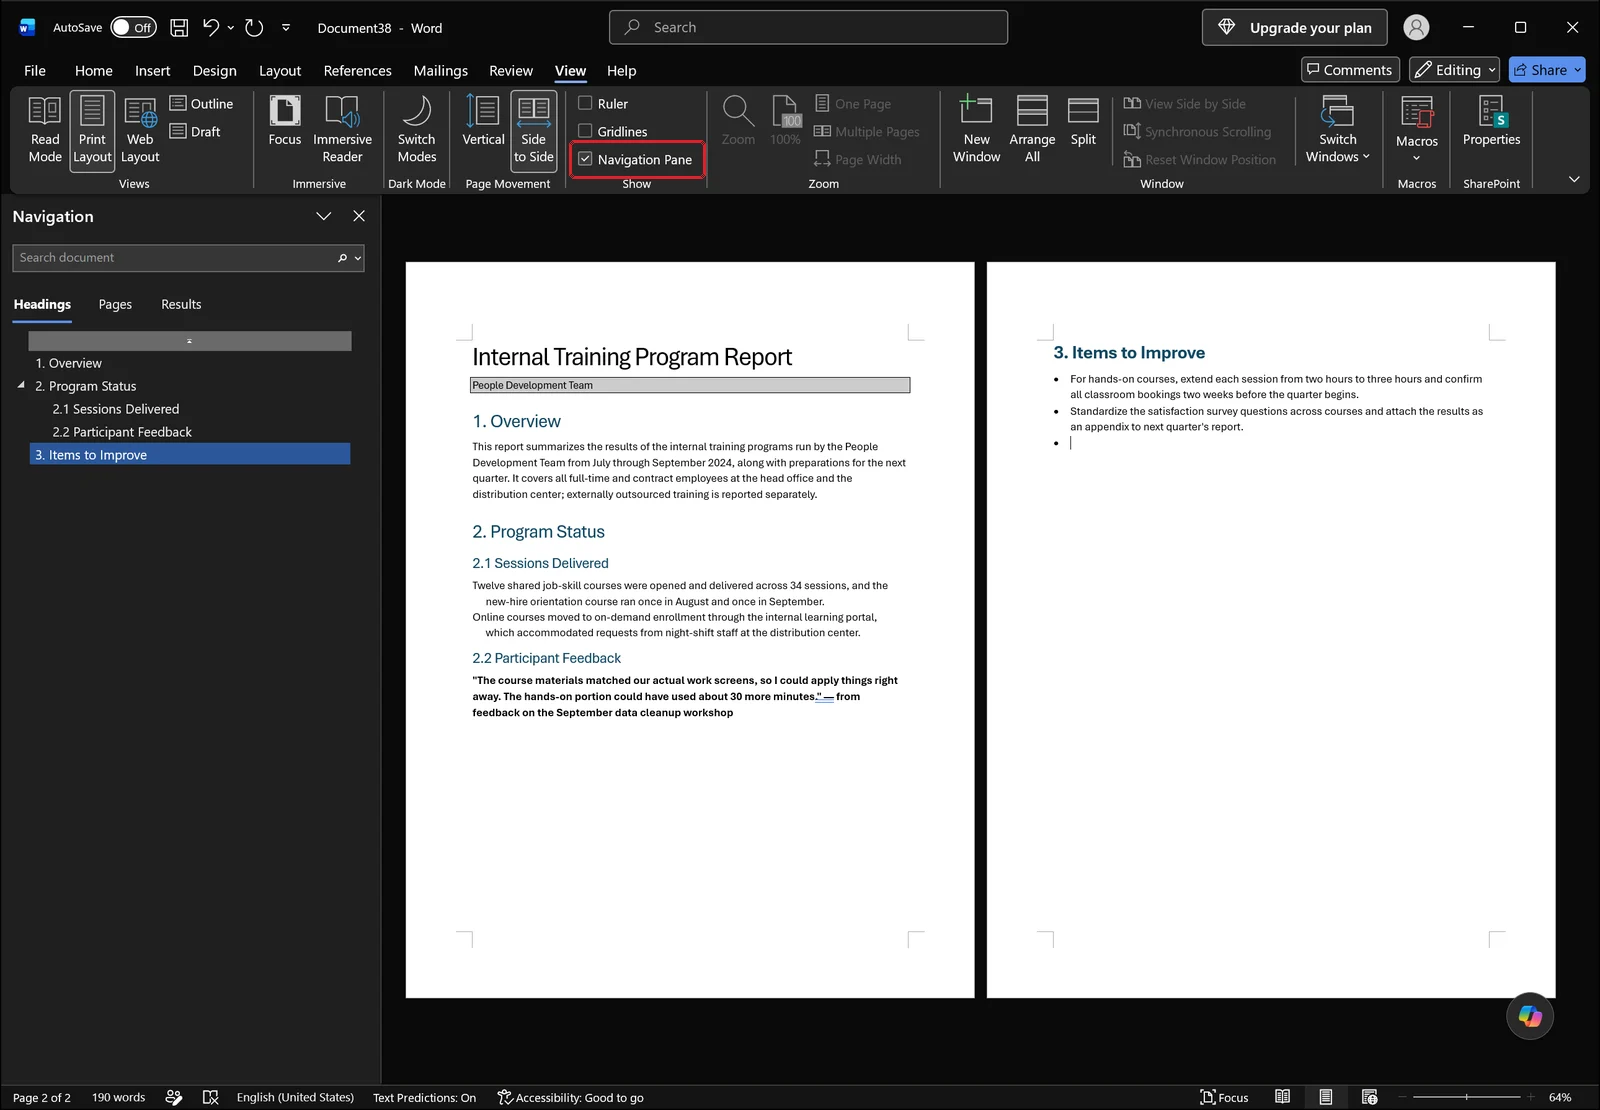
The pane opens on the left and lists the document's headings indented by level, with a Search document box at the top and Headings, Pages, and Results tabs underneath it. Anything missing from the Headings list is not a heading, no matter how it looks on the page. That is the clearest signal that the paragraph is still body text with manual formatting on top of it.
Spotting level mistakes in Outline view
When the problem is a wrong level rather than a missing style, Outline view is the better tool. Click Outline in the Views group on the View tab.
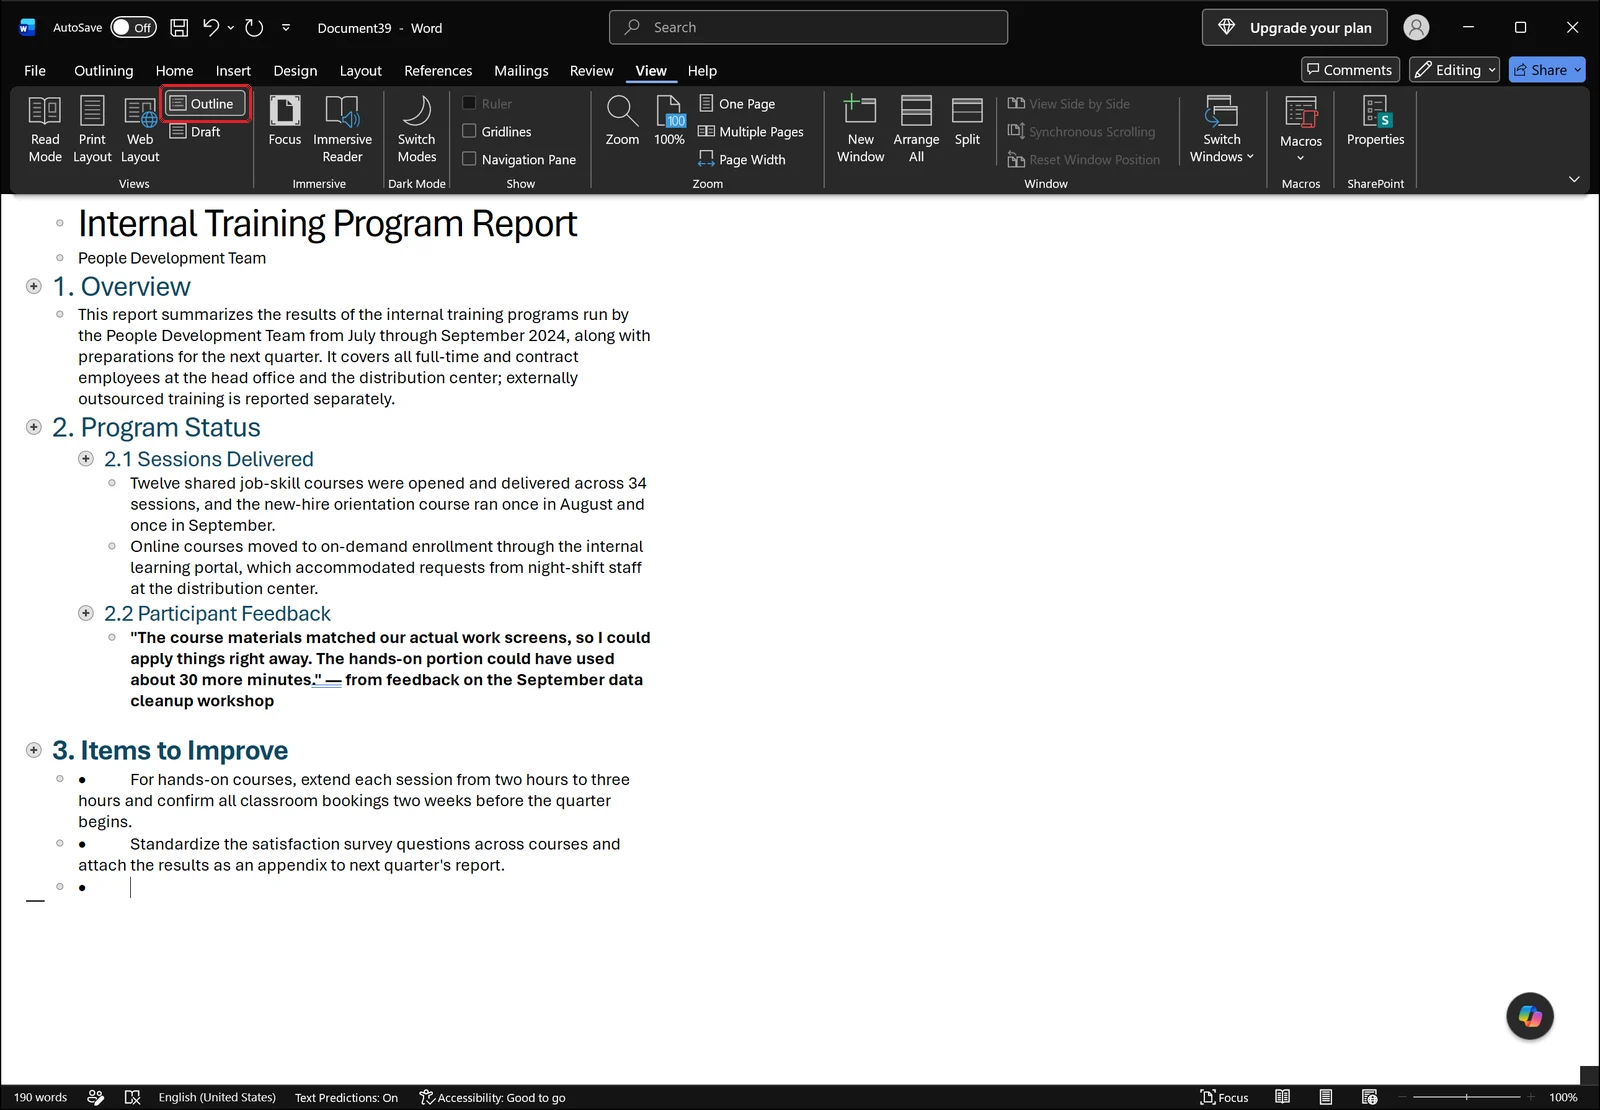
The document redraws as an indented outline: level 1 lines sit at the left margin and level 2 lines are indented beneath them, so a heading sitting at the wrong depth is obvious at a glance. Switching to this view also adds the Outlining tab to the ribbon, with promote and demote controls and an outline level list you can use to fix the offending line immediately.
👉 Numbered List in Word: Restart, Continue, and Turn Off Auto
Modify the Style to Unify Every Heading at Once
This is the part that makes the whole exercise worth it. If twenty paragraphs carry Heading 1, editing the Heading 1 definition once changes all twenty.
Right-click the style, then Modify
Right-click Heading 1 in the Styles gallery on the Home tab and choose Modify. The Modify Style dialog shows the style name and the style it is based on at the top, plus a formatting row in the middle for the common settings — font, size, color, alignment — that you can change without going any deeper.
Changing font, size, and color
For anything not on that row, use the Format button at the bottom left of the dialog and choose Font. The dialog that opens is the same one you get from the Home tab.
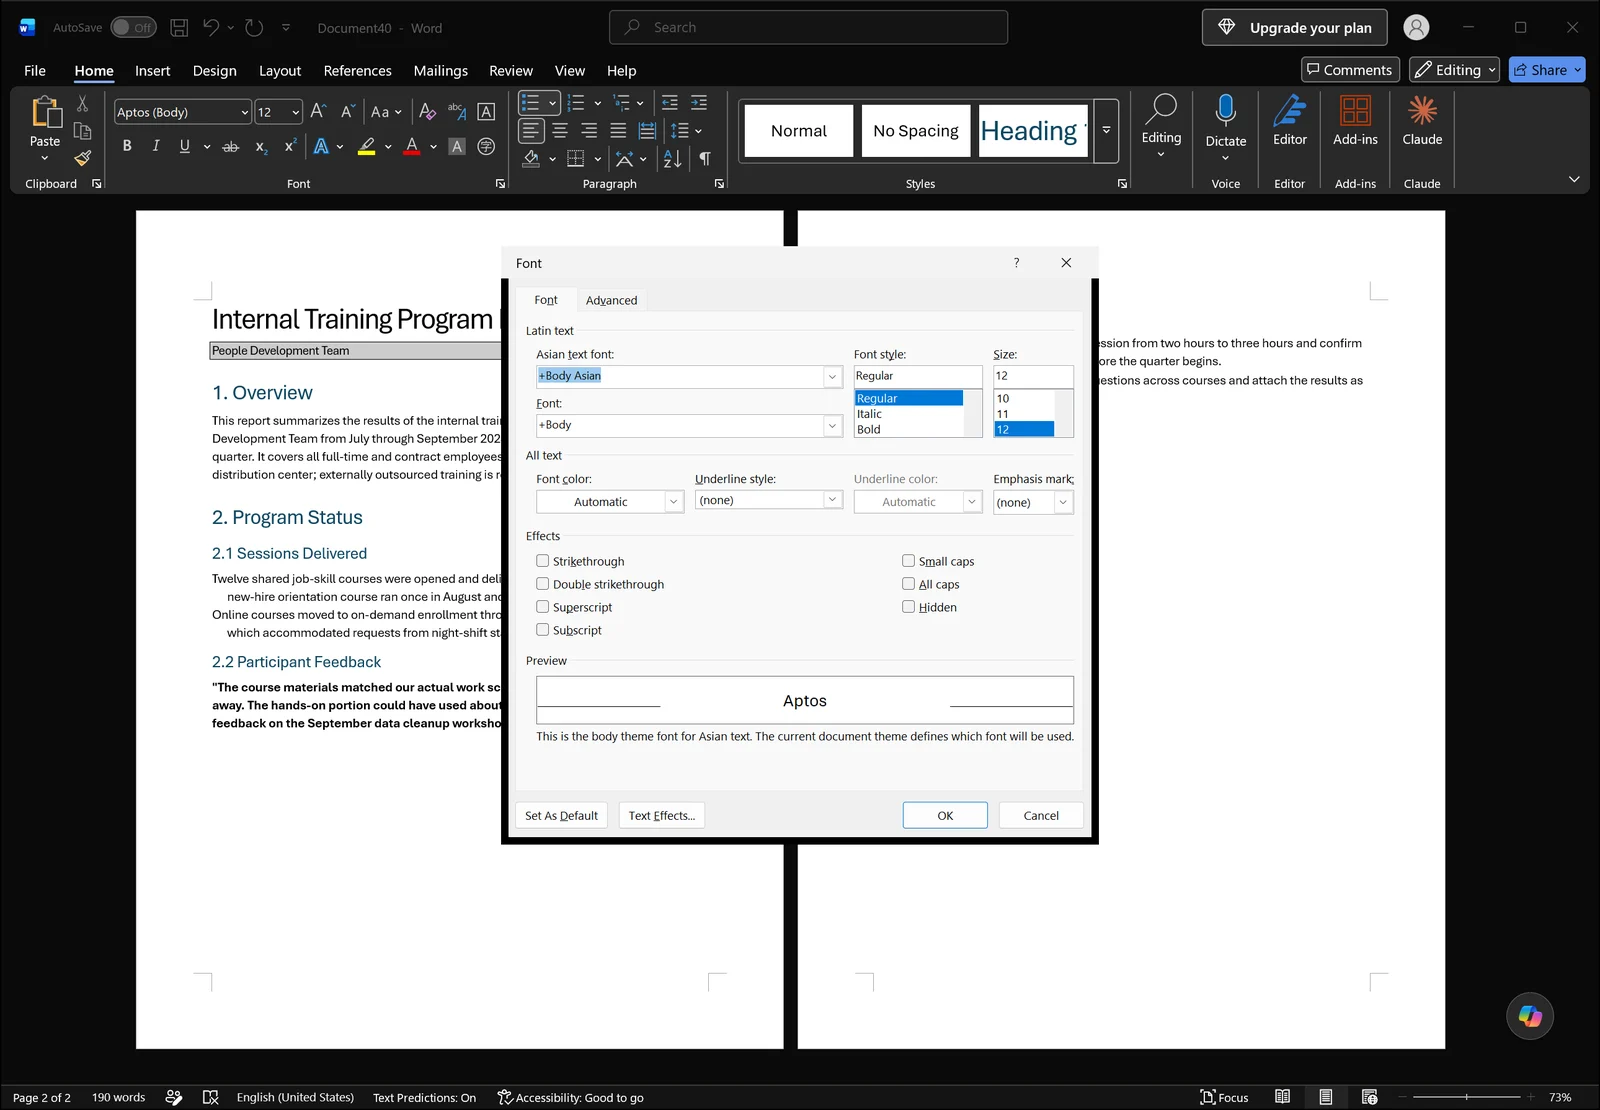
Set the font, the font style, the size, and the font color, watch the preview at the bottom, then click OK. When you opened it through Modify Style, OK returns you to the Modify Style dialog rather than closing everything, so you can move straight on to the paragraph settings.
Adjusting the space above and below a heading
If your headings are crowding the body text or floating too far from it, the spacing needs work. Open the Paragraph dialog from the launcher in the Paragraph group on the Home tab, or from Format > Paragraph inside Modify Style. Either route lands on the same Indents and Spacing tab.
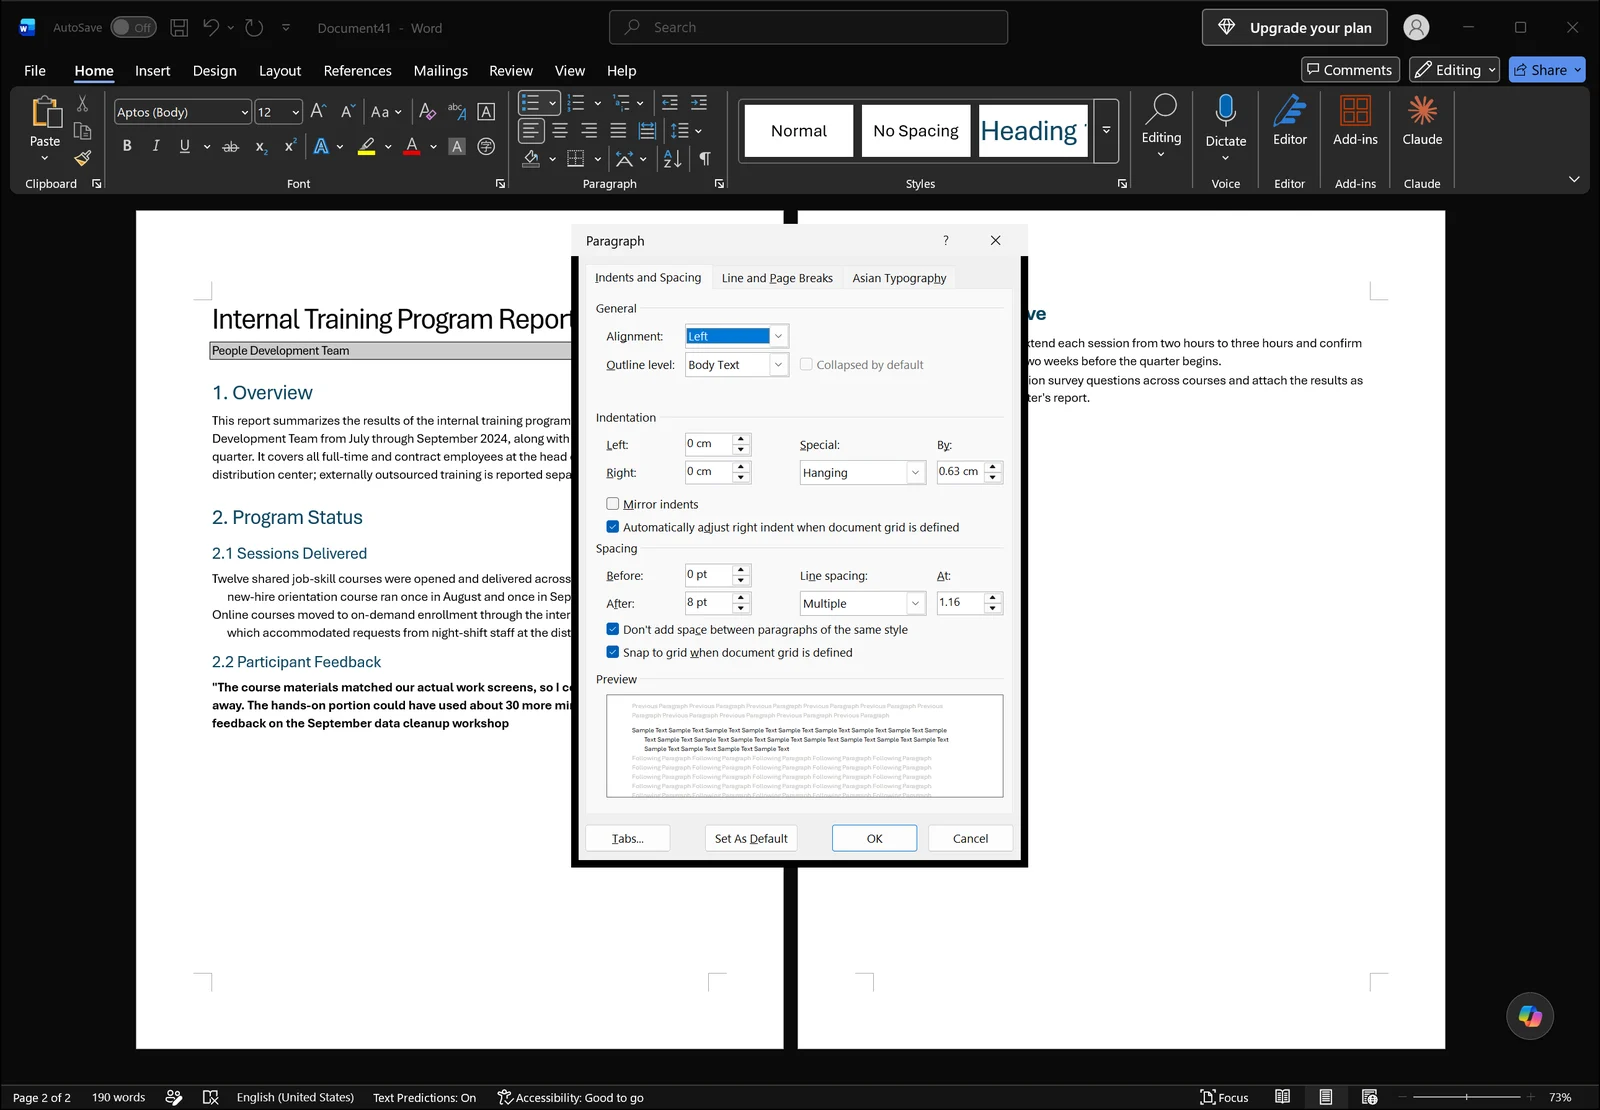
The screenshot above shows Before set to 0pt and After to 8pt — that's a typical body-paragraph value, not the recommended setup for a heading, so use it to see where the dialog lives rather than as target numbers. Spacing Before is the gap above the heading and Spacing After is the gap between the heading and the paragraph that follows it. For report headings, Before should be noticeably larger than After — that is what makes a new section feel like it starts, instead of drifting out of the previous one. The Outline level box on the same tab controls which level the paragraph is treated as in the table of contents and Navigation Pane, so leave it alone in a heading style; the style already sets it correctly.
If a heading keeps stranding itself at the bottom of a page with its body text on the next one, switch to the Line and Page Breaks tab in the same dialog and select Keep with next. Built-in heading styles usually have it on already, but it often gets cleared in documents that have been edited by several people.
This document only, or every new document
Near the bottom of the Modify Style dialog you choose between applying the change to this document only or to new documents based on this template. The default, this document only, keeps the change inside the current file.
The second option writes the change into the Normal template, so every new document you create from then on starts with your version of Heading 1. If your team has a standard template, that setting quietly puts every future file out of alignment with it, so leave it off unless you are deliberately defining your own personal defaults.
Changing the Overall Look from the Design Tab
Once styles are applied properly, you can change the entire feel of the document without touching a single style definition.
Swapping the style set
The Design tab holds a gallery of style sets in the Document Formatting group, each one a packaged combination of heading and body formatting.
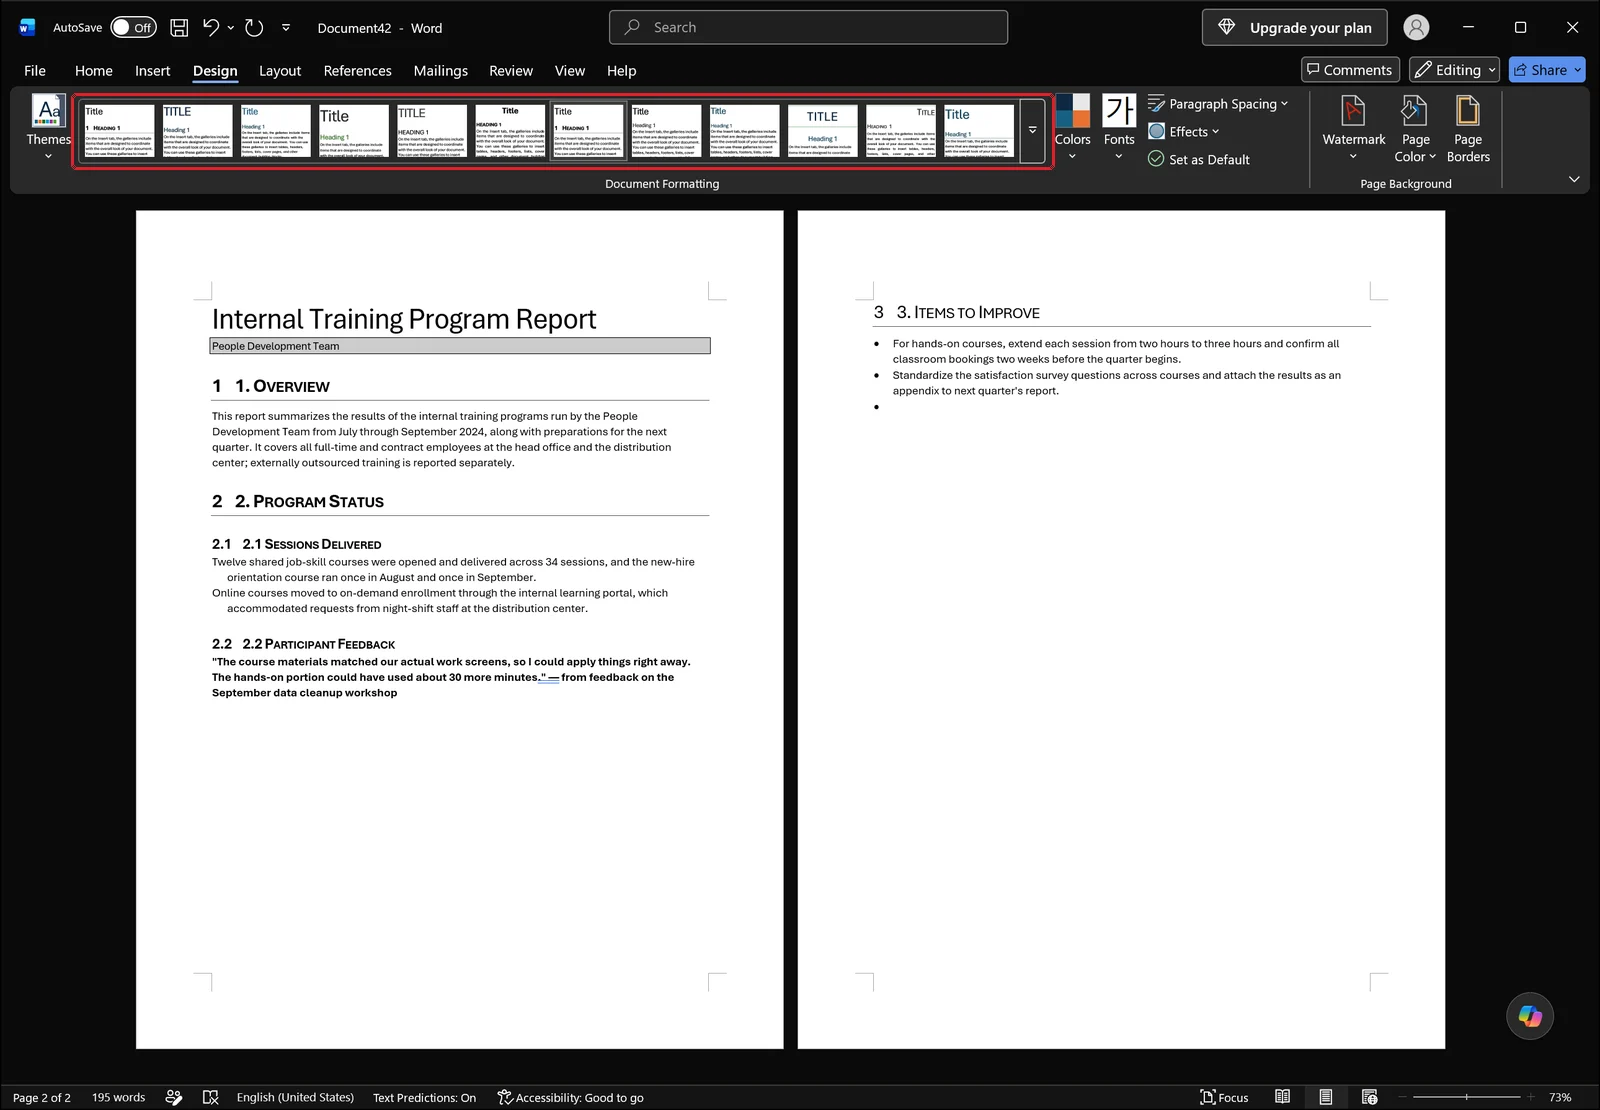
In the ribbon the gallery appears as the single row of thumbnails outlined above; click the More arrow, the small chevron at the right edge of that row, to expand it into a full grid. Hovering a thumbnail previews the change live in the document, and clicking commits it. Heading 1, Heading 2, and body text all change together, which means restyling a report takes exactly one click.
Changing heading and body fonts together
If fonts are all you want to change, use Fonts on the same tab. Each entry in the list is a pair: the heading font on top, the body font underneath.
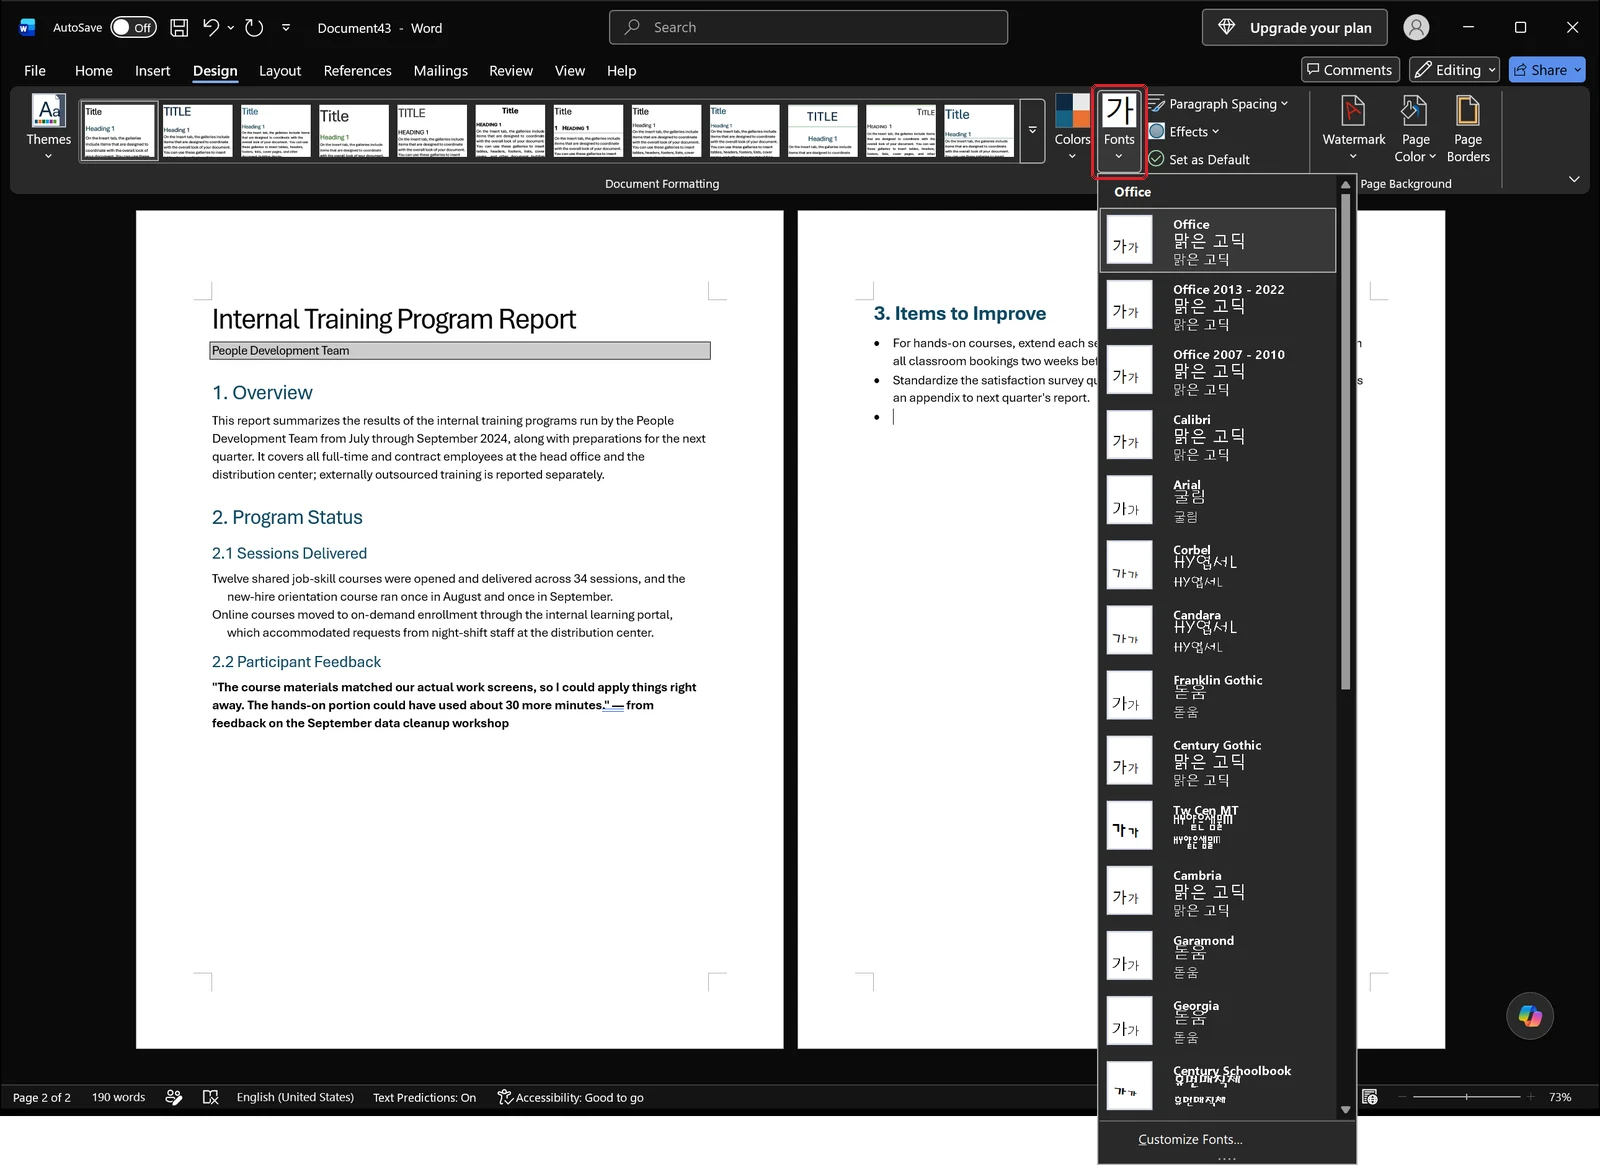
Pick a pair and every heading level switches to the heading font while body text switches to the body font. You never have to set a font individually per heading style.
Paragraph spacing presets
When the page feels cramped, or the opposite, open Paragraph Spacing.
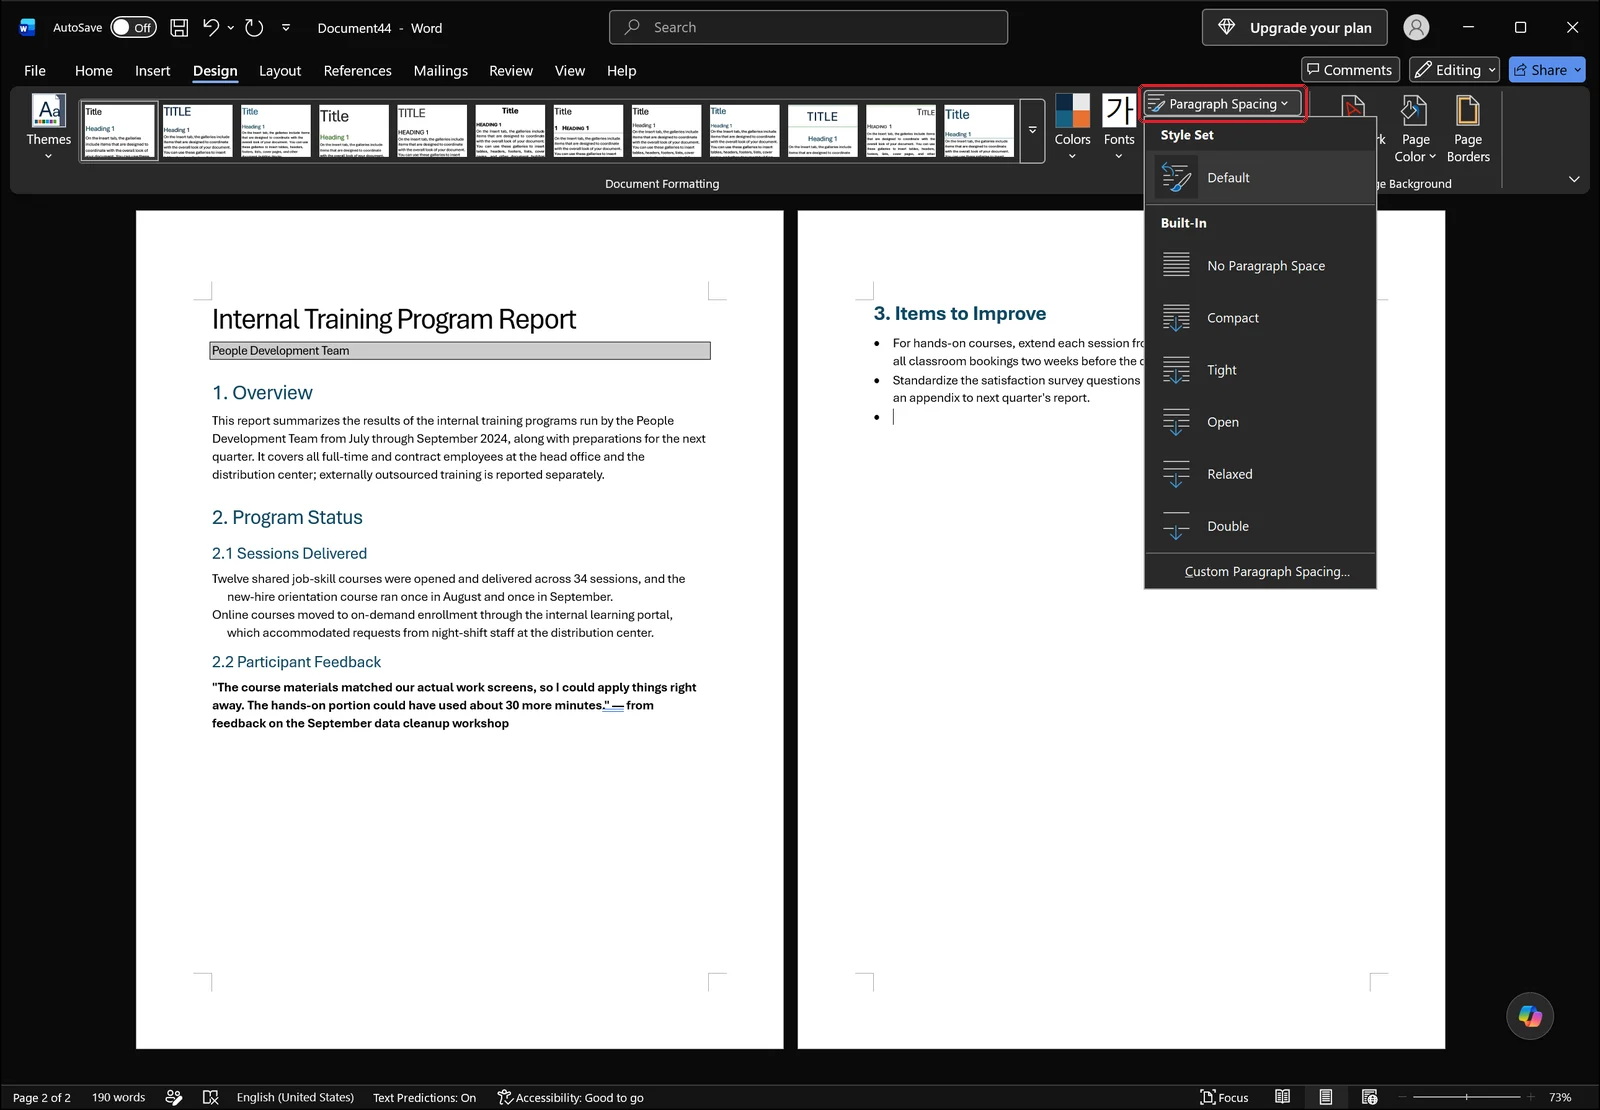
The list runs from No Paragraph Space through Compact, Tight, Open, Relaxed, and Double, with a custom paragraph spacing command at the bottom if you want to type exact values. It adjusts paragraph spacing and line spacing across the whole document at once, which is handy when you are trying to squeeze a report back onto a set number of pages.
Every method in this section only affects paragraphs that carry a style. Headings you built with bold text and a larger font size will sit there unchanged while everything around them shifts — which is exactly why applying Heading 1 and Heading 2 comes first.
👉 How to Change Line Spacing in Word: 1.5, Exact pt, and Fixes
When Styles Drift: Resetting and Troubleshooting
If your headings are subtly inconsistent — same style name, but one is a shade darker or a point larger — direct formatting has been layered on top of the style. Word keeps both, and the manual formatting wins.
Clearing formatting and starting over
The fastest reset is to strip the paragraph back to nothing and reapply the style. Put the cursor in the paragraph and click Clear Formatting in the Font group on the Home tab.
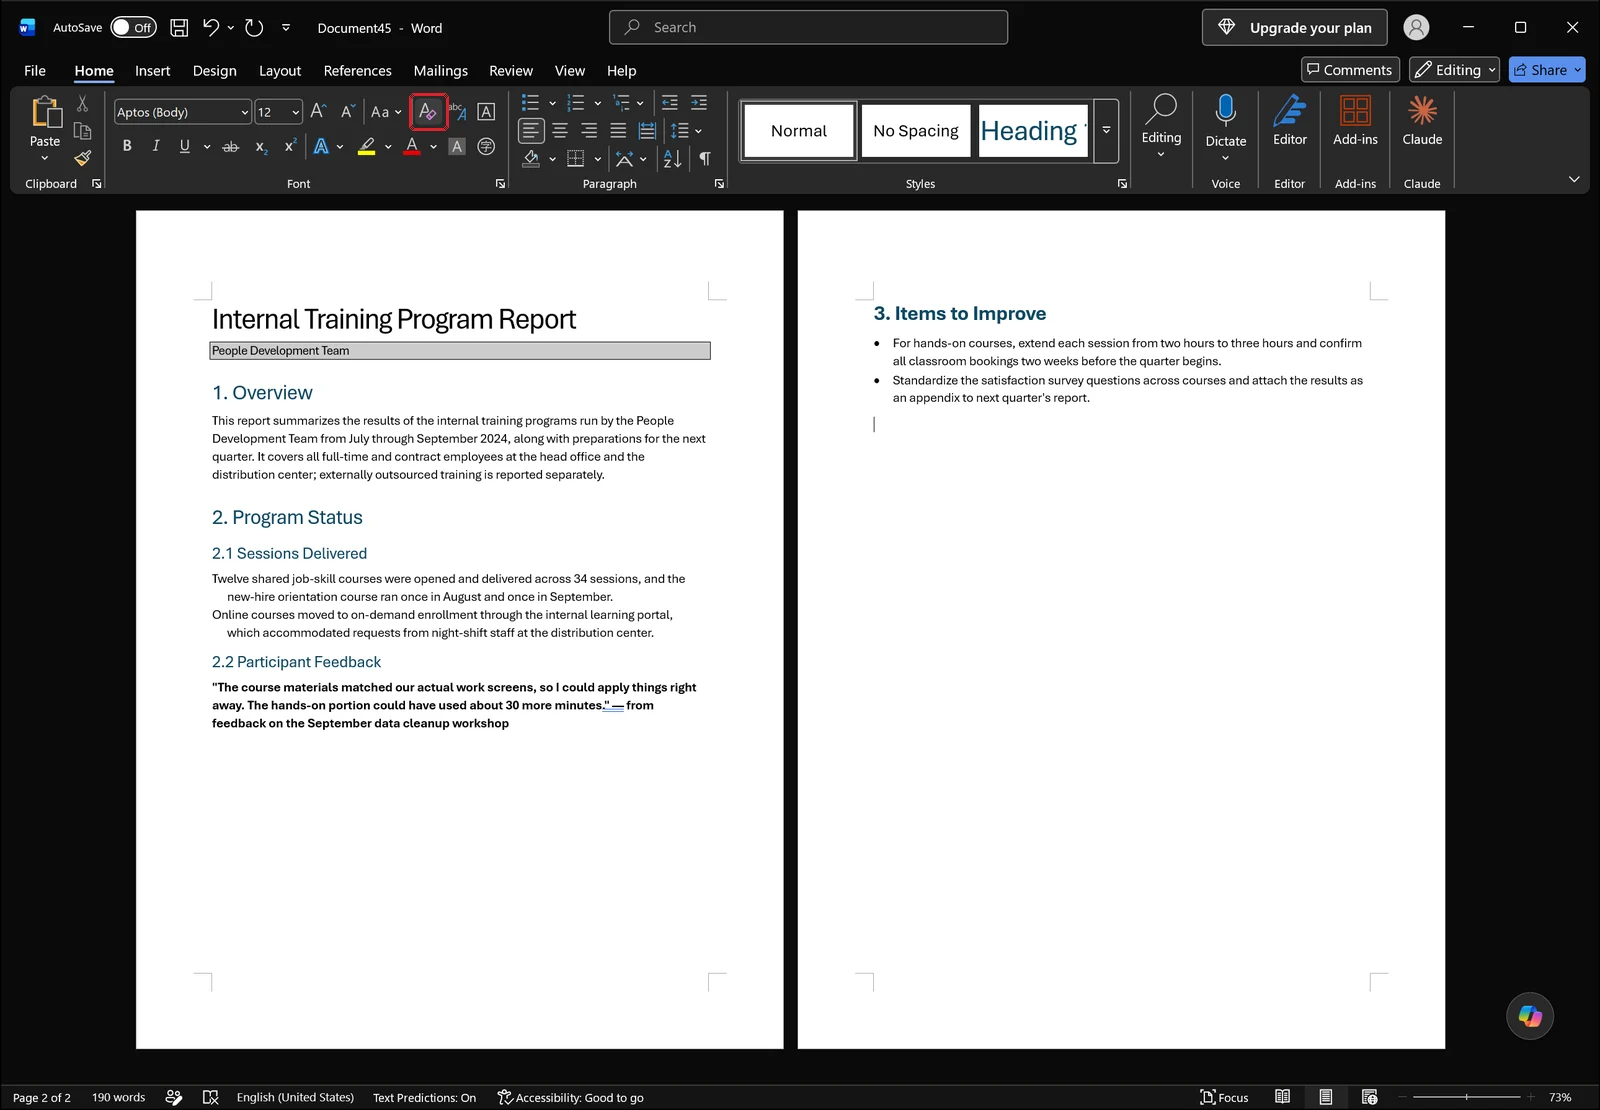
The paragraph drops to plain left-aligned body text in the default font, as shown above, while the other headings keep their styling. Click Heading 1 again and you get a clean heading that matches the style definition exactly. Note that Ctrl+Space only clears character formatting and leaves the paragraph style in place, so use the button when you want a full reset.
Copying formatting from a heading that already works
If one heading in the document is already correct, you can copy its formatting onto others. Click inside the correct heading paragraph, then click Format Painter in the Clipboard group at the left end of the Home tab, and drag across the paragraph you want to fix.
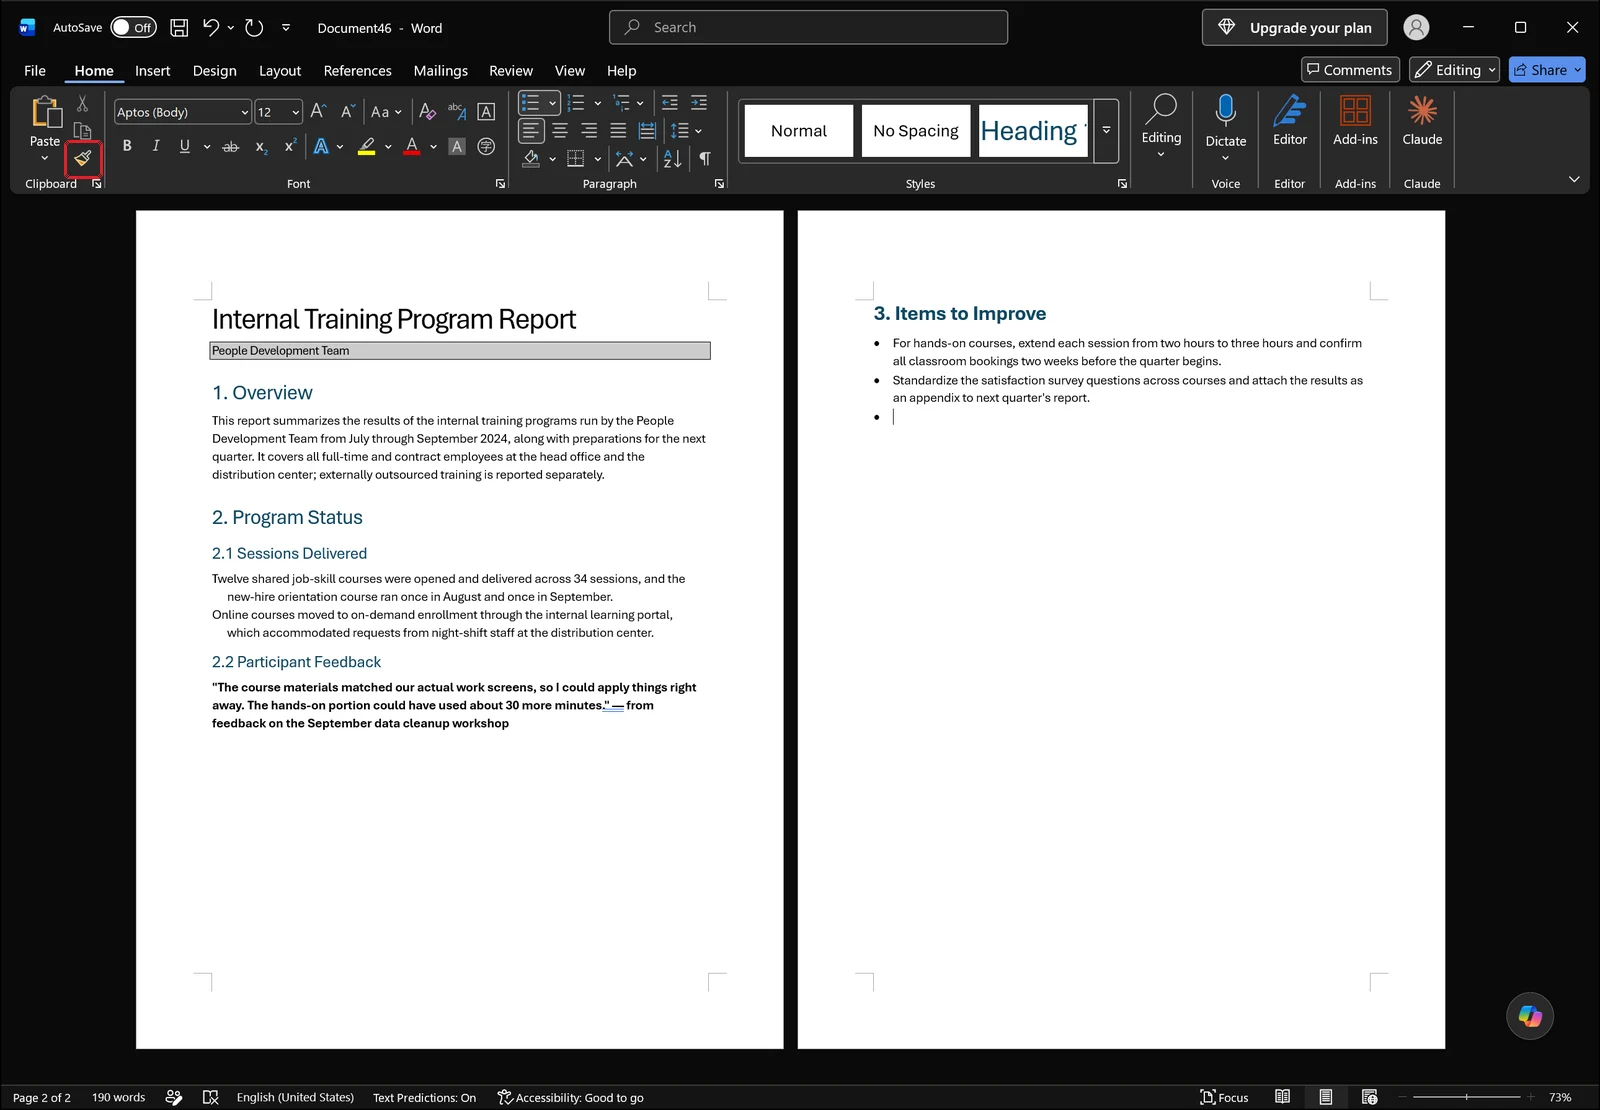
Double-clicking the button locks it on so you can keep painting paragraph after paragraph; Esc releases it. Format Painter matches the appearance, though, not the underlying rule, so for cleaning up a whole document, editing the style definition remains the easier thing to maintain.
Adding a style you use often to the gallery
If a style you need never shows up in the gallery, open the Styles pane, click the arrow next to the style name, and choose Add to Style Gallery. From then on it is one click away on the Home tab.
Using a table of contents as the final check
When the structure is done, insert a table of contents and read it as a checklist. On the References tab, click Table of Contents.
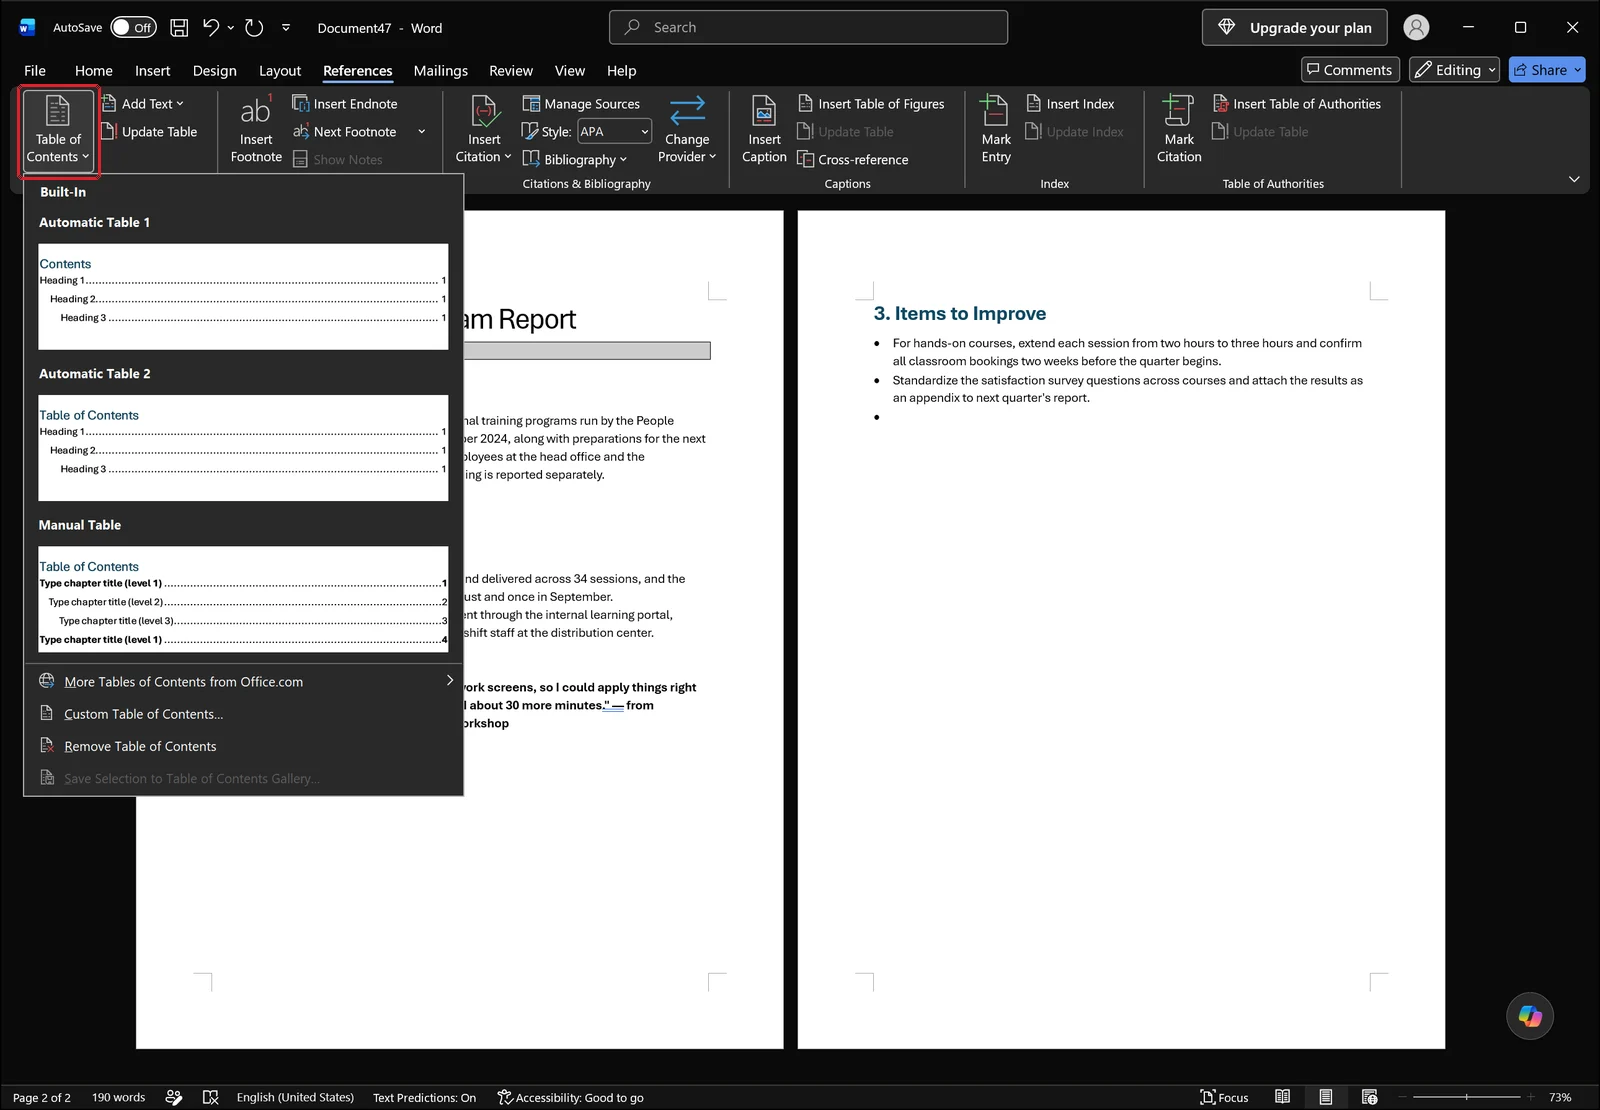
The gallery lists automatic table thumbnails alongside a manual table and a custom table of contents command. Insert an automatic table, and anything missing from it is a paragraph that never got a heading style. Anything indented at the wrong depth means Heading 1 and Heading 2 got swapped. The table of contents is both the deliverable and the audit.
Frequently Asked Questions
Q. I applied a heading style, but the heading is not in the Navigation Pane.
That paragraph is almost certainly still Normal with bold and a larger size applied by hand. Click inside the line and check which entry is highlighted in the Styles gallery on the Home tab. If it shows Normal, click Clear Formatting and then apply Heading 1 again, and the line will appear in the pane.
Q. How do I reuse an edited heading style in other documents?
In the Modify Style dialog, choosing the option for new documents based on this template saves the change to the Normal template, so future new documents start with your heading formatting. To move it into documents that already exist, it is cleaner to save the finished file as a template (.dotx) and start new documents from that file.
Q. Can Word number my headings as 1., 1.1 automatically?
Yes. Open Multilevel List on the Home tab and pick the list type that is linked to the heading styles. Heading 1 paragraphs then get 1., 2., and Heading 2 paragraphs get 1.1, 1.2, with the numbering recalculated whenever you reorder sections. Numbers you typed yourself have to be corrected by hand every time the order changes.
Q. Can I reset the styles back to Word's defaults?
Expand the style set gallery on the Design tab and use the command at the bottom that restores the document to the template's formatting. If only a few paragraphs are broken, there is no need to reset the whole file — click Clear Formatting on those paragraphs and reapply the heading style.
Cleaning Up Document Formatting with inline AI
Editing a style definition solves one file quickly, but it does nothing for the pile of documents where headings were built with bold text and a larger font size in the first place. Someone still has to read through each one, decide which paragraphs are headings, and apply the right level by hand.
inline AI is a desktop AI that runs on your PC and can open Word files directly, inspect the paragraph structure, and apply styles according to the rules you describe. You can write something like "make bold paragraphs that start with a number Heading 1, and paragraphs starting with 1.1 Heading 2," and it reads the file, makes the changes, and saves the result.
Because the work happens on your own machine, internal drafts that have not been reviewed yet never get uploaded to an outside server.
See what an agent could take over at your company in a 30-minute call.