Learn
PowerPoint Line Spacing: Set Exact Multiples and Point Values

There are two ways to set PowerPoint line spacing, and the one you want depends on whether you already know the number. Common values like 1.0 or 1.5 take a single click on the Home tab. Anything more specific, like a 1.2 multiple or a fixed 20pt row height, requires the Paragraph dialog. Add the space before and after each paragraph and you have covered nearly every case of body text that either looks cramped or spills past the placeholder. This guide walks through where both controls live, what values to type, how to push the same settings across a whole deck, and what to check when the number changes but the slide looks identical.
Line Spacing vs. Paragraph Spacing: What Each One Moves
Before typing any value, separate these two settings in your head. Confusing them is why people keep changing numbers and never get the layout they want.
Line spacing is between rows, paragraph spacing is between items
Line spacing is the distance between rows inside a single paragraph. When one sentence wraps onto two or three lines, line spacing decides how far apart those lines sit. Paragraph spacing is the distance from the end of one paragraph to the start of the next. Every bullet item is its own paragraph, so the gap between list items is controlled by paragraph spacing, not line spacing.
When everything is loose at once — wide rows and wide gaps between items — tightening line spacing alone tends to jam the items together and make the list harder to scan. A better result usually comes from keeping line spacing near 1.0 and leaving 6–10pt between paragraphs, so the items stay distinct while the block stops feeling padded.
Multiple vs. exact point values
You can enter line spacing two different ways. A multiple scales with the font size: set 0.9, 1.0, or 1.2, and if you later bump the text from 20pt to 24pt, the spacing grows with it. An exact value pins the row height in points regardless of font size, so putting 20pt exact on 24pt text will clip the tops of the letters.
The rule of thumb: use a multiple for body text whose font size might still change, and an exact value where row heights have to stay uniform, like tables or tightly aligned lists. When you do use an exact value, keep it at 1.2–1.3 times the font size or higher to stay safe.
Where both settings live on the ribbon
Both controls sit in the Paragraph group on the Home tab. Below, the body placeholder is selected and the Line Spacing button in that group is boxed in red.
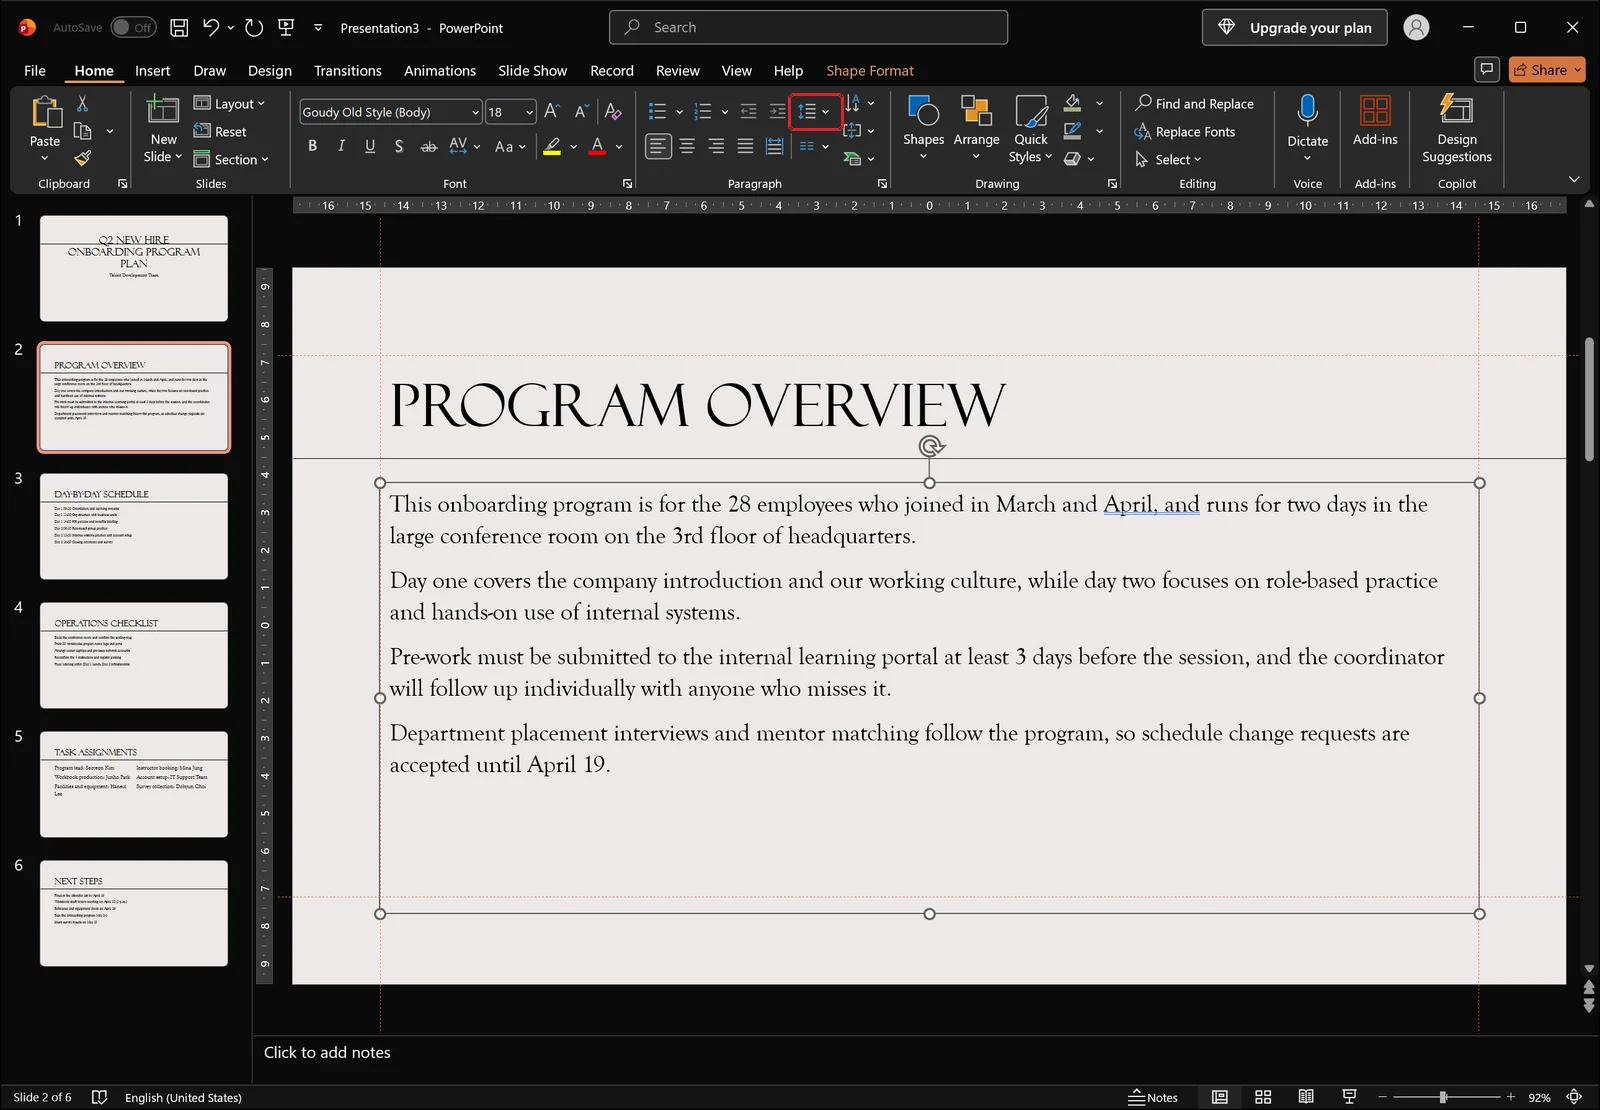
Clicking that button gives you the common presets right away. Decimal multiples like 1.2, exact point values, and space before and after paragraphs all live one level deeper, in the Paragraph dialog. PowerPoint's preset list only carries round numbers such as 1.0, 1.5, and 2.0, so anything finer has to go through the dialog.
Before You Adjust: Check Your Selection and Turn On the Ruler
The single biggest reason the same command produces different results is what you had selected. Depending on that, one paragraph changes or the entire box does.
Clicking the placeholder border applies to the whole object
Click once inside the text to place a cursor, then click the border again and the object itself becomes selected. You are in that state when the box shows a border and sizing handles all the way around.
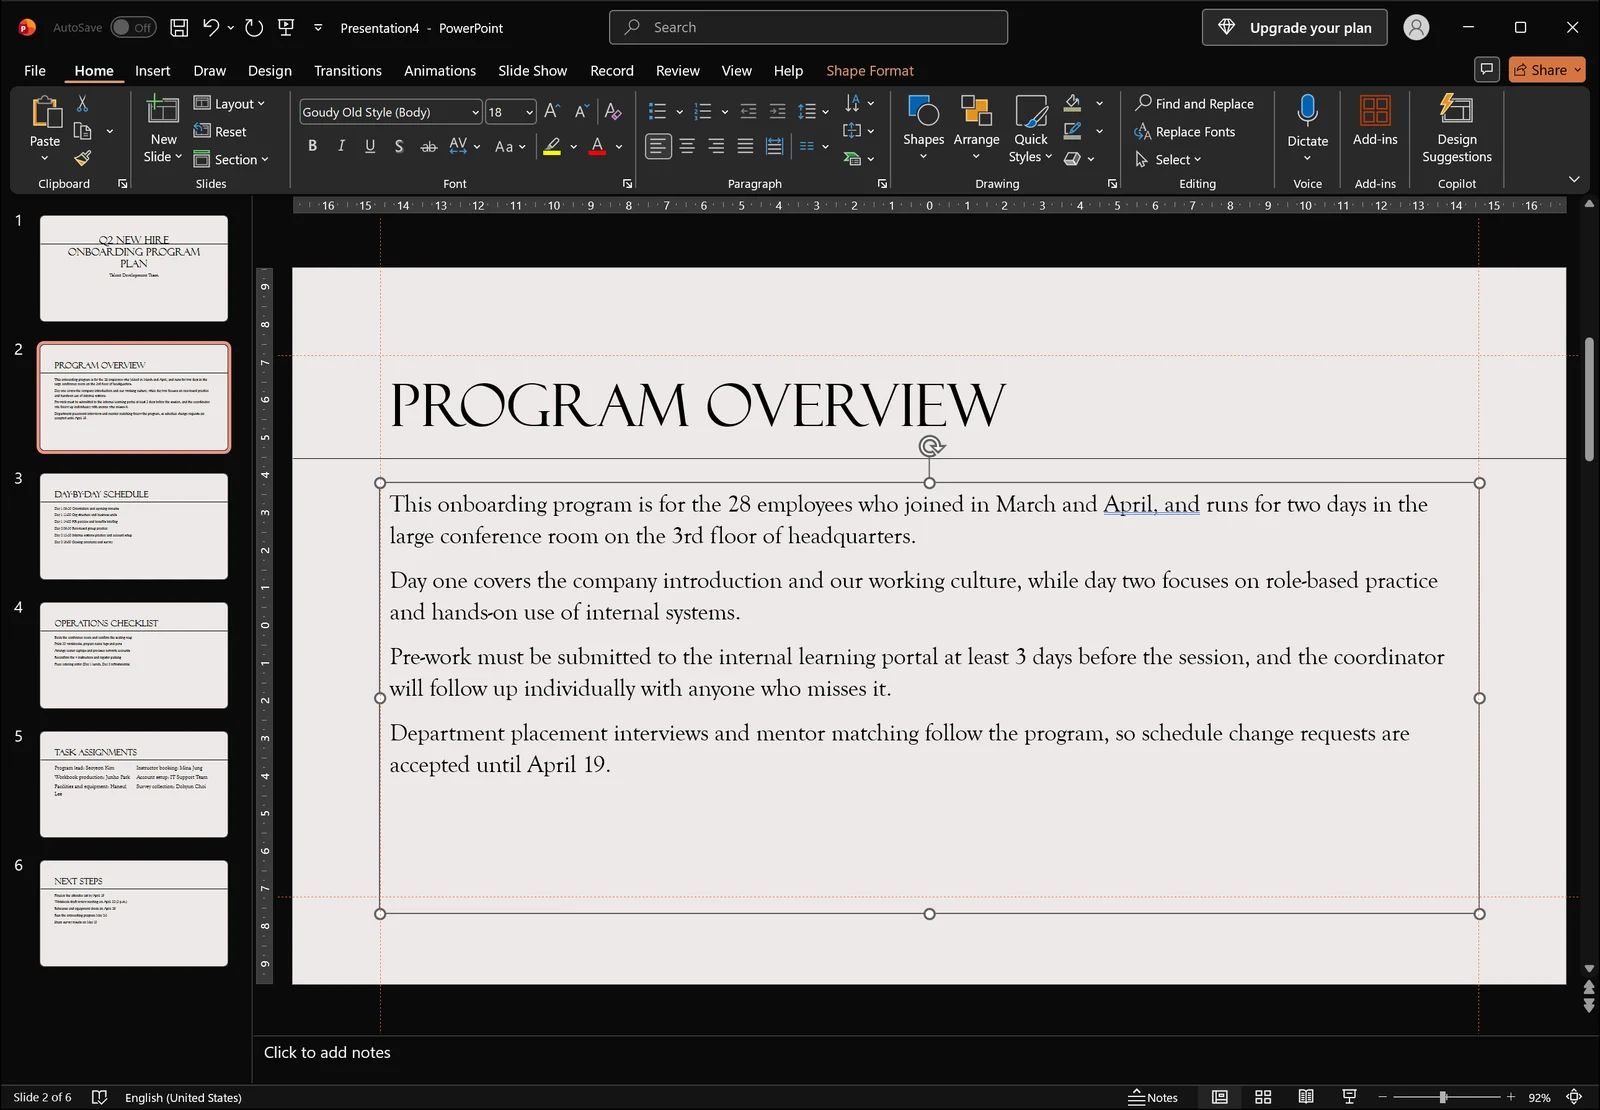
Change line spacing now and every paragraph inside the box updates at once. This is the fastest way to clean up a single slide from top to bottom.
A blinking cursor changes only that paragraph
If the cursor is just blinking inside the text with nothing highlighted, only the paragraph containing the cursor changes. That is what you want when a specific item needs to be tighter or looser than the rest. To select all the text in the box, click inside it and press Ctrl+A.
Testing a few values is faster than reasoning about them. Ctrl+Z undoes instantly, so applying 0.9 and 1.0 back to back and judging by eye usually gets you there in seconds.
The Ruler tells you whether indentation is the real problem
Sometimes no amount of line spacing fixes a cramped block because the actual culprit is indentation. On the View tab, turn on the Ruler checkbox in the Show group and a horizontal ruler appears above the slide editing area, with indent markers visible whenever the cursor is in text.
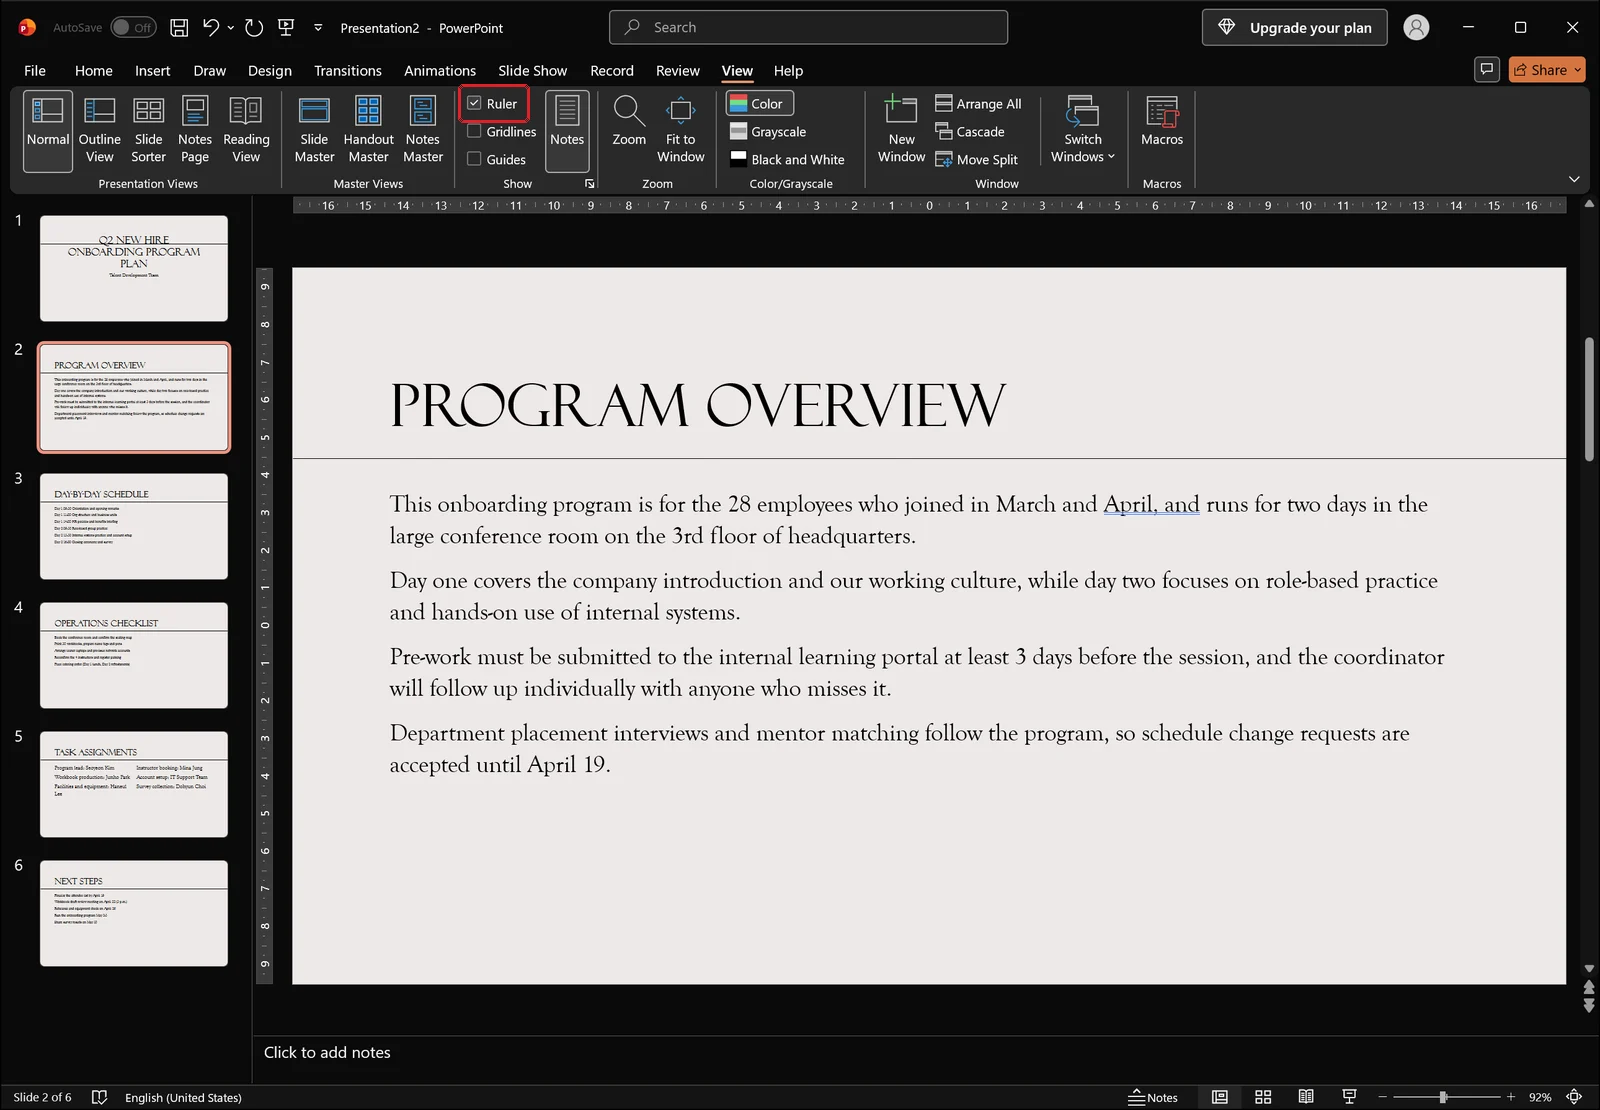
If those markers are pushed well to the right, the text has less horizontal room, wraps more often, and eats more vertical space as a result. In that case fix the indent first and revisit line spacing afterward.
👉 PowerPoint Bullets and Numbering: Fix Spacing and List Levels
Apply 1.0, 1.5, or 2.0 from the Line Spacing Button
If you have not settled on a specific number yet, picking from the preset list is the quickest way to find one.
Open Line Spacing in the Home tab Paragraph group
Select the text box, then click Line Spacing in the Paragraph group on the Home tab. The menu lists values such as 1.0, 1.5, 2.0, 2.5, and 3.0, with a command at the bottom that opens the fuller settings.
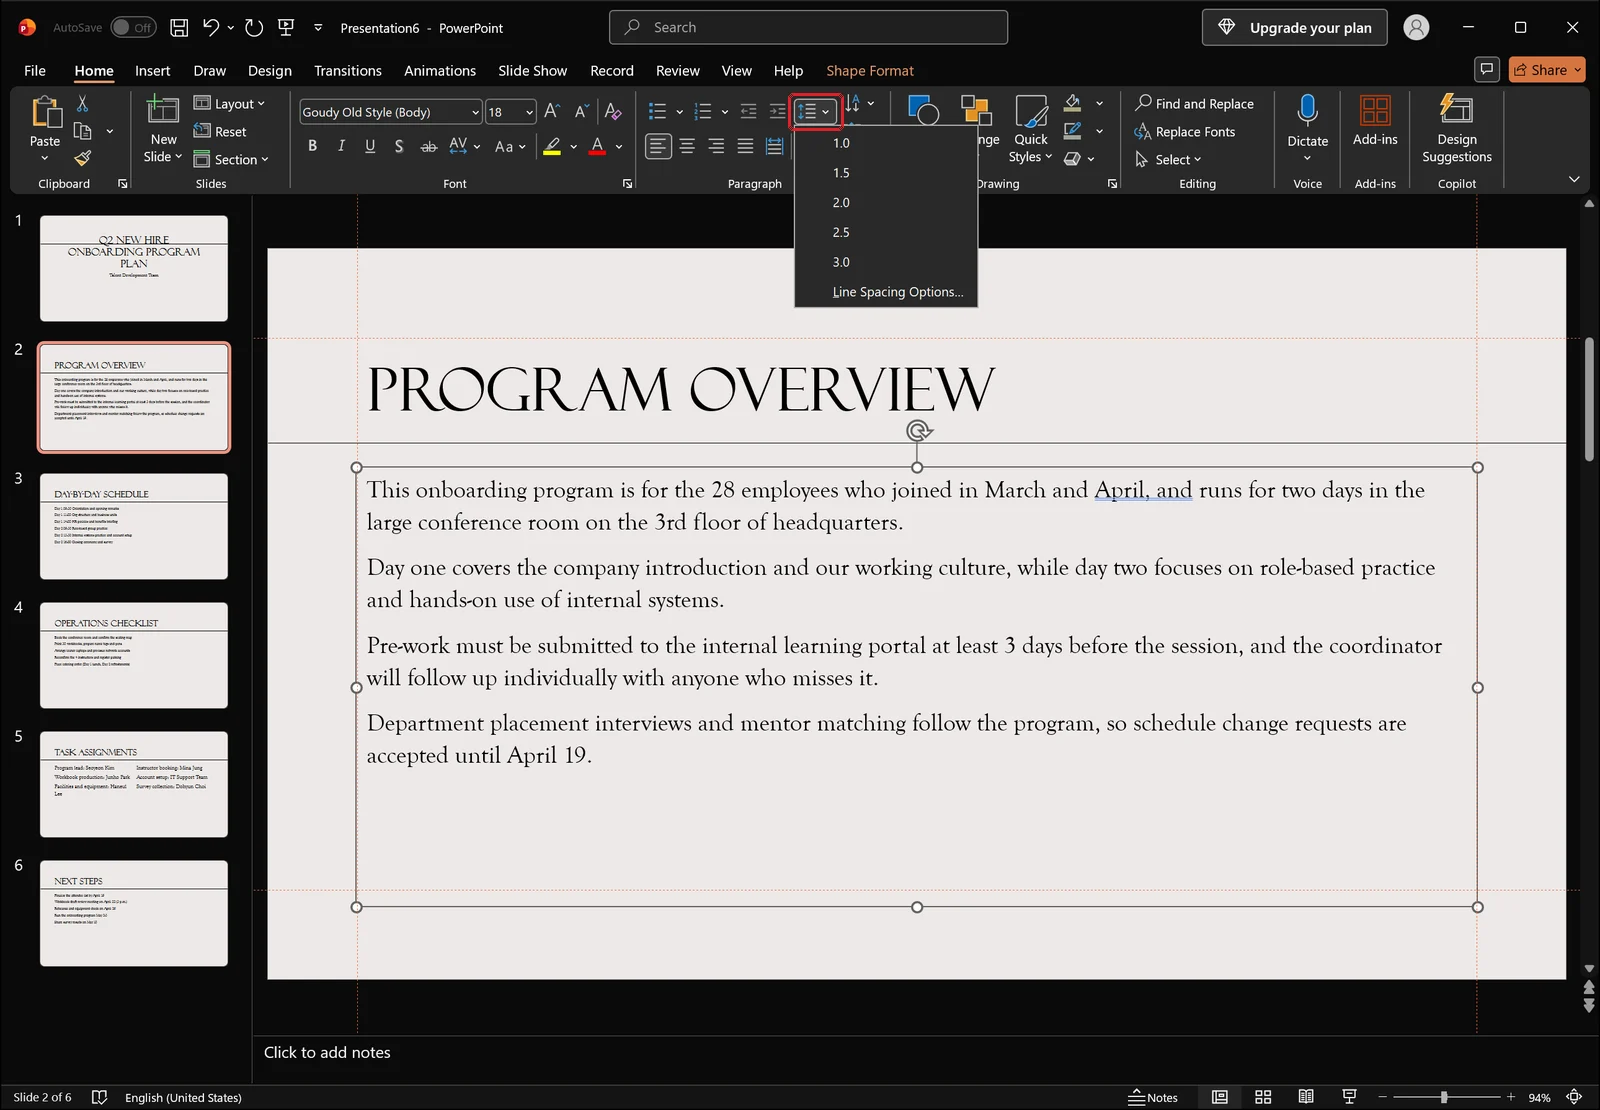
Click a value and it applies to the current selection immediately. Cycle through a couple of them, and when you decide the number you want is not on the list, use the command at the bottom to open the dialog.
Check the result on the slide
Here is the same body text after tightening the spacing. The rows sit closer together and there is now clear empty space at the bottom of the placeholder.
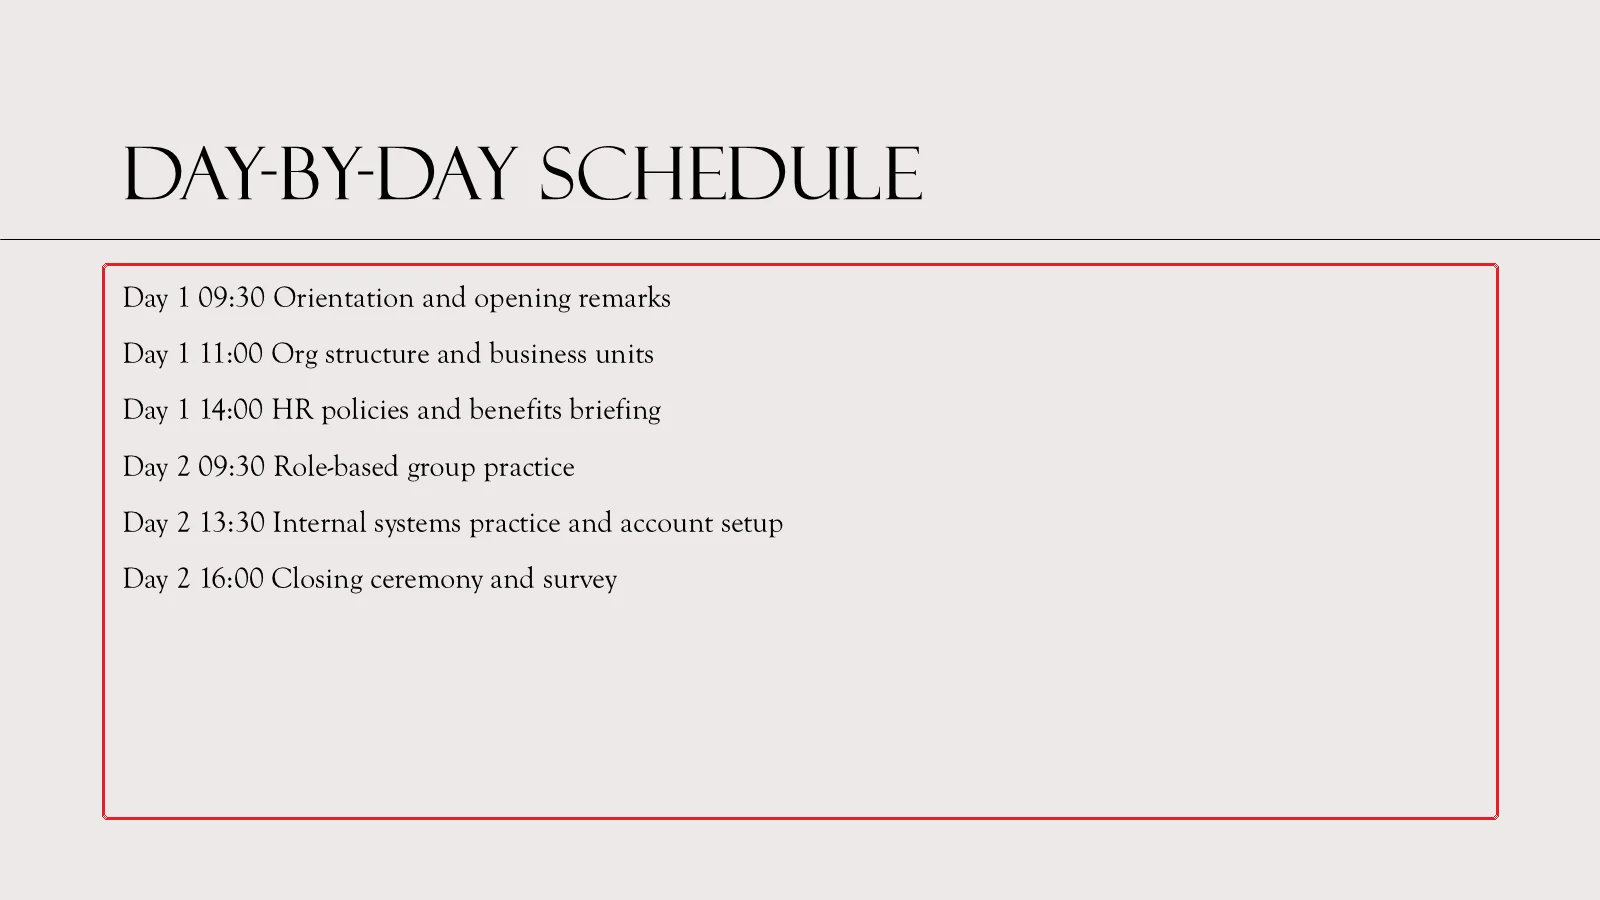
That leftover room is useful. You can raise the font size slightly, or spend it on paragraph spacing to make the item breaks more obvious. This is why a slide can feel far less crowded without deleting a single word.
Shortcuts and values that hold up in practice
Word has dedicated shortcuts like Ctrl+1 and Ctrl+2 for line spacing. PowerPoint does not ship with equivalents. The practical alternatives are pressing Alt to bring up the ribbon key tips and walking to the Paragraph group, or adding the Line Spacing command to the Quick Access Toolbar so you can trigger it with Alt plus a number. If one box is already dialed in, copying its formatting with Ctrl+Shift+C and Ctrl+Shift+V is often faster than either.
As for the numbers themselves, it depends on how the deck is read. Document-style slides read on a screen sit comfortably around 0.9–1.1. Large text projected in a room usually works at 0.85–1.0. The bigger the type, the wider the same multiple looks, so titles and oversized text often need to go slightly below 1.0 to stay balanced.
Set a 1.2 Multiple, an Exact Value, or Space Before and After
Values that are not in the preset list, exact point heights, and the gap between paragraphs all live in the Paragraph dialog.
Where to open the dialog
Click the small dialog launcher arrow at the bottom-right corner of the Paragraph group on the Home tab.
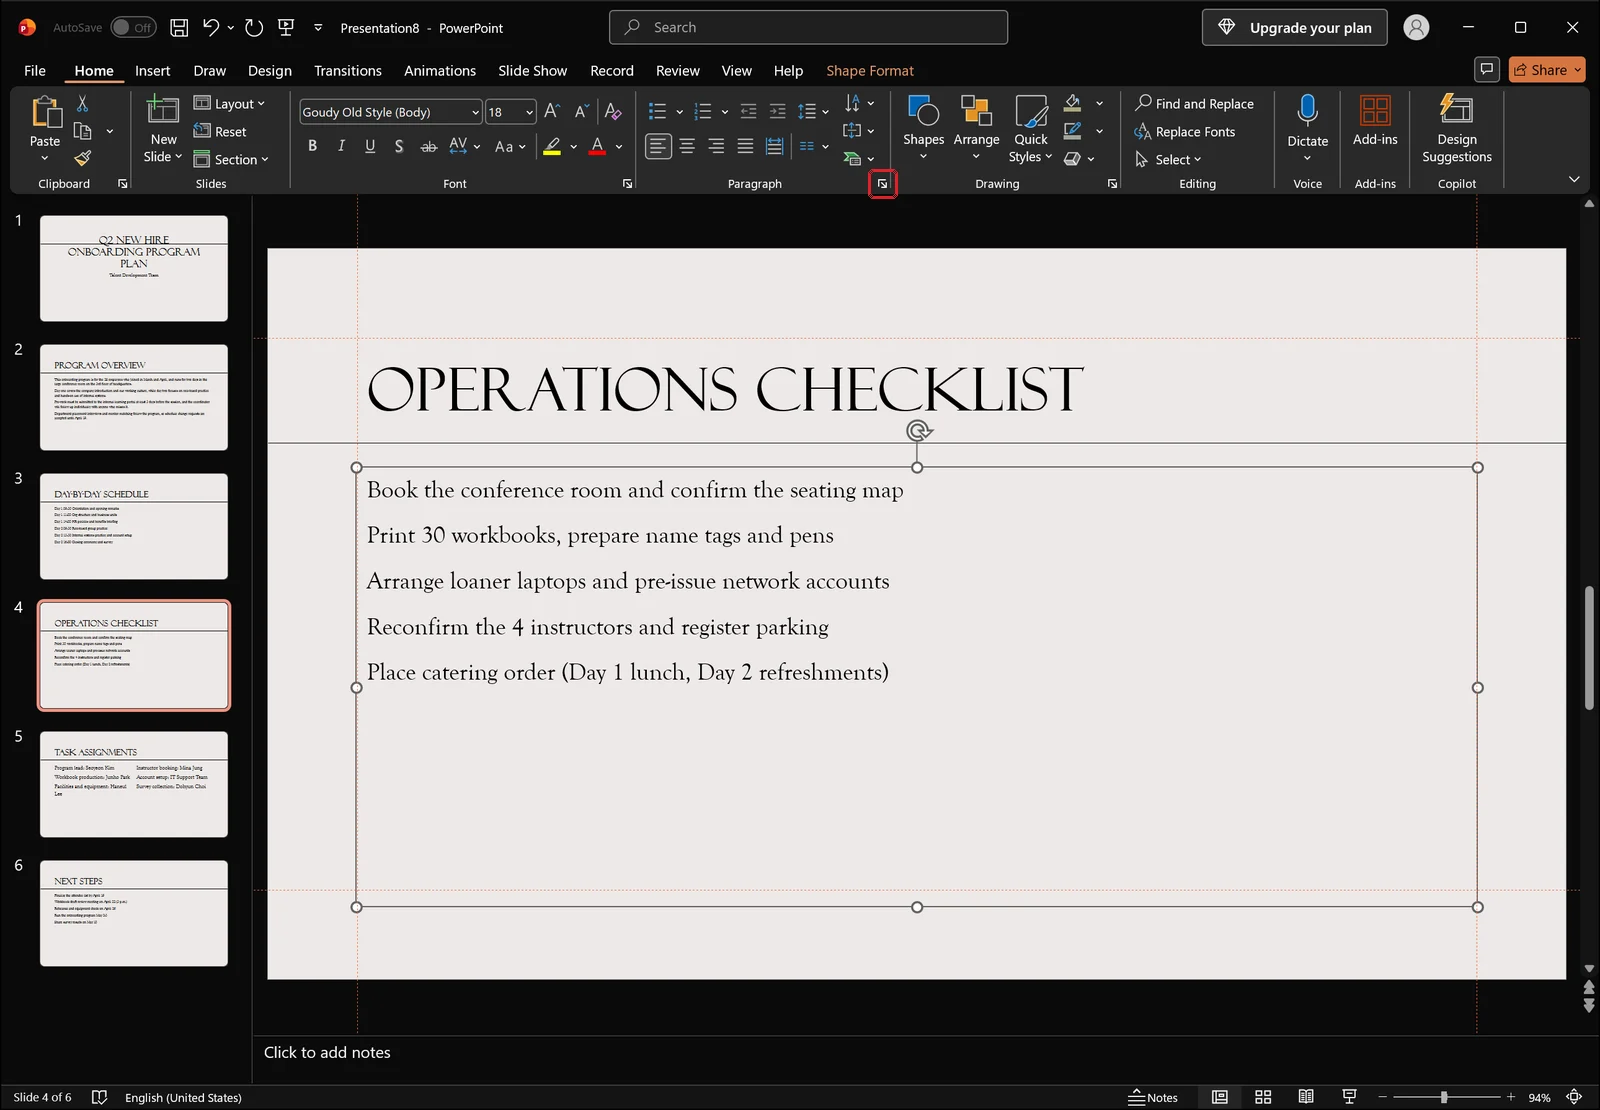
Right-clicking the text and choosing Paragraph from the context menu opens the same window.
Enter a 1.2 multiple or a fixed 20pt
The dialog puts alignment and indentation at the top and a spacing area underneath, holding Before and After boxes, a Line Spacing dropdown, and a value box next to it.
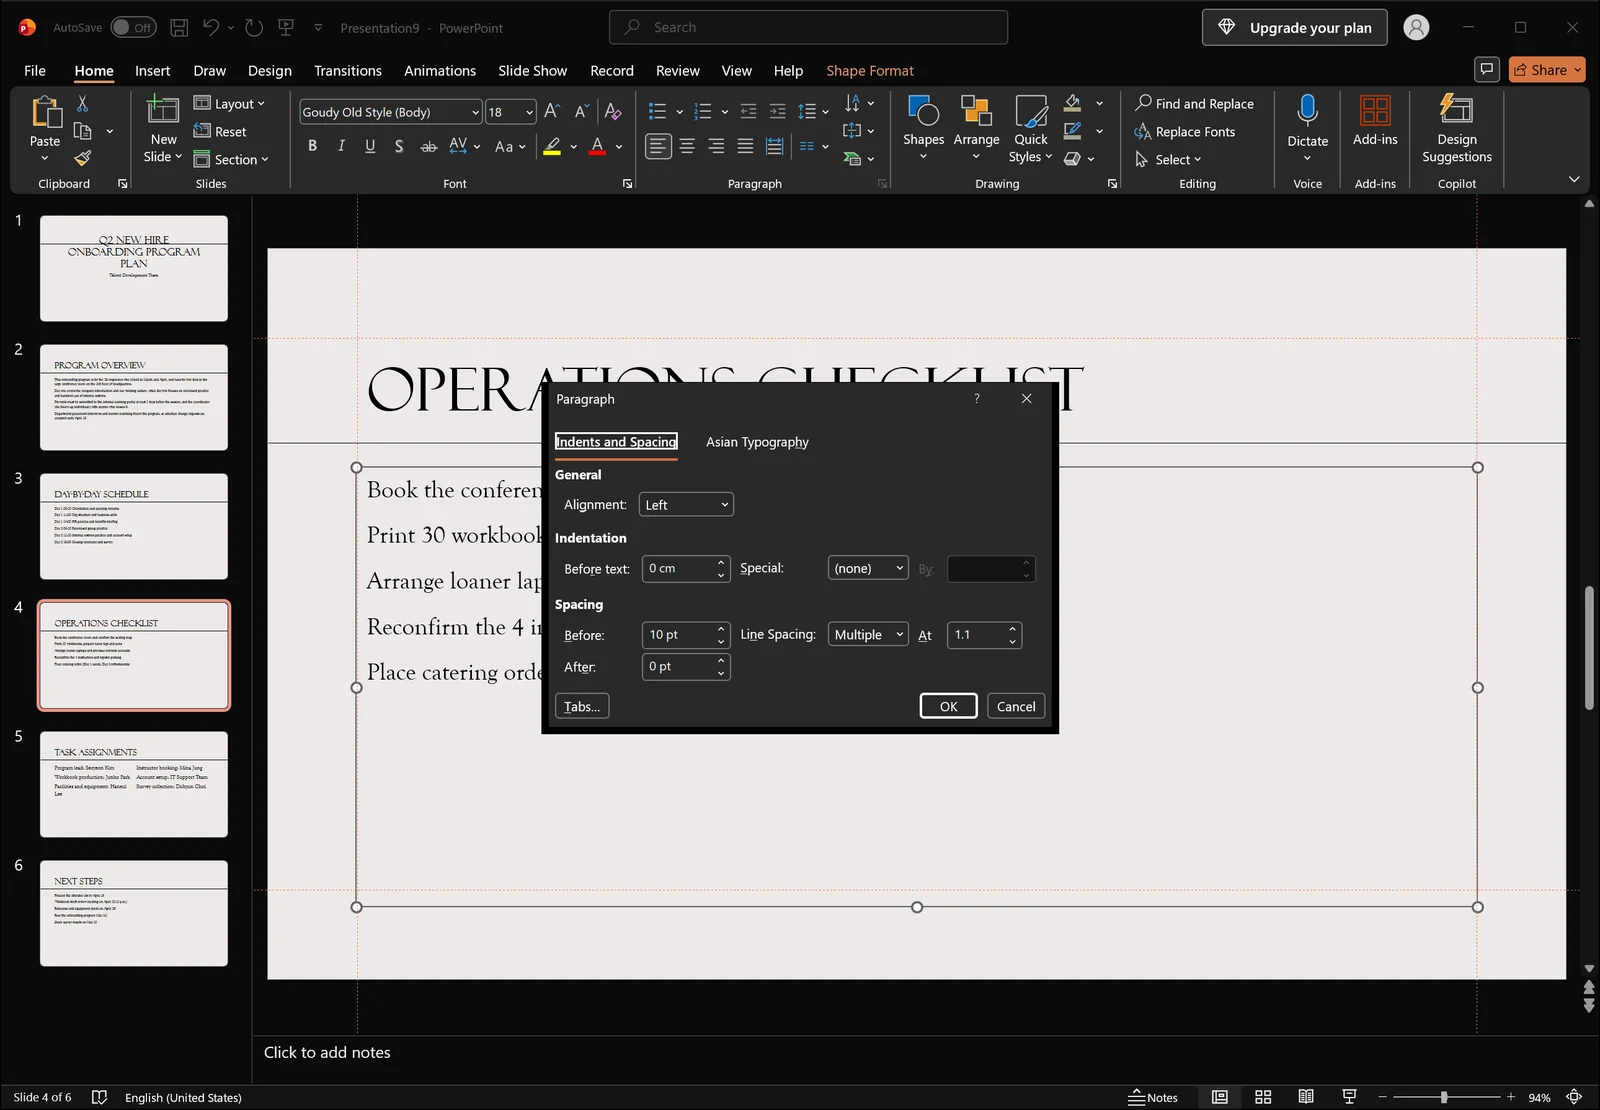
Choose Multiple in the Line Spacing dropdown and type 1.2 in the box beside it to get 1.2 line spacing. Values below 1, such as 0.85 or 0.95, are accepted the same way, which is exactly what you need when a block overflows by one stubborn line.
To pin the row height in points, choose Exactly and enter a point value. For 18pt text, something around 22–24pt is safe. Anything equal to or smaller than the font size will clip the tops of the characters, so click OK and check the slide with your eyes before moving on.
Leave Before at 0pt and put 6pt in After
If you only want space between paragraphs, use one side, not both. Filling in Before and After means the After value of one paragraph stacks on top of the Before value of the next, and the gap ends up much wider than you intended. Keeping Before at 0pt and putting 6–10pt in After is far easier to reason about later.
Generous paragraph spacing produces the layout below, where an even gap separates each item from the next.
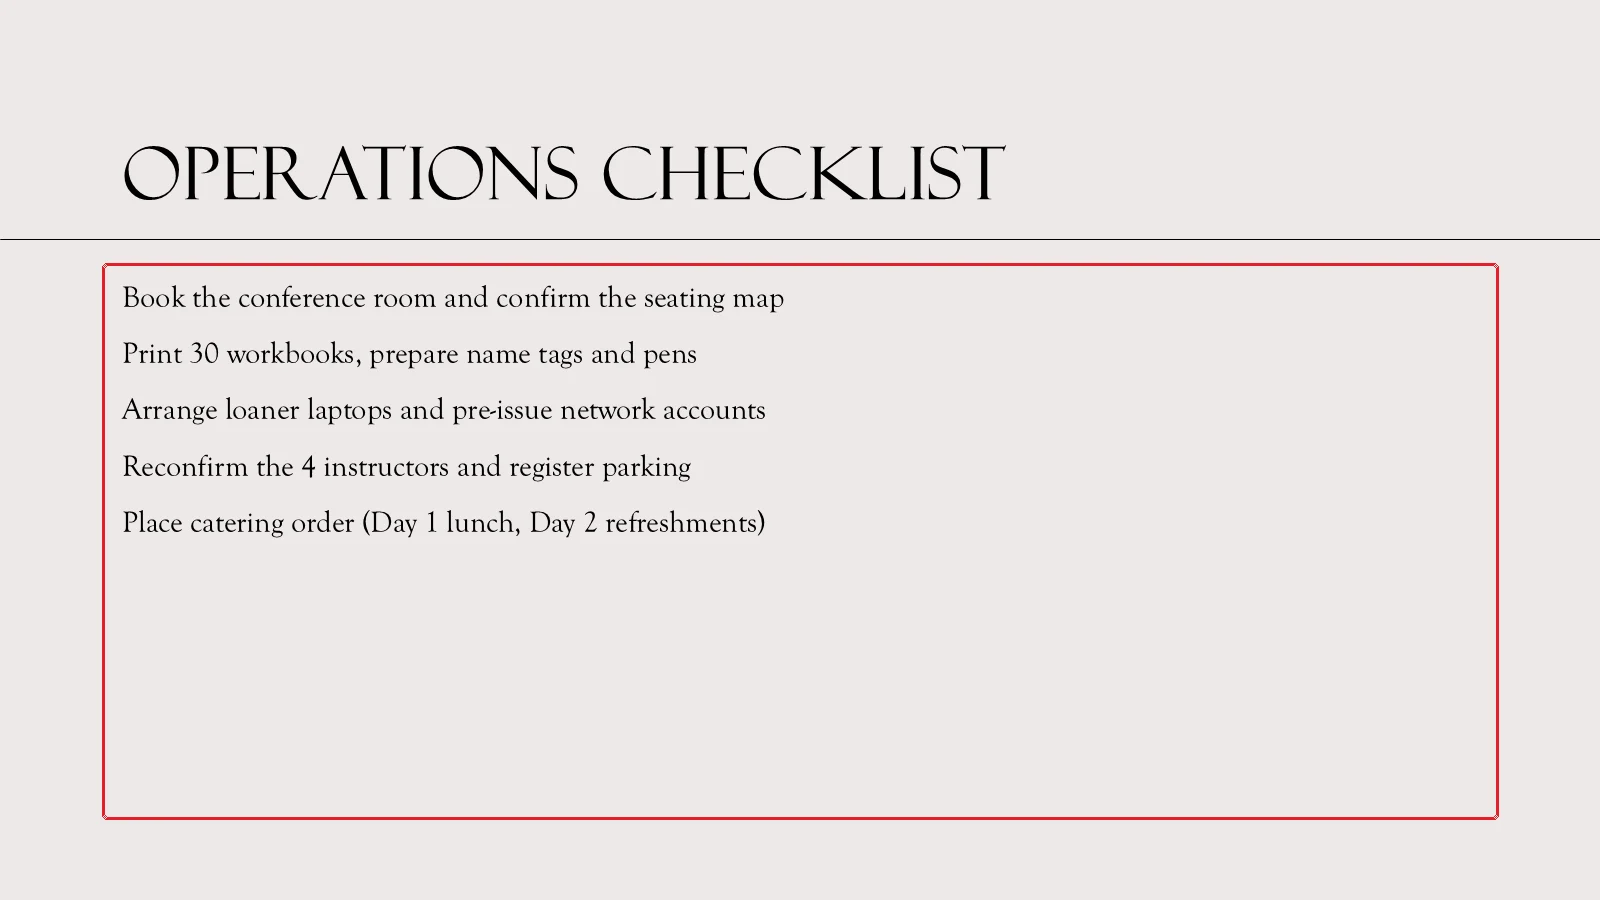
On list slides this gap does more for readability than anything else, and it takes far less fiddling than trying to solve everything with line spacing alone.
Apply the Same Line Spacing Across Every Slide
Past twenty slides, fixing boxes one at a time stops being realistic. Three approaches cover most situations.
Edit the body placeholder in Slide Master view
On the View tab, click Slide Master and the editing area switches to master view. The left pane lists the master slide with its layout thumbnails beneath it, and selecting one shows that layout's title placeholder along with a body placeholder split into multiple outline levels.
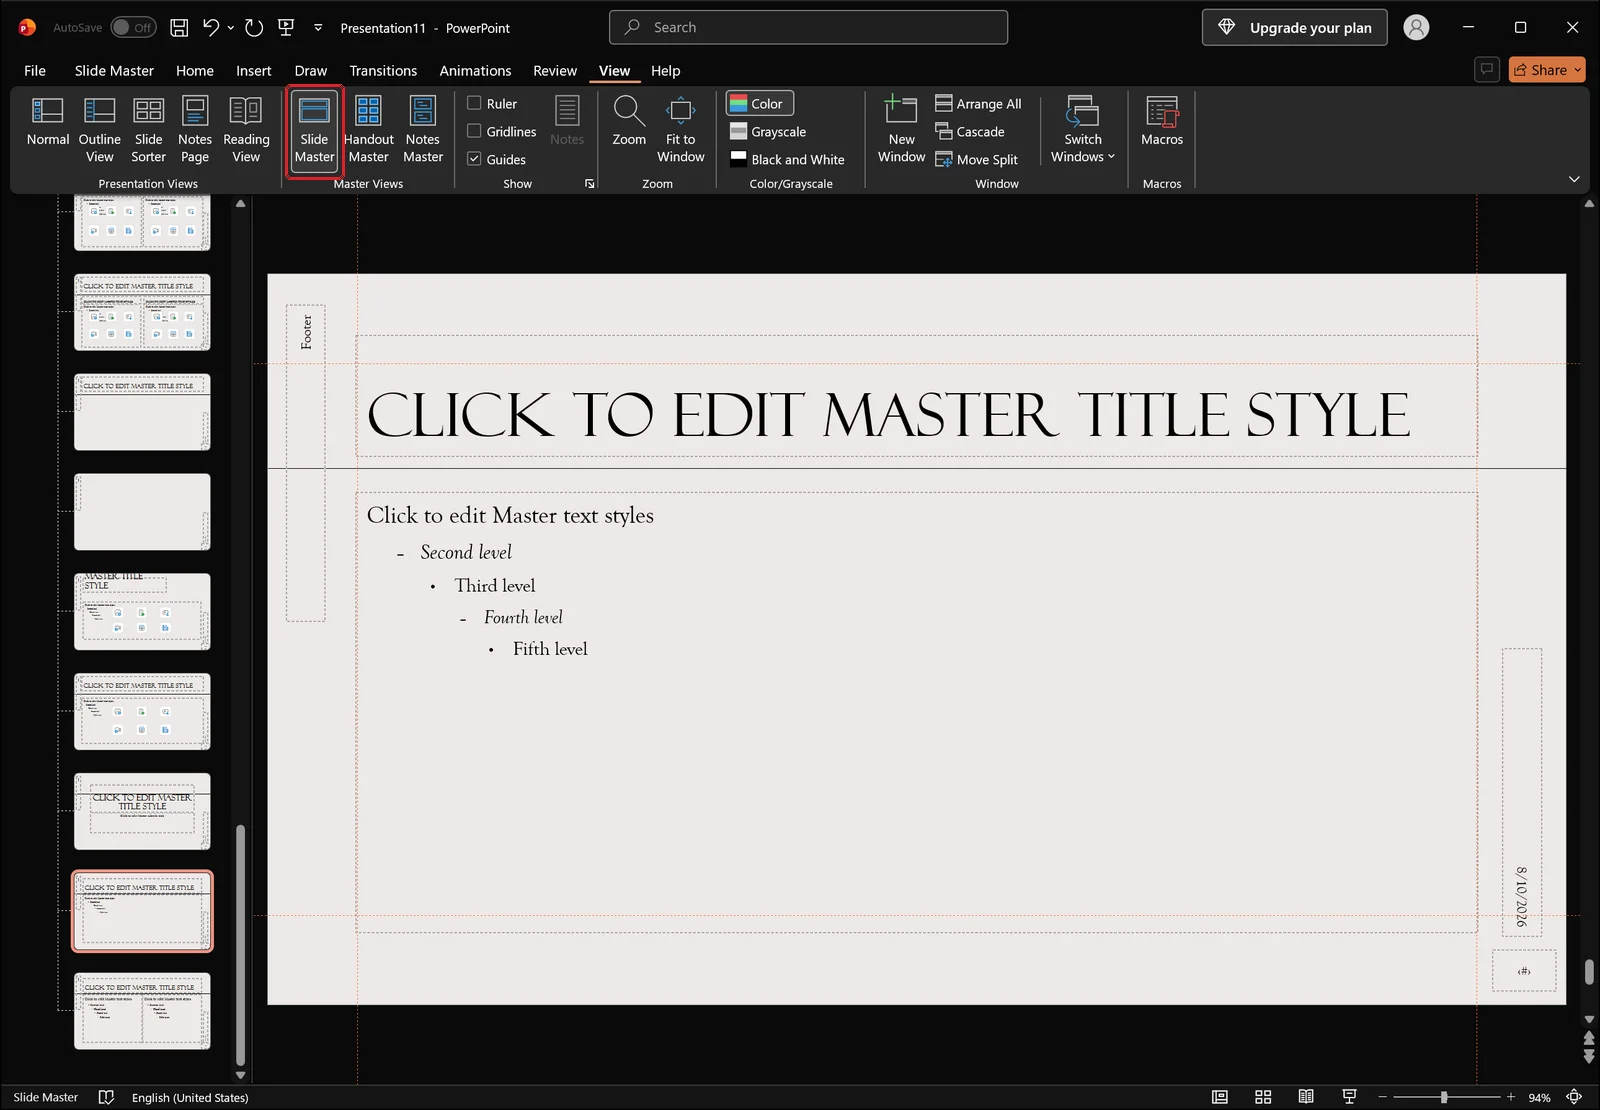
Set line spacing and paragraph spacing per level here and every slide using that layout picks it up at once. Giving the first level 10pt after and the second level 6pt, for example, means you stop reformatting text every time you add a slide.
One catch: boxes where someone already changed line spacing directly on the slide will not be overridden by the master. Those need the Reset button covered further down before they follow the master values again.
👉 How to Use Slide Master in PowerPoint: Format Every Slide
Carry the formatting over with Format Painter
When touching the master feels like overkill, or only a few boxes are off, Format Painter is quicker. Select the box you already got right, click Format Painter in the Clipboard group on the Home tab, then click the box you want to fix.
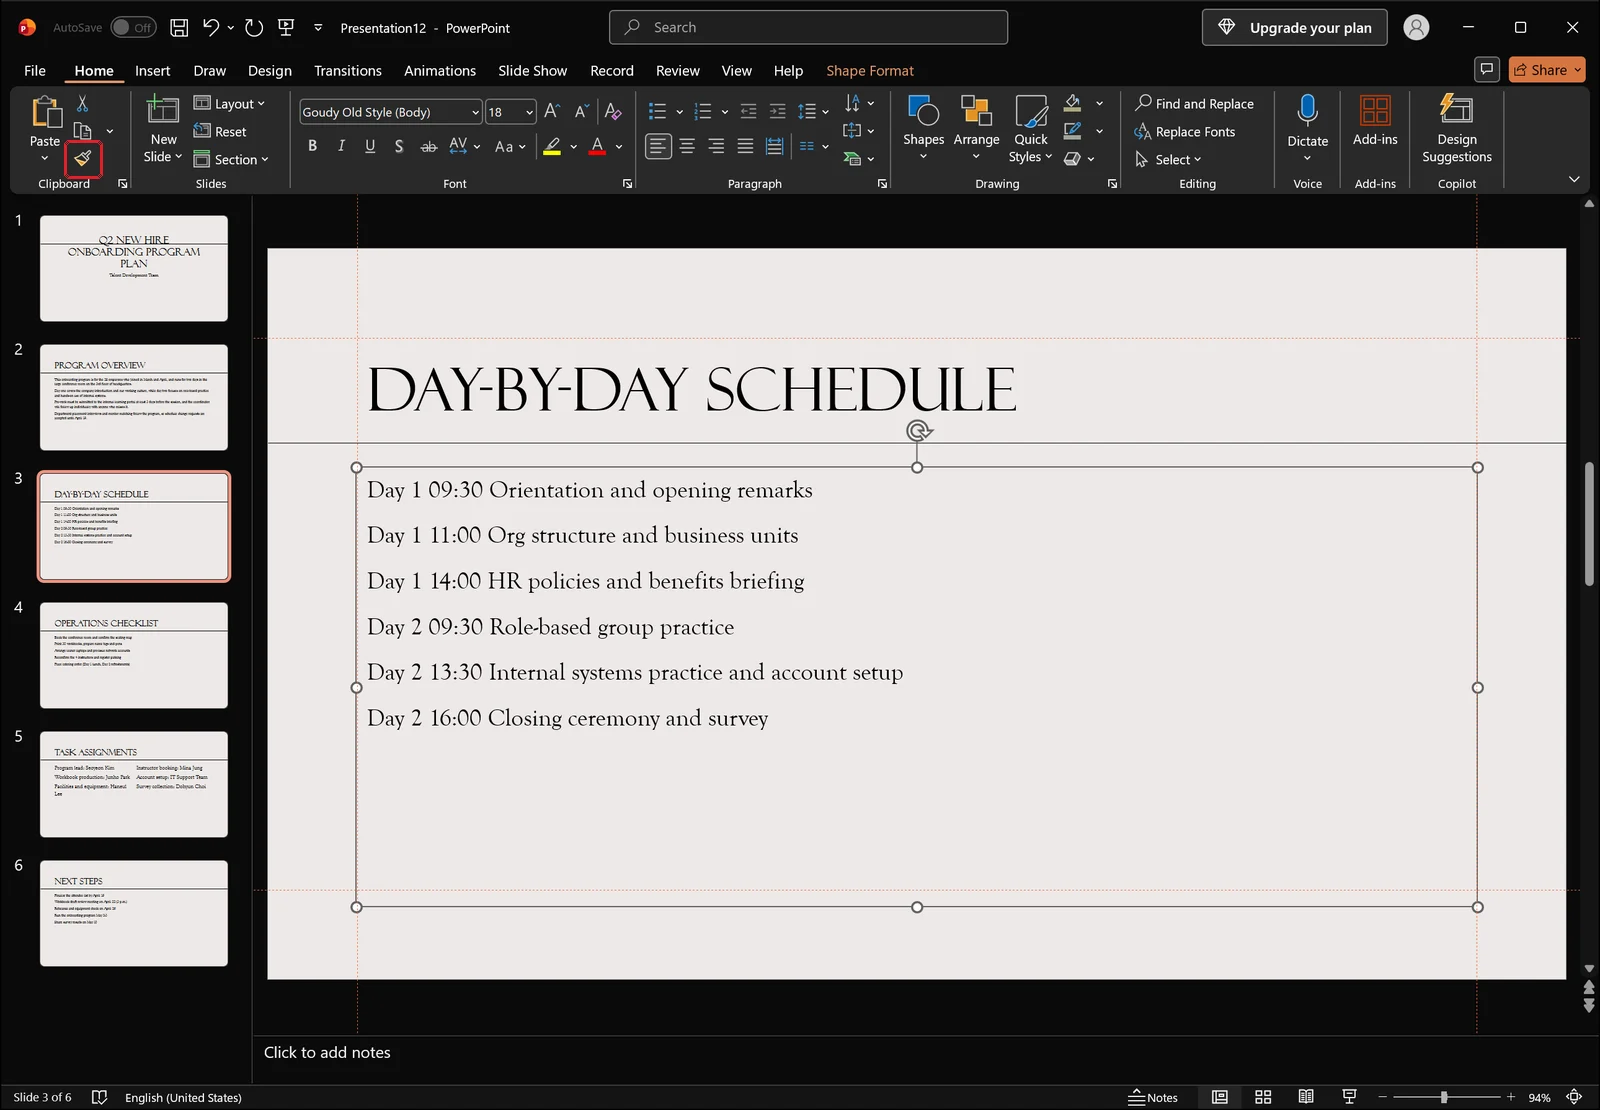
Select the box itself rather than leaving a cursor inside the text, otherwise paragraph-level formatting like line spacing and paragraph spacing does not travel with it. If several boxes need the same treatment, double-click Format Painter to keep it active and apply it with a click each time, then press Esc when you are done.
Check consistency in Slide Sorter view
When the pass is finished, click Slide Sorter on the View tab to lay the whole deck out at once. The thumbnails appear in a grid, so a slide that is unusually dense or unusually airy stands out immediately.
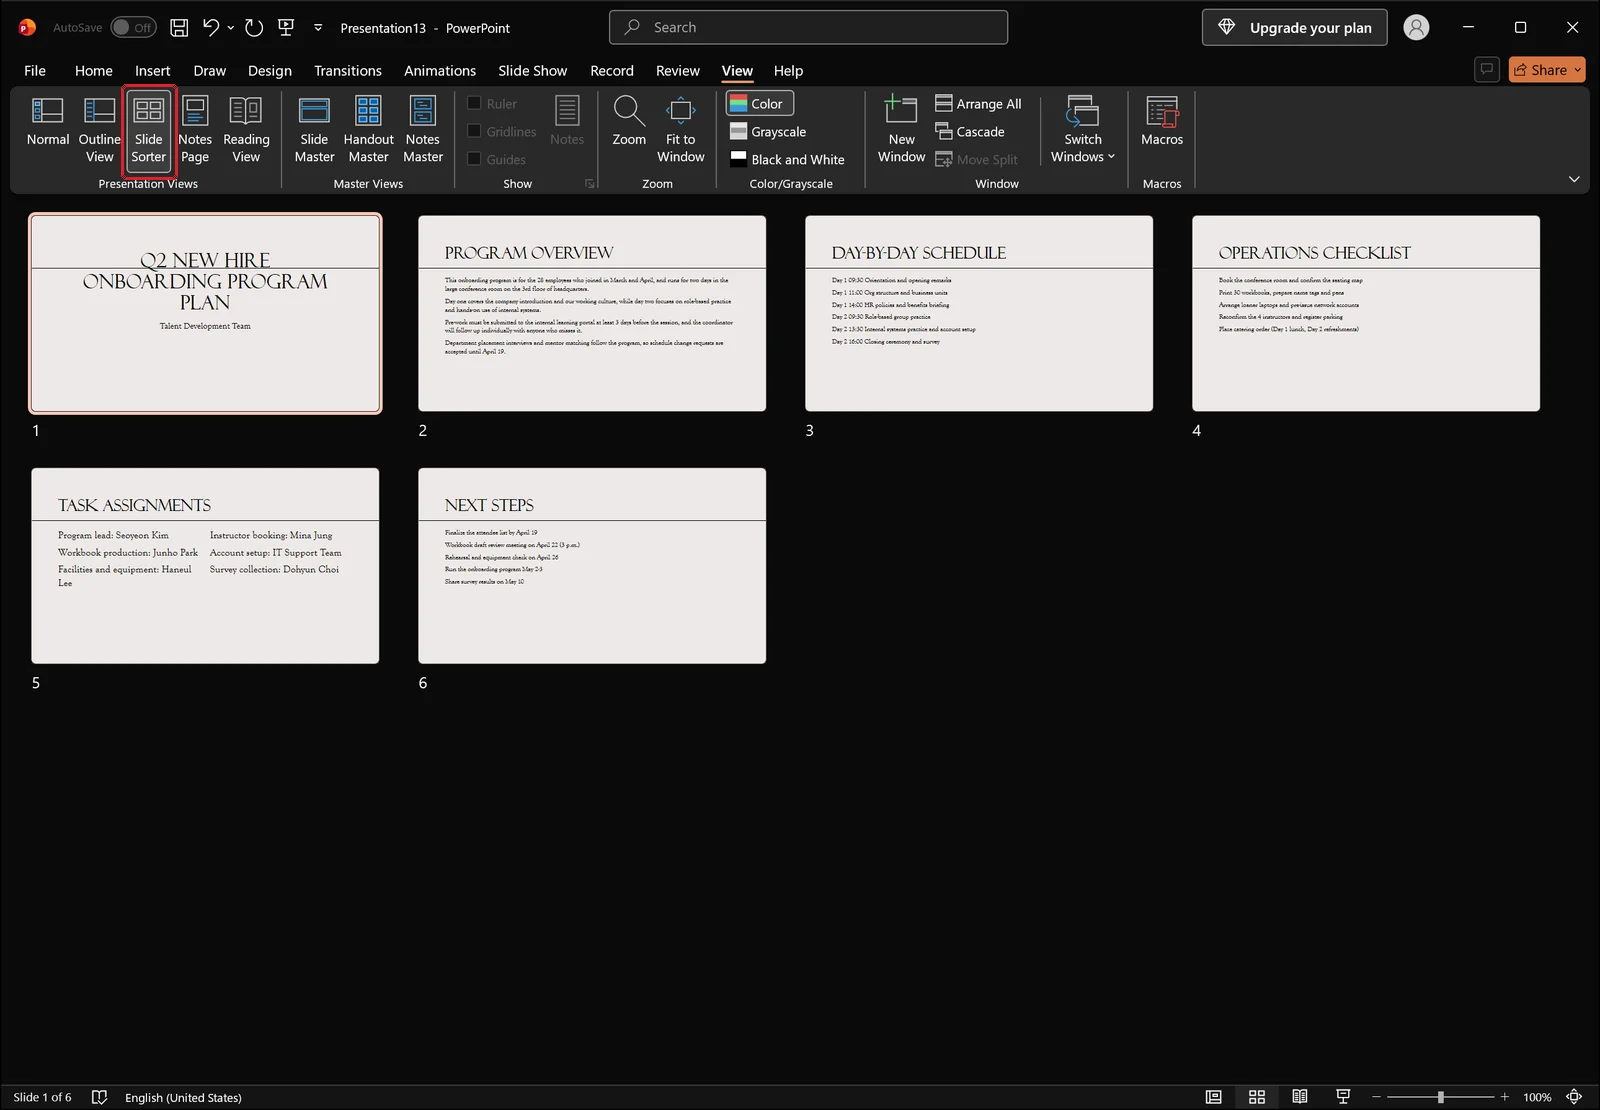
Clicking through slides one by one hides these differences; seeing them side by side exposes them in seconds. Double-click any thumbnail that looks off to jump back into the editing view and fix it.
Four Things to Check When Line Spacing Will Not Change
Sometimes you clearly changed the value and the slide looks exactly the same. It is almost always one of these four.
Autofit is resizing the font along with it
This is the most common cause by a wide margin. When the placeholder is set to shrink text on overflow, tightening line spacing frees up space and PowerPoint immediately grows the font back to fill it. The net result on screen is no change at all.
You check this setting in the Format Shape pane. When the pane opens on the right, the Shape Options tab is selected first with fill and line settings showing; click the Text Options tab beside it to reach the autofit and internal margin controls.
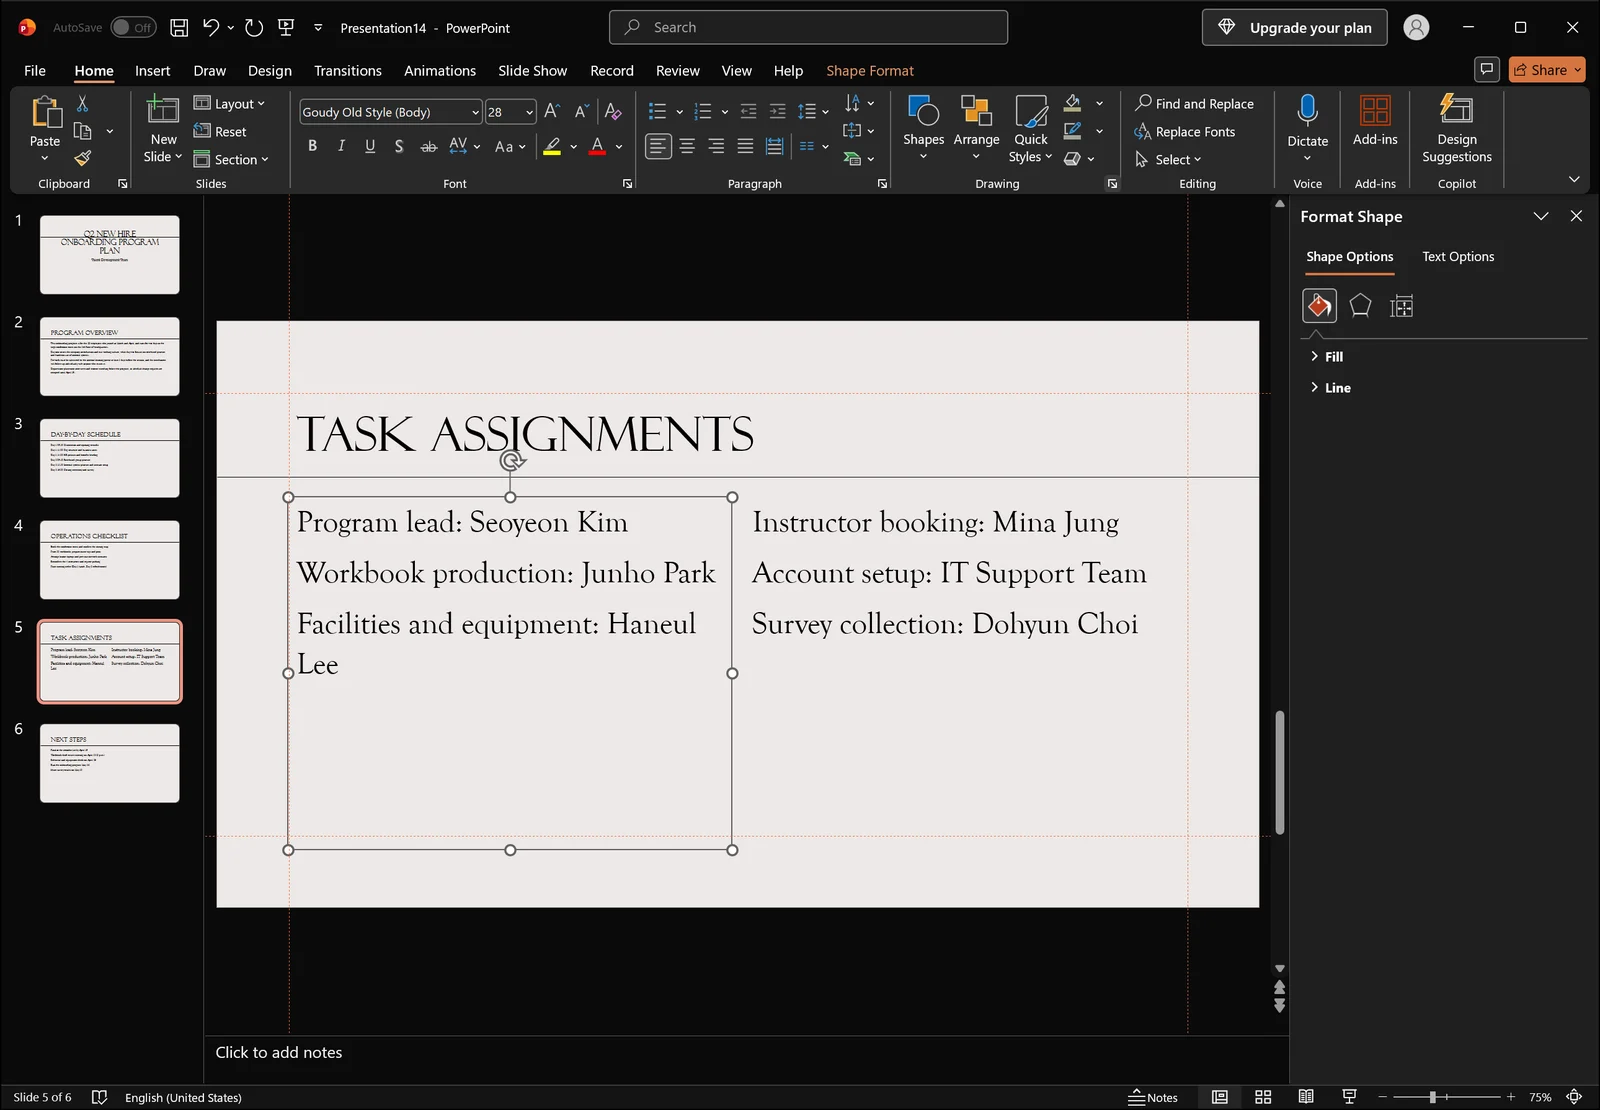
Turn autofit off, then set line spacing again and the value sticks. Decide the font size yourself afterward.
👉 Turn Off Autofit Text in PowerPoint: Stop Fonts Shrinking
The exact value is smaller than the font size
If you chose Exactly, typed a point value, and now the tops of letters are cut off or the rows look like they overlap, the value is at or below the font size. Putting 24pt on 24pt text leaves zero breathing room. Raise it to at least 1.2–1.3 times the font size, or switch to a multiple instead.
Master settings are fighting direct formatting
If you edited the master and one slide refuses to follow, that slide's placeholder still carries direct formatting. Select the placeholder and click Reset in the Slides group on the Home tab to snap it back to the layout's position, size, and text formatting.
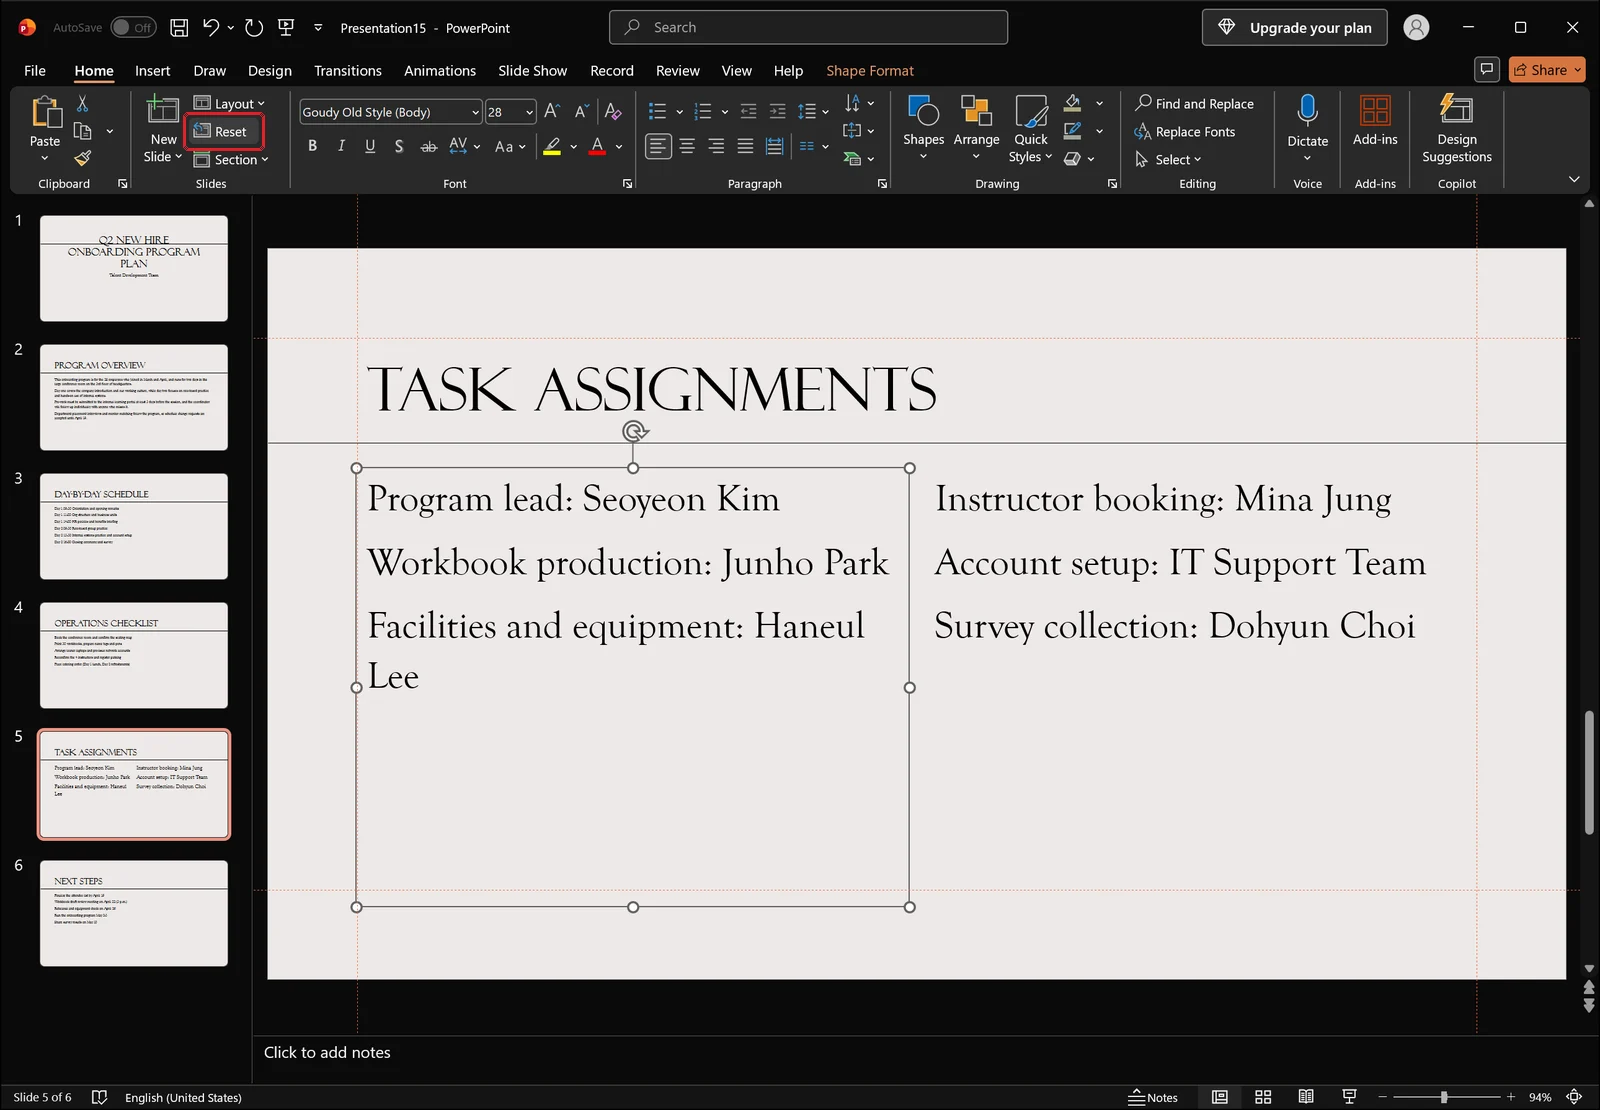
Reset also throws away any position and size changes you made by hand, so think twice before using it on a slide you deliberately arranged.
Vertical alignment or internal margins make it look cramped
Occasionally line spacing was never the issue: the text is bunched at the top of the box or pushed toward the bottom, and that imbalance reads as crowding. Click Align Text in the Paragraph group on the Home tab and the dropdown offers Top, Middle, Bottom, and More Options...
Switching to Middle alone fixes the balance on a surprising number of slides. It is worth checking the internal margin values in the Format Shape pane too: if they are set large, the text has less room to work with no matter what spacing you apply.
One more thing worth knowing: fonts differ in how much leading they carry built in. At the same 1.0 multiple, some typefaces look noticeably more spread out than others, so when you switch fonts across a deck, expect to retune the spacing rather than assume the old number still works.
PowerPoint Line Spacing FAQ
Q. Is there a keyboard shortcut for line spacing in PowerPoint?
PowerPoint does not include dedicated shortcuts equivalent to Word's Ctrl+1, Ctrl+5, and Ctrl+2. The workarounds are pressing Alt to show ribbon key tips and navigating to the Paragraph group on the Home tab, or adding the Line Spacing command to the Quick Access Toolbar so it responds to Alt plus a number. If a box is already set the way you want, copying its formatting with Ctrl+Shift+C and Ctrl+Shift+V is usually faster than either route.
Q. Where do I enter 1.2 line spacing?
The Line Spacing menu on the Home tab has no 1.2 entry. Open the Paragraph dialog, choose Multiple in the Line Spacing dropdown in the spacing area, and type 1.2 in the value box next to it. Values like 0.85 or 1.15 go in the same place.
Q. Should I use Exactly or Multiple?
Multiple is the safer default when a box mixes several font sizes or when the text size might change later, because the spacing scales along with the font. Use Exactly where row heights have to match precisely, such as tables and tightly aligned lists. If you do, keep the point value at 1.2–1.3 times the font size or higher so the tops of characters do not get clipped.
Q. I reduced line spacing and the text still overflows the box.
Check in this order: autofit, the After spacing on paragraphs, the shape's internal margins, and the placeholder size. Turning autofit off makes your spacing change actually take effect, and if After is set to 12pt or more, dropping it to 6pt or below often recovers several lines on its own. If it still overflows, splitting the content across two slides serves the audience better than squeezing the spacing further.
Cleaning Up Slide Formatting with inline AI
Everything above assumes you know which box needs which value and apply it yourself, one at a time. In a deck of fifty slides that several people have edited, just finding the boxes with mismatched spacing takes longer than fixing them.
inline AI works on top of the PowerPoint window you already have open. You describe the outcome in plain language, such as setting body line spacing to 1.0 and standardizing paragraph spacing after to 6pt, and it locates the relevant text and applies the formatting. You can also ask it to report which slides and which boxes are currently using different values.
It runs on your own PC, so internal decks and unreleased plans stay on your machine instead of being uploaded anywhere.
See what an agent could take over at your company in a 30-minute call.