Learn
Clear Formatting in Word: Fix Fonts and Shading After Pasting

Most people assume the eraser button on the Home tab wipes out everything, and that assumption is why cleanup takes three times longer than it should. Learning to clear formatting in Word properly means knowing what that button actually resets, which leftovers it never touches, and where each of those leftovers lives on the ribbon. Highlighting, paragraph borders and table shading all survive it. This guide works through a document called "Web Clip Collection — For Internal Wiki Migration", where a vendor's online help page was pasted in as is, and covers both how to stop the mess at paste time and how to clean it up after the fact.
When Clearing Formatting Becomes Necessary
Why One Paste Wrecks a Document
Text on a web page is not a plain string. It arrives bundled with a font, a size, a text color, background shading and link styling, and Word's default paste behavior preserves as much of that as it can. The result is that the source site's design lands inside your document along with the words you actually wanted.
That is why paragraphs end up with different fonts and heading sizes that no longer line up. When the material is headed for an internal wiki or a report, you needed the content and got the design as well.
What the Clear Formatting Button Removes, and What It Leaves
The Clear Formatting button on the Home tab strips direct character formatting such as font, size, color and bold, along with paragraph formatting such as alignment and indentation, and it resets the paragraph to the Normal style.
What it does not fix is just as important. A table stays a table. Hyperlinks are applied as a character style, so the blue underline usually survives. Highlighting (Text Highlight Color) and some paragraph borders also stay behind and have to be removed separately.
Check What Is Applied First
If you are not sure what has been applied to a problem paragraph, select it and press Ctrl+D to open the Font dialog box.
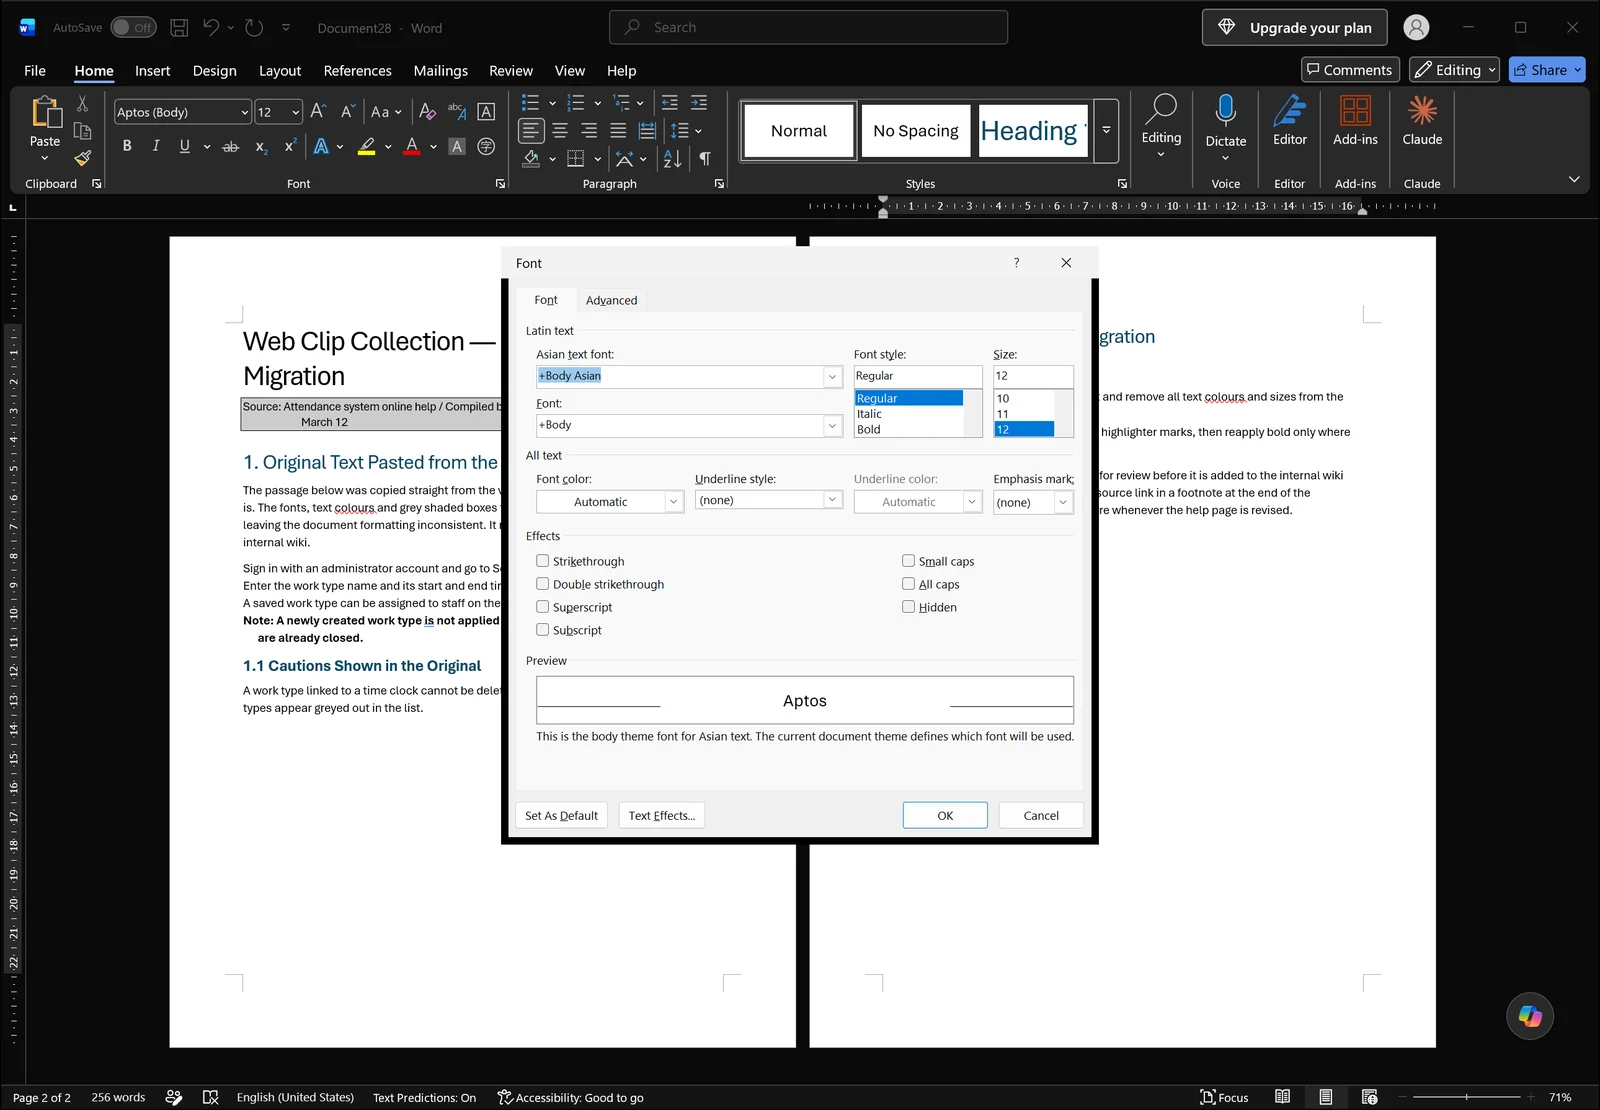
The dialog shows the font, font style and size currently applied, with the matching entries selected in each list, and the preview area at the bottom shows how the text looks right now. If you select several paragraphs at once and the font box comes up empty, that means the selection contains more than one font.
Stop the Formatting at Paste Time
Comparing the Three Paste Options
The cleanest fix is never importing the formatting in the first place. Word gives you three ways to paste.
| Option | Result | Best for |
|---|---|---|
| Keep Source Formatting | Brings the font, color and shading from the source | Moving a design across intact |
| Merge Formatting | Matches the destination formatting but keeps some emphasis such as bold and italic | Preserving lists or inline emphasis |
| Keep Text Only | Inserts the characters only and adopts the current paragraph formatting | Cleaning up material copied from the web |
The Shortcut for Pasting Without Formatting
After copying, press Ctrl+Shift+V and only the characters come in.
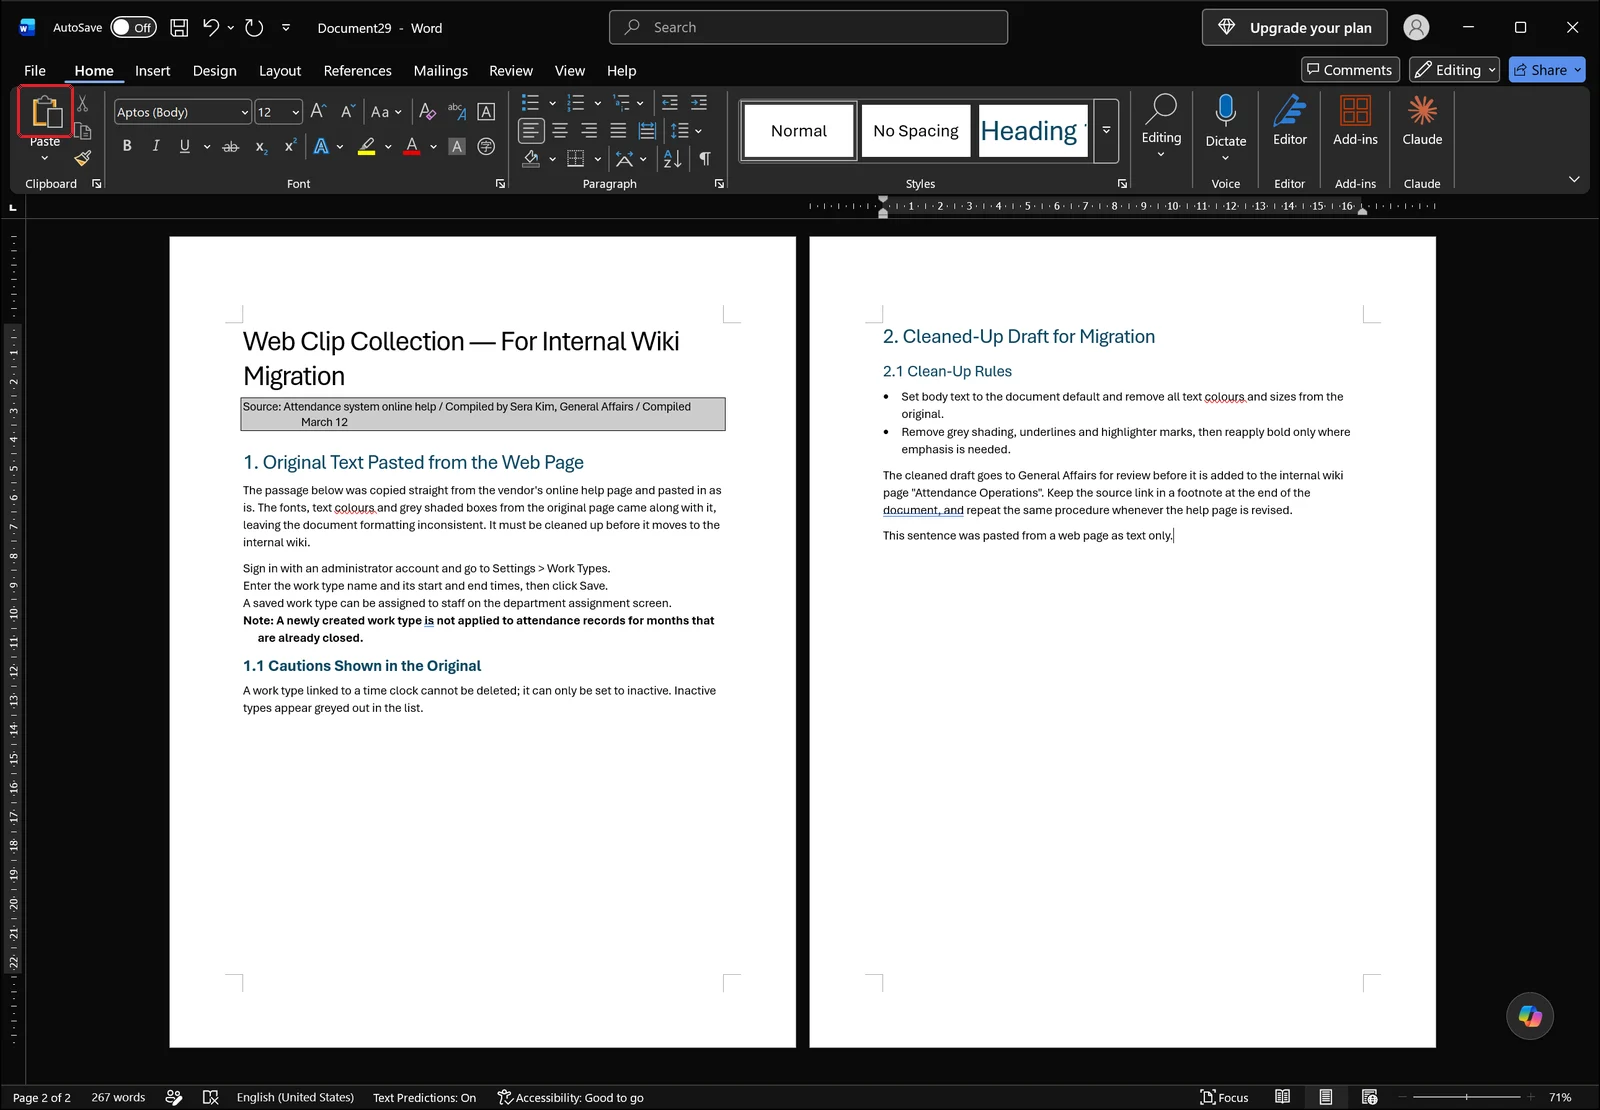
In the screenshot, the line at the cursor reads "This sentence was pasted from a web page as text only." and it sits in the plain default body formatting, with none of the source styling carried across.
If the shortcut does not work in your setup, click the arrow under the Paste button at the left end of the Home tab and choose Keep Text Only from the menu that opens. And if you have already pasted, press Ctrl once to bring up the paste options that appear next to the insertion point, then press T to switch to Keep Text Only.
Make Keep Text Only the Default
If remembering the shortcut every time is a nuisance, change the default behavior instead. Go to File > Options > Advanced and find the Cut, copy, and paste section.
Set Pasting from other programs to Keep Text Only, and anything copied out of a browser or a PDF always arrives unformatted. Pasting between Word documents is controlled by a separate setting, so you can leave that one on Keep Source Formatting.
Collecting Several Items with the Clipboard Pane
When you are gathering material across several pages, click the small arrow at the bottom right of the Clipboard group on the Home tab to open the Clipboard pane. Copied items stack up as a list, so you can paste only the ones you need and deal with the formatting afterward.
Clearing Formatting from Text You Already Pasted
Choosing the Right Selection
To reset an entire document, press Ctrl+A. If only a few paragraphs are the problem, dragging over just those paragraphs is safer. In a document where you have applied heading styles, selecting everything wipes the headings too, so it is usually better to select the body paragraphs in blocks.
The Clear Formatting Button on the Home Tab
Once the selection is set, click the eraser icon in the Font group on the Home tab.
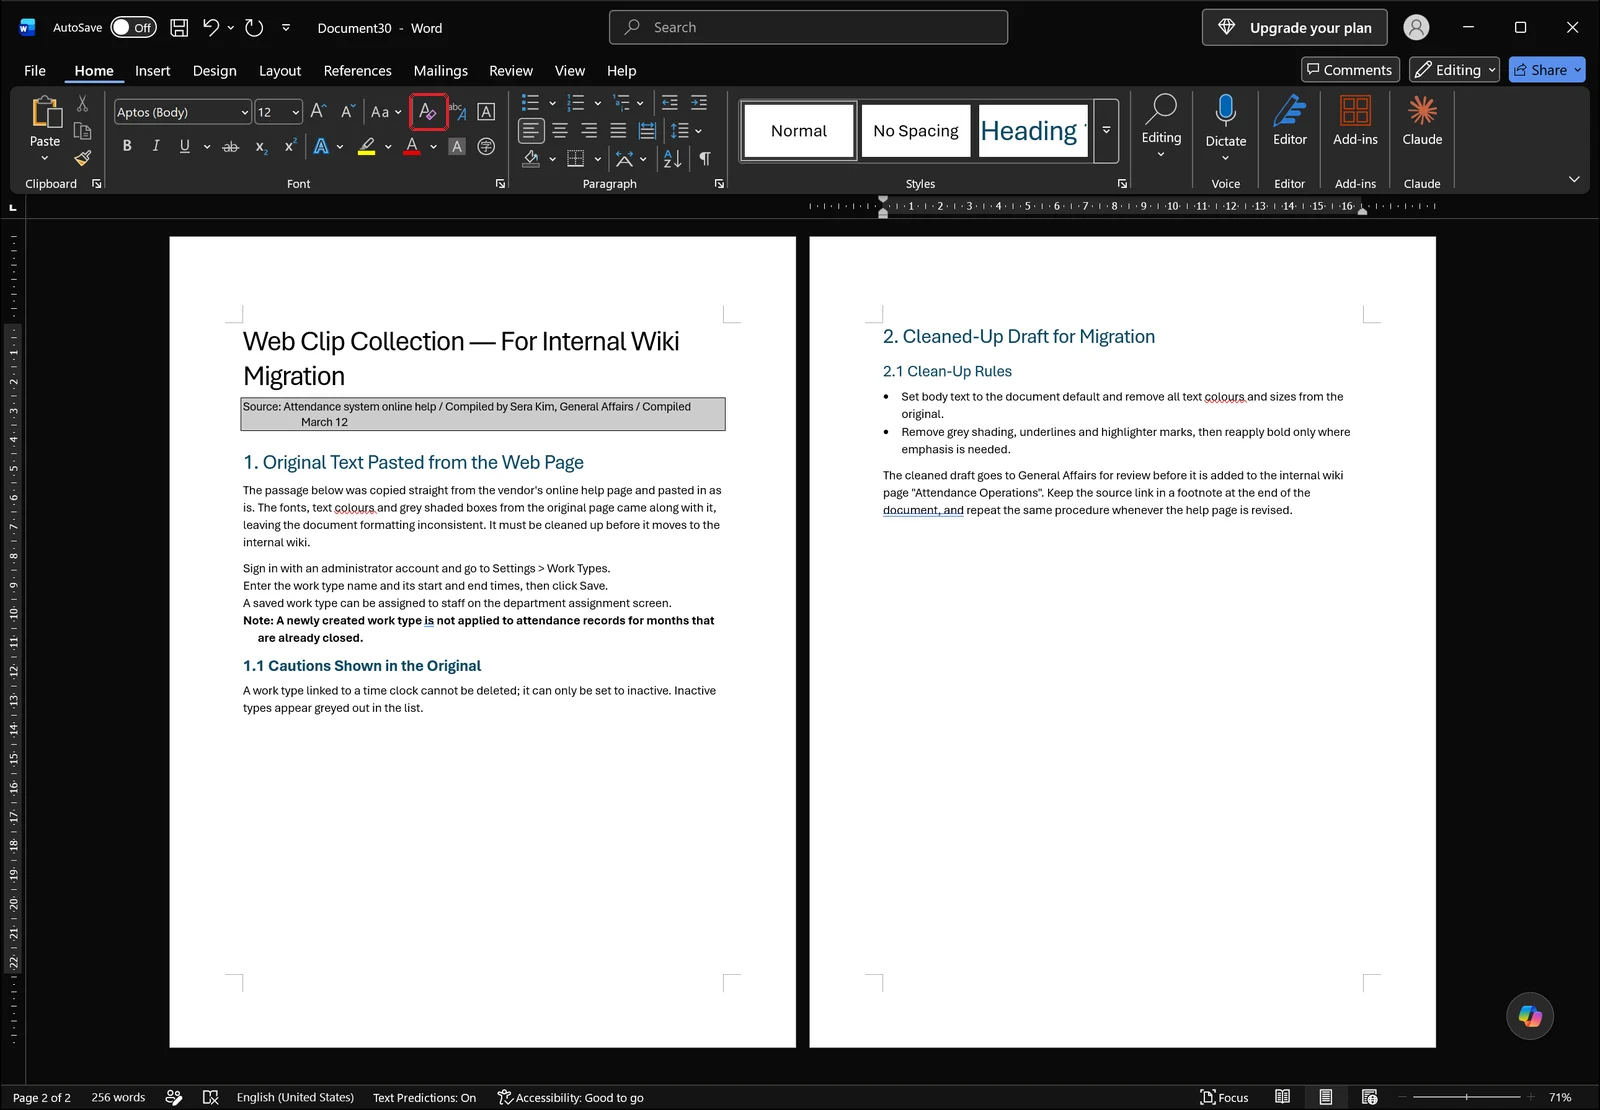
The Font group holds the font name box, the size box, the grow and shrink font buttons and the Aa change case button, with the eraser sitting to the right of them; bold, italic and underline are on the row below. The messy pasted document is still visible under the ribbon: a left-aligned title, a grey shaded source box and blue heading-styled lines all mixed together.
Checking the Result
Click the button and the selected paragraph drops back to the default body formatting in one step.
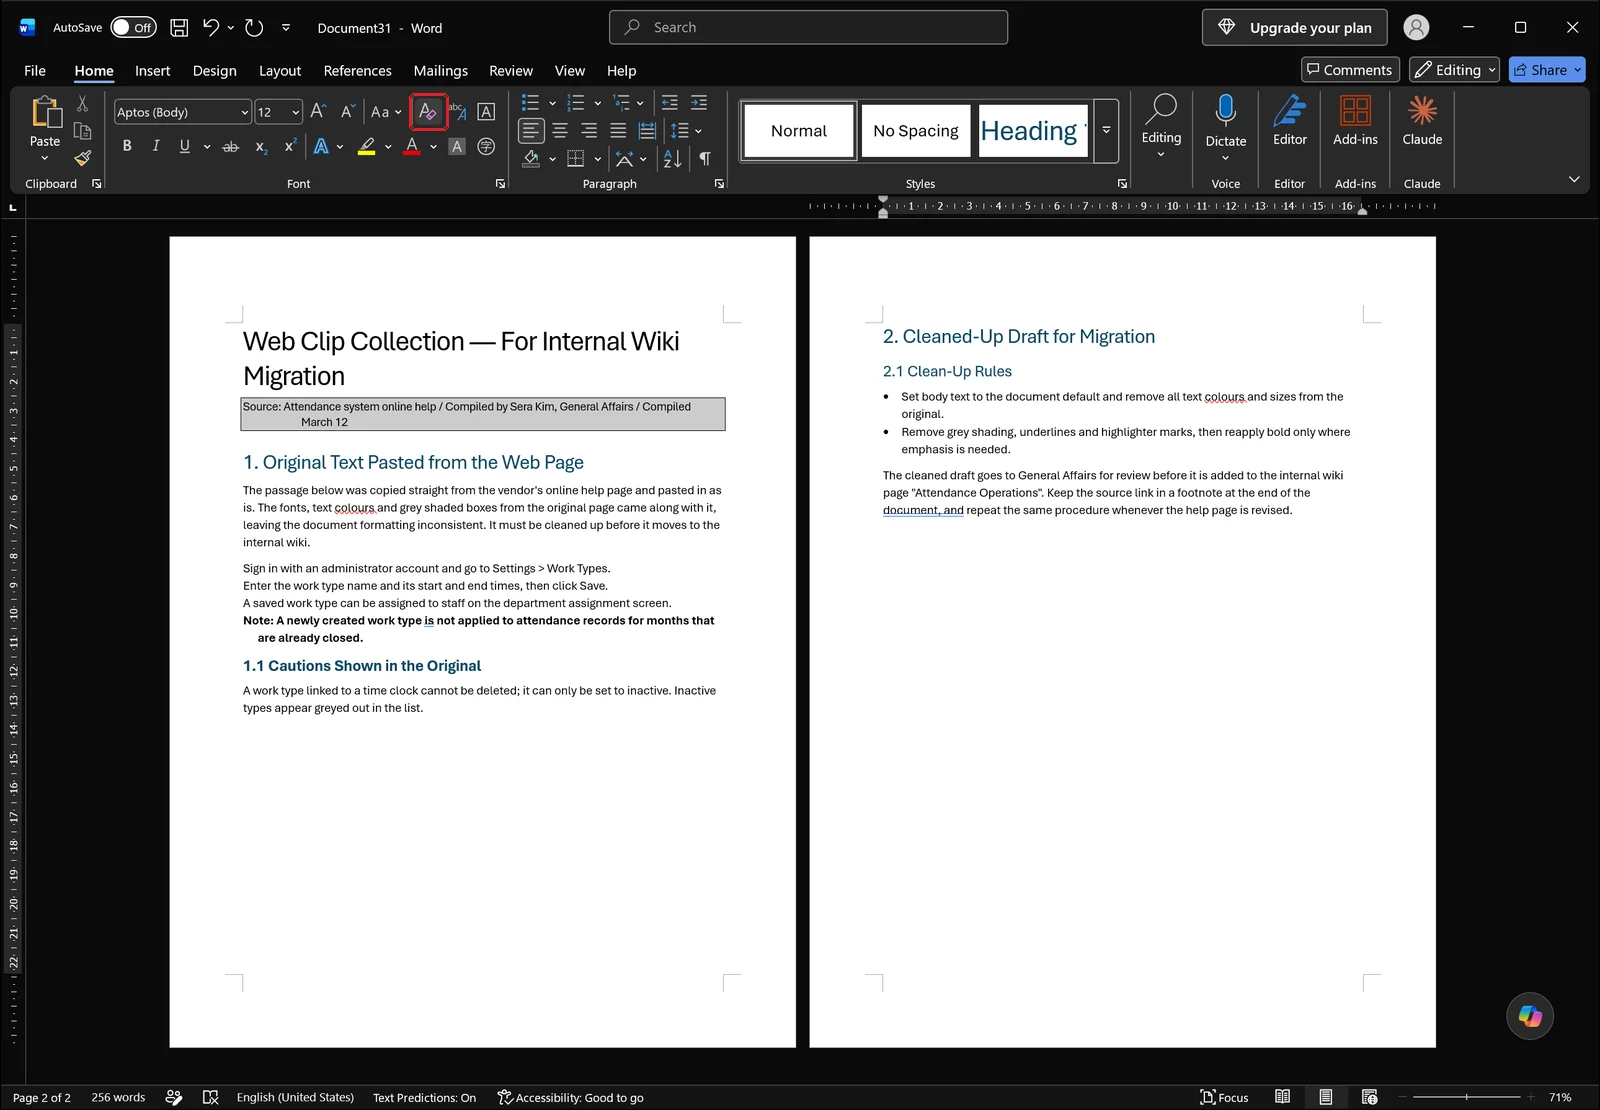
After the click, the paragraph loses its custom font, size and color and sits left-aligned in the default font. Note that the style is reset to Normal at the same time, so if a line you were using as a heading now looks the same size as body text, reapply the heading style after the cleanup.
Ctrl+Space vs. Ctrl+Q
Ctrl+Space resets character formatting only. It returns font, size, color and bold to the style definition while leaving paragraph formatting and the applied style intact, which makes it the safer choice when you want to keep a heading structure. Ctrl+Q does the opposite, resetting paragraph formatting such as alignment, indentation and spacing. Press both in sequence and you get something close to the Clear Formatting button, with one difference: the style stays as it was.
👉 Heading Styles in Word: Apply Heading 1 and 2, Then Edit Them
Removing Shading, Highlighting and Borders
Clearing Paragraph Shading
The grey box sitting behind text is usually paragraph shading. Select the paragraph and click the Shading button in the Paragraph group on the Home tab.
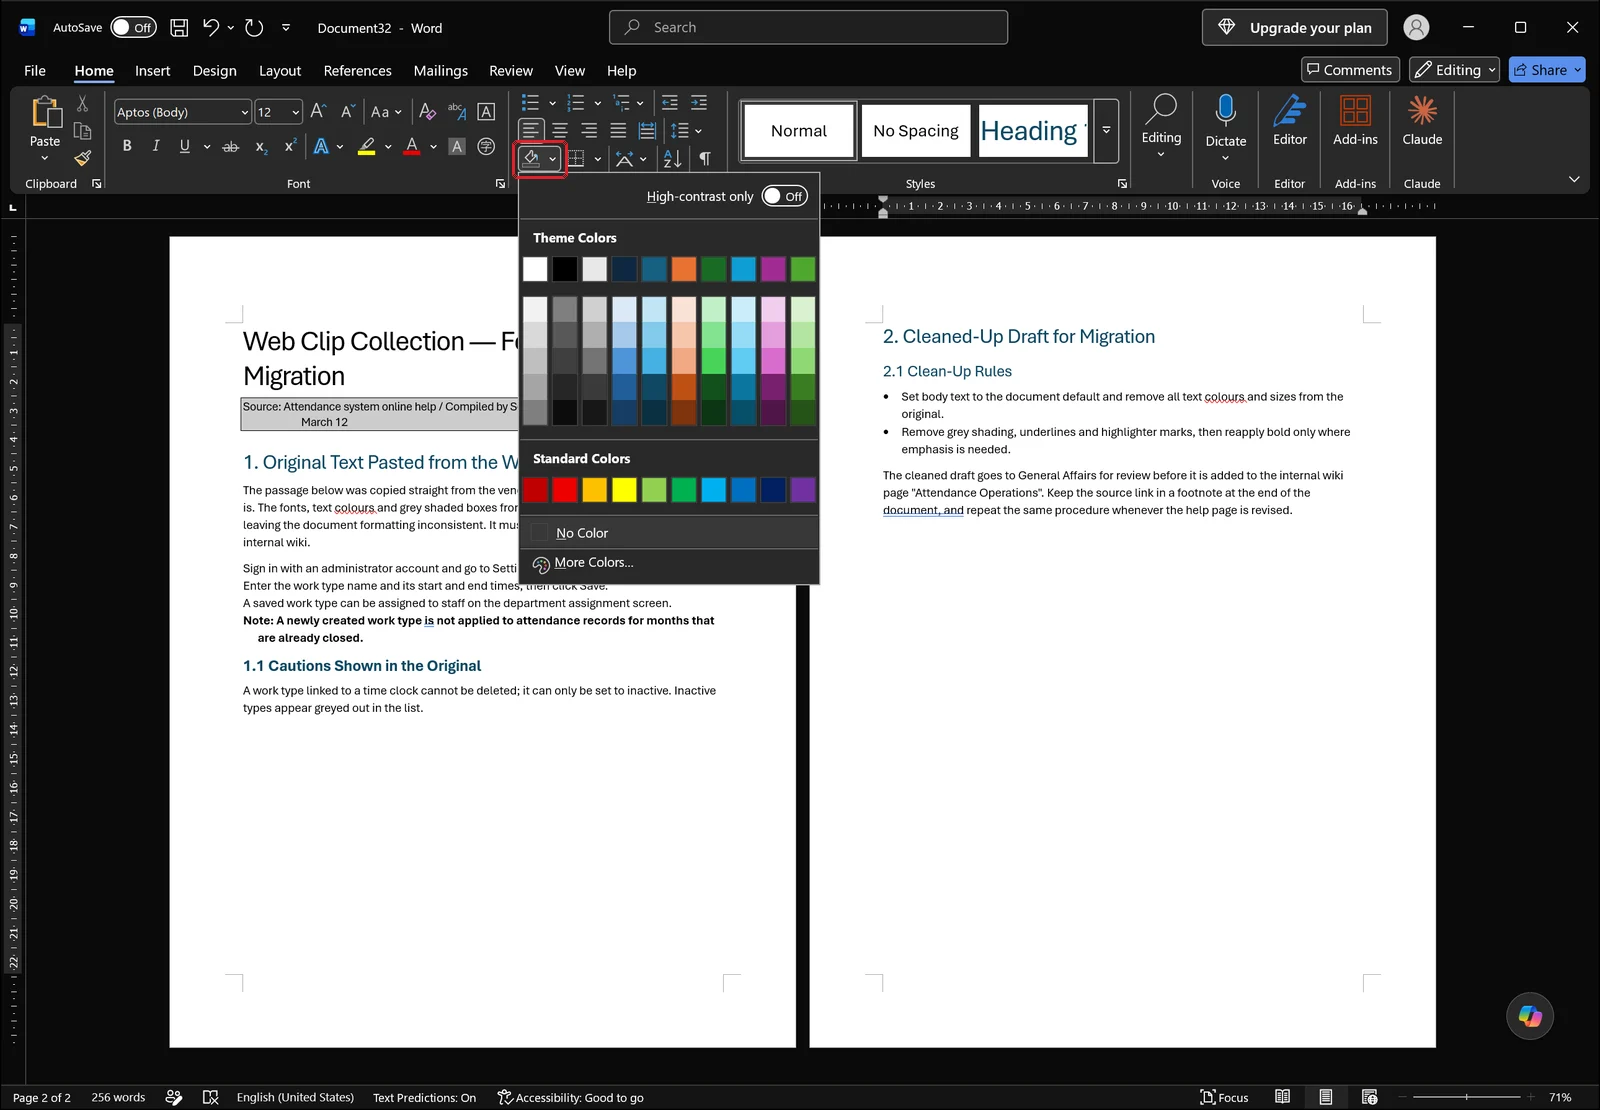
The palette shows theme colors and standard colors, with a no-color command and a more colors command underneath. Choose the no-color command and the background disappears. If the text was pasted into a table, the shading may be applied per cell, so select the cells first and use the same route.
Removing Highlighting
If the background is a strong yellow or green rather than grey, it is almost certainly highlighting. This is the classic item that Clear Formatting leaves untouched, so it needs its own pass.
Select the range, click the arrow next to Text Highlight Color in the Font group, and choose the no-color command at the bottom of the list. The highlight comes off immediately.
Taking Off Paragraph and Character Borders
Copying a callout box from a help page often brings a rule or a full outline along with it. Click the arrow next to the Borders button in the Paragraph group to choose which lines to add or remove.
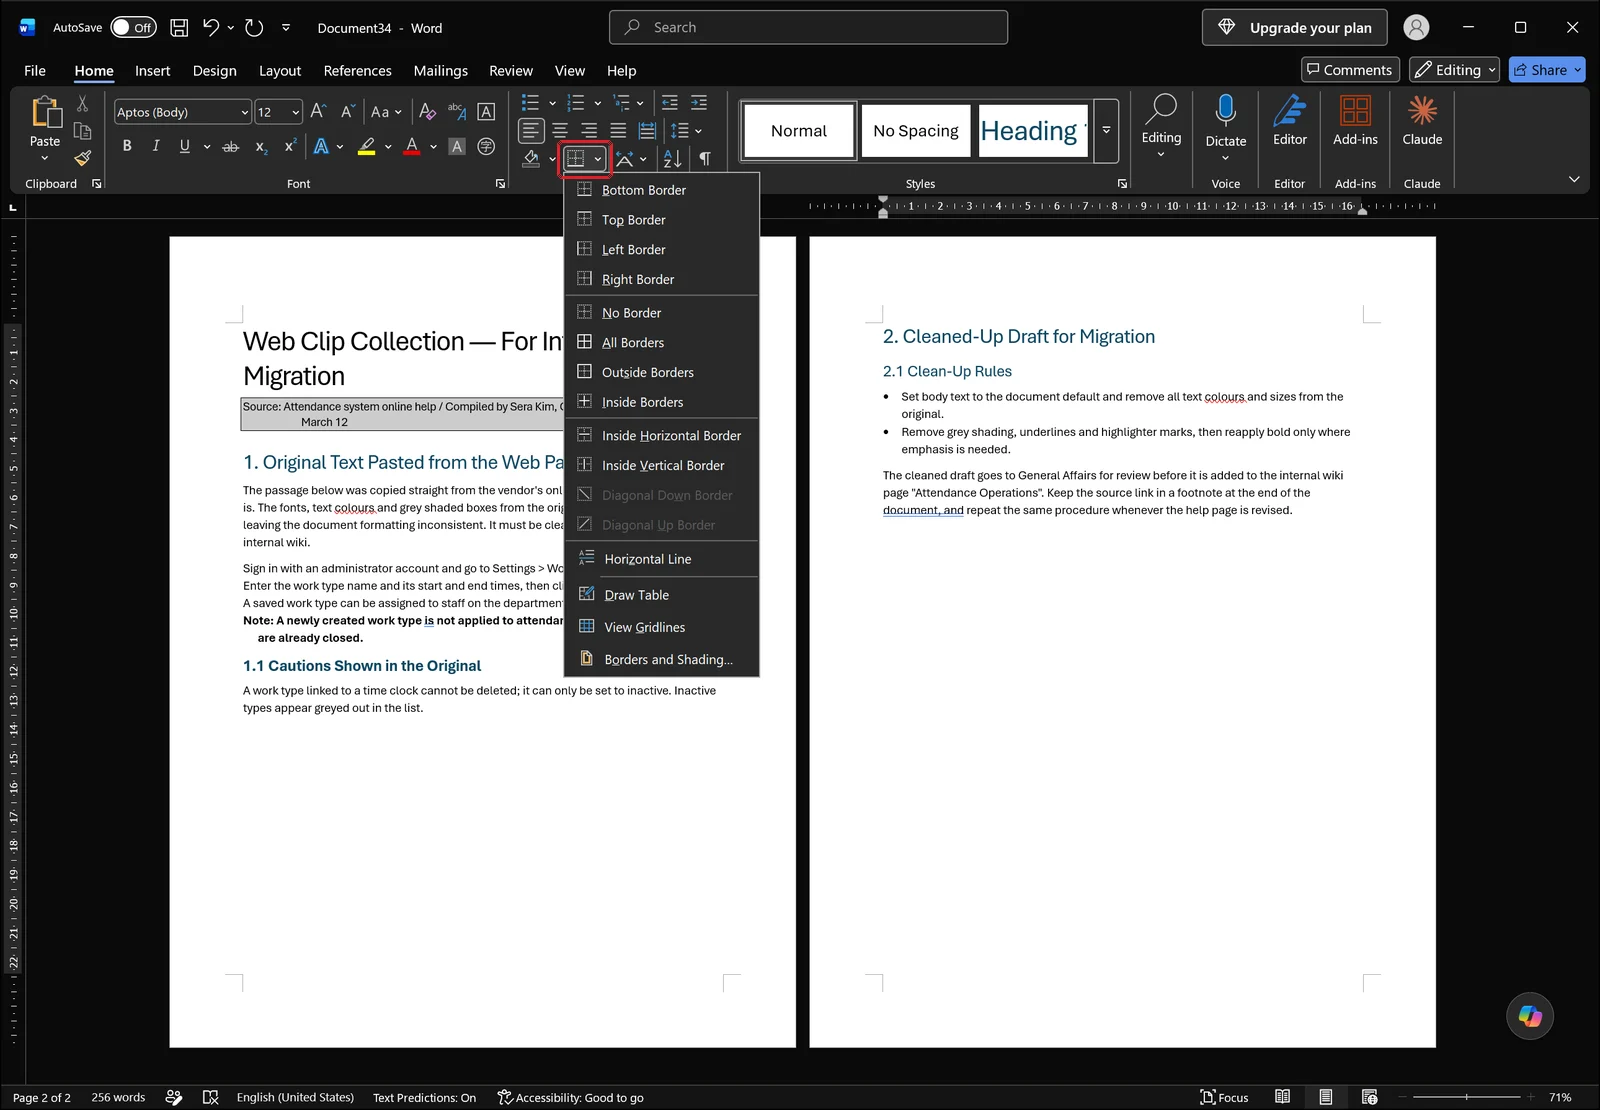
The list covers bottom, top, left and right borders, no border, all borders and outside borders, with a borders and shading command at the bottom. Picking no border strips every line from the selected paragraphs, and the borders and shading command opens a dialog where you can review line style and shading together.
Dealing with Blue Underlined Links
Links inside copied sentences stay blue and underlined. Select the range and press Ctrl+Shift+F9 to convert the links to plain text, then run Clear Formatting to take care of the color and underline. If you need to keep the link addresses, skip that step and change the font color instead.
If the content came in as a table, clearing formatting will not remove the table itself. Click inside it, go to the Layout tab that appears, run Convert to Text, and then clean up the formatting.
Unifying the Document with Styles and Theme Fonts
Putting Body Text Back on Normal
Once the formatting is stripped, use the Styles group on the Home tab to apply Normal to body paragraphs and Heading 1 and Heading 2 to the heading lines. Building structure with styles rather than manually enlarging fonts means a later change to font or size happens in one place.
Checking for Leftovers in the Styles Pane
Press Alt+Ctrl+Shift+S to open the Styles pane. It shows the applied style each time you click into a paragraph, so if a paragraph is set to Normal but still looks different, direct formatting is layered on top of the style. Press Ctrl+Space on that paragraph alone to clear it.
Matching Every Font with a Theme Font Set
When fonts drift slightly from paragraph to paragraph, the Design tab can bring them into line in one move.
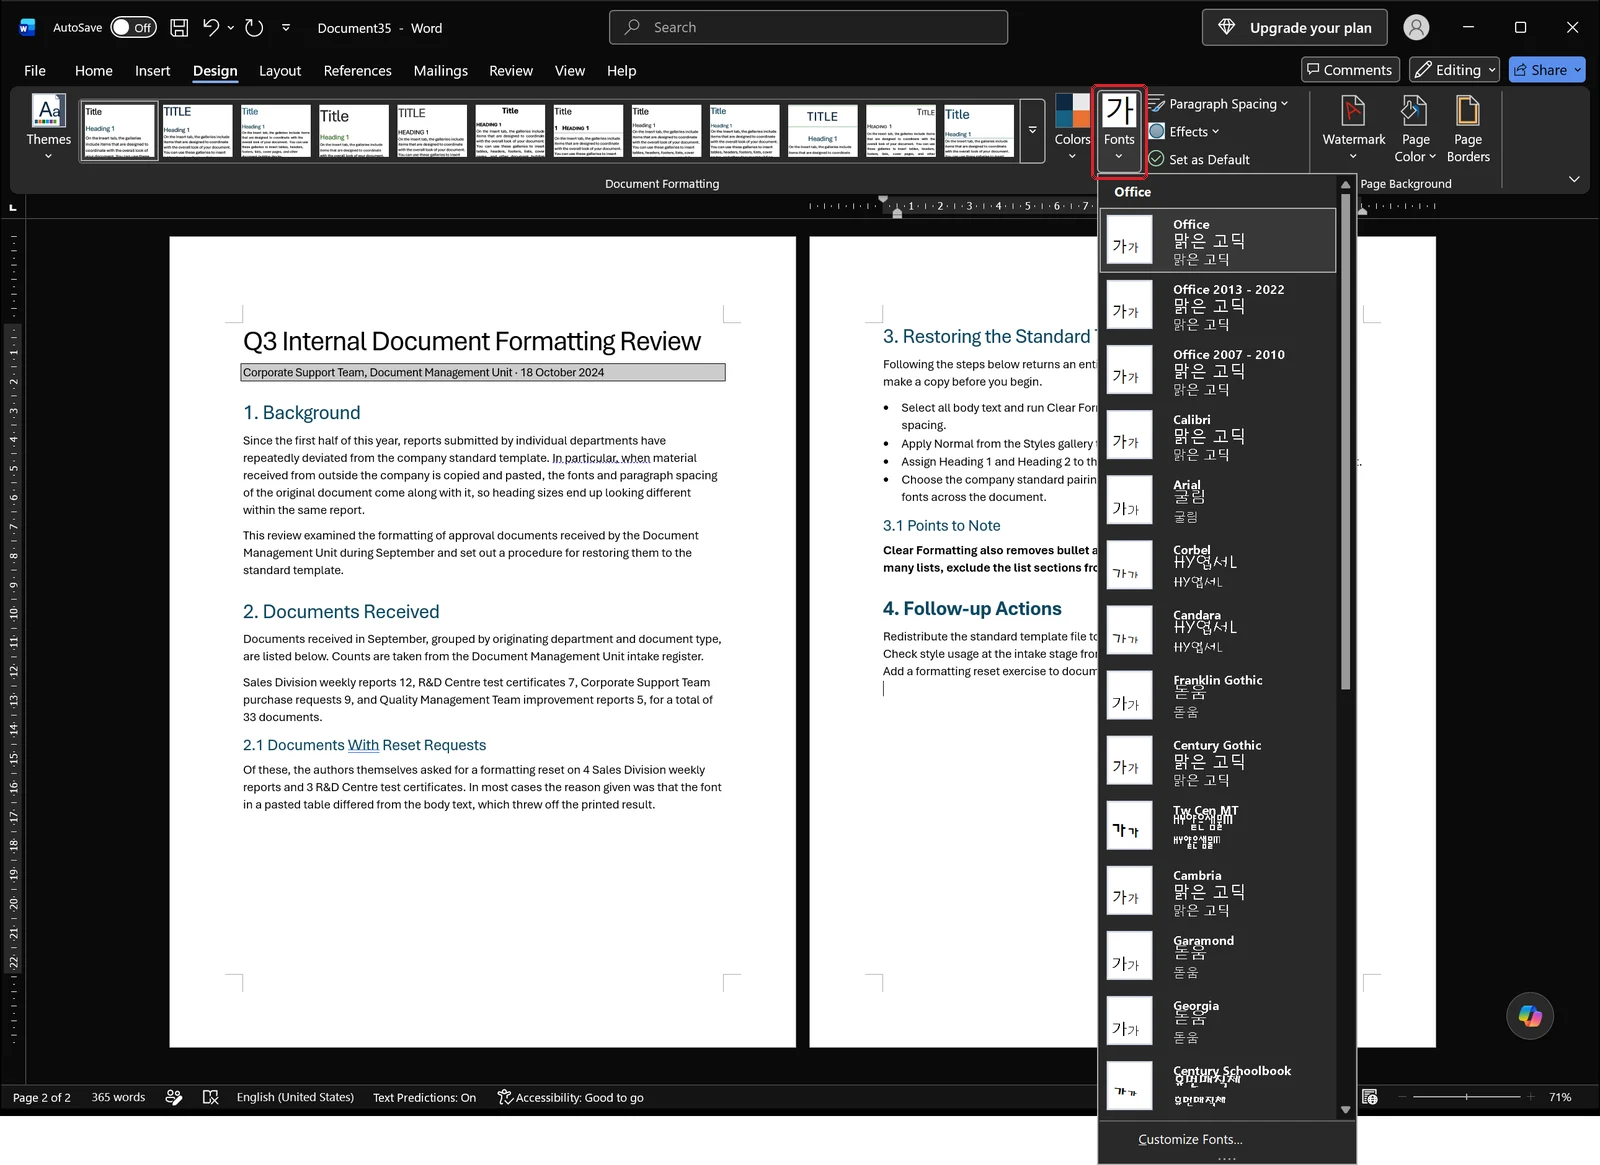
Each entry in the Fonts list pairs a heading font with a body font, and a customize command sits at the bottom. Pick one and every paragraph that follows a style changes across the whole document. Paragraphs with a manually assigned font ignore the setting entirely, which is exactly why clearing formatting has to come first.
Copying Formatting from a Reference Paragraph
For smaller touch-ups, put the cursor in a paragraph that already looks right, click Format Painter on the Home tab, and drag over the paragraph you want to fix. Double-click the Format Painter button to keep it switched on for repeated use, and press Esc to turn it off.
What to Check When Formatting Will Not Clear
Rolling Back with Undo
If the cleanup did not land the way you expected, press Ctrl+Z. Clicking the small arrow next to the Undo arrow in the quick access toolbar at the top left lists your recent actions.
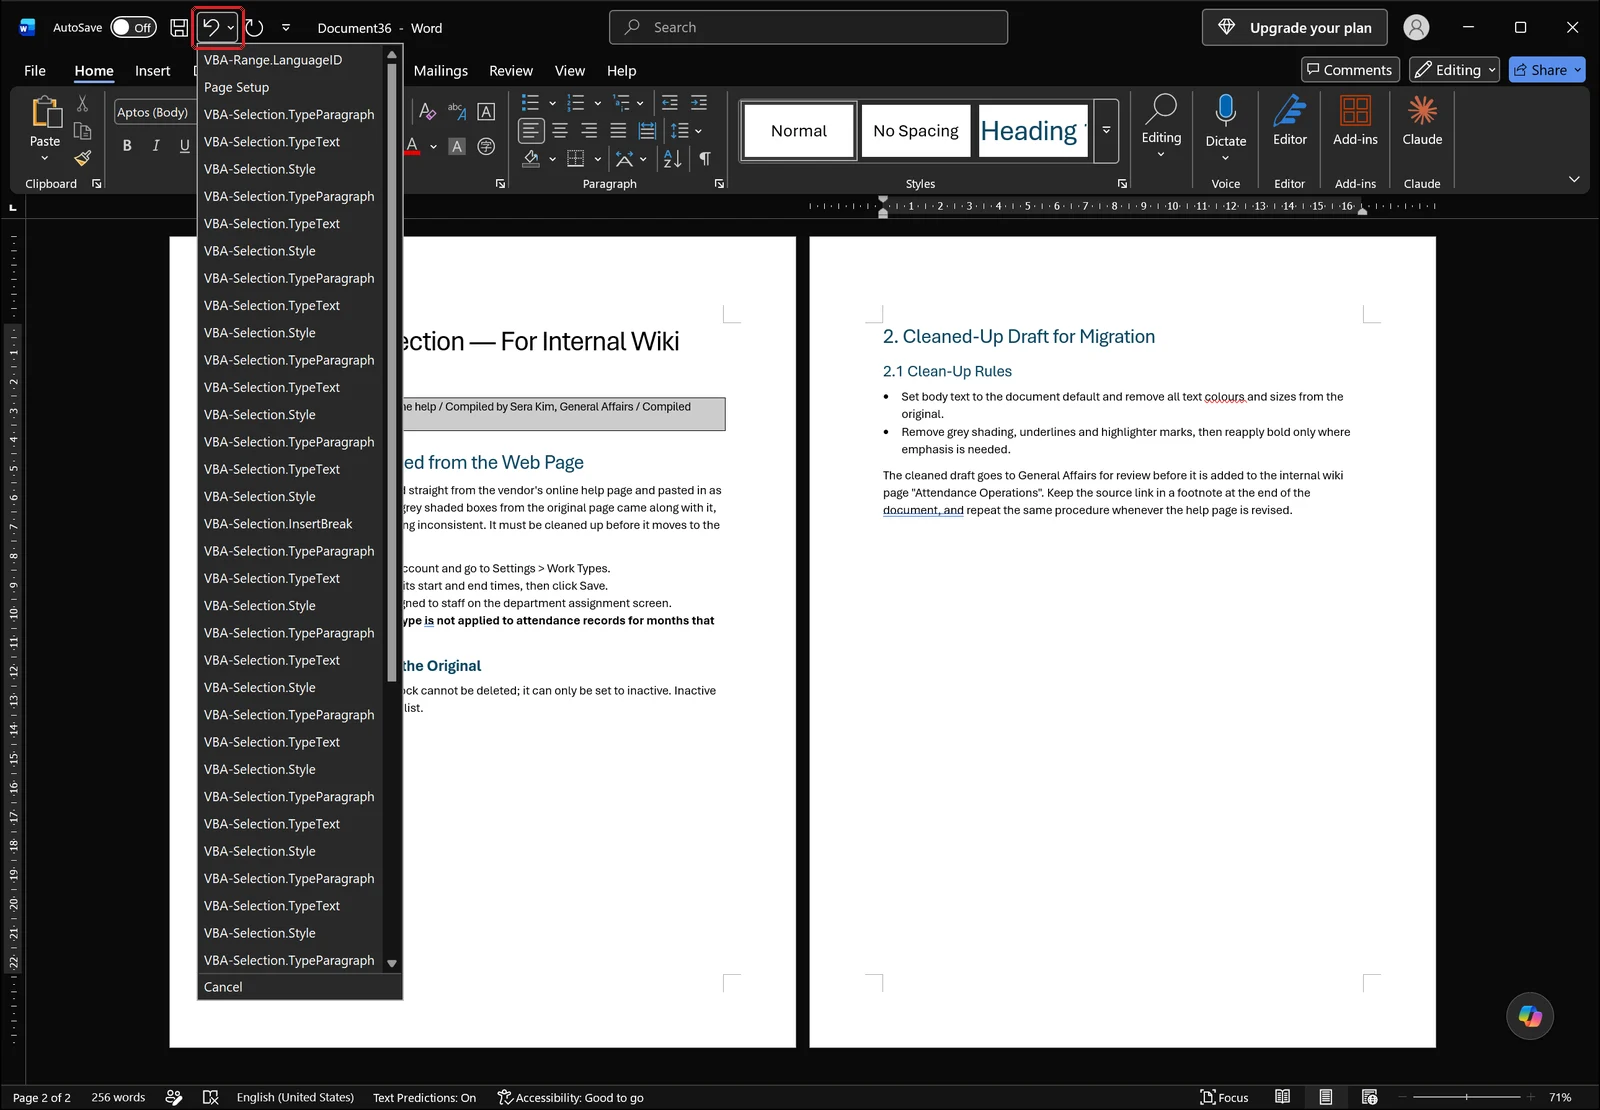
Drag down the list to a specific entry and everything above it is undone at once. Formatting cleanup is the kind of work you often reverse, so save the file once before you start.
When Spacing and Indentation Survive
If fonts and colors are clean but the line spacing or margins still look off, paragraph formatting is what remains. Select the paragraphs and click the small arrow at the bottom right of the Paragraph group on the Home tab.
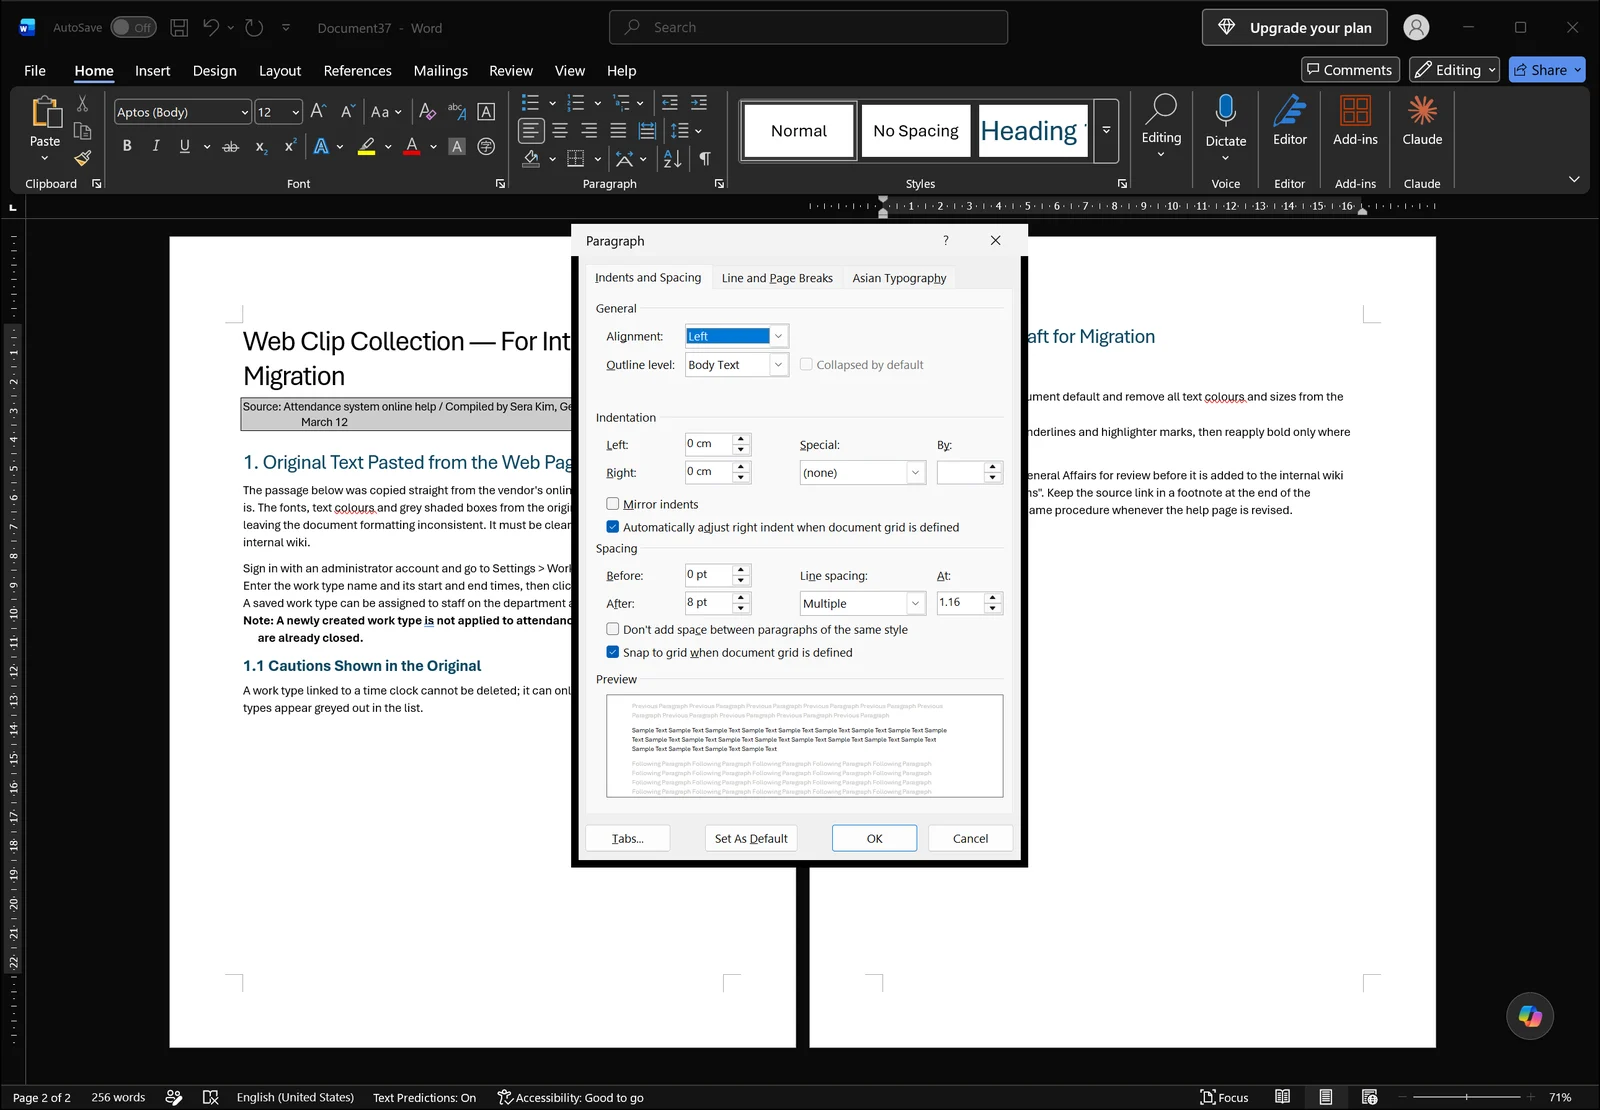
On the Indents and Spacing tab, set left and right indentation to 0, then adjust Spacing Before and After and the Line spacing value to match your document standard. The preview area at the bottom shows the result before you commit.
👉 How to Change Line Spacing in Word: 1.5, Exact pt, and Fixes
When the Style Itself Has Been Modified
If Clear Formatting keeps returning text to an odd font, the Normal style in that particular document has probably been redefined. Either reset the style to its original definition, or start a new document and move the text across with Ctrl+Shift+V, which is usually faster.
Text Inside Tables and Objects
Cell shading, and text inside text boxes or shapes, is not always caught when you select the body of the document. Click each object individually, reselect the text inside it, and apply the same steps.
FAQ: Clearing Formatting in Word
Q. What is the shortcut for pasting without formatting?
Ctrl+Shift+V. If that shortcut is unavailable in your setup, press Ctrl right after pasting and press T in the paste options that appear, or choose Keep Text Only from the arrow under the Paste button on the Home tab.
Q. I cleared the formatting but the grey background is still there.
That background is not character formatting. It is either paragraph shading or highlighting. Apply the no-color command in both the Shading palette and the Text Highlight Color list on the Home tab. If the content was pasted as a table, convert the table to text first and try again.
Q. How is Ctrl+Space different from the Clear Formatting button?
Ctrl+Space resets only character formatting such as font, size, color and bold, leaving paragraph formatting and the applied style alone. The Clear Formatting button removes both character and paragraph formatting and resets the style to Normal. To clean up without losing your heading structure, stick to Ctrl+Space.
Q. What order should I follow to standardize an entire document?
Select everything with Ctrl+A and clear the formatting, apply Normal to body text, then reapply Heading 1 and Heading 2 to the heading lines. Finally, pick a font pair from the Fonts list on the Design tab to align the fonts across the whole document at once.
Cleaning Up Document Formatting with inline AI
Everything above takes a handful of clicks on a single document, but the moment you need dozens of files from different departments brought to the same standard, you are repeating the same sequence file by file, and items split across separate buttons like shading and highlighting are easy to miss.
inline AI is a desktop AI that runs on your PC and can open Word documents directly, check what formatting is still applied, and change it to the standard you specify. Ask it in plain language, for example "remove all shading and highlighting from the body paragraphs, apply the Normal style, and set only the heading lines to Heading 1", and it reads the file, makes the changes and saves the result.
Because the processing runs on your own machine, internal documents never have to be uploaded to an outside server.
See what an agent could take over at your company in a 30-minute call.